> ## Documentation Index
> Fetch the complete documentation index at: https://docs.pipeshub.com/llms.txt
> Use this file to discover all available pages before exploring further.

# Dropbox Teams

> Cloud storage and file sharing connector

<div className="max-w-2xl mx-auto mt-12">
  <div className="p-6 border rounded-lg bg-blue-50">
    <div className="flex items-center mb-4">
      <img src="https://mintcdn.com/pipeshub/8k-iBPRh1yJZHQe1/logo/dropbox.png?fit=max&auto=format&n=8k-iBPRh1yJZHQe1&q=85&s=0744ad48a6ebbbaf04901f0d853f5b21" alt="Dropbox Logo" className="w-8 h-8 mr-3 object-contain flex-shrink-0" width="554" height="554" data-path="logo/dropbox.png" />

      <h2 className="text-2xl text-indigo-800 font-semibold m-0"> Dropbox Teams</h2>
    </div>

    <p className="text-lg text-gray-700 mb-4">Cloud storage and file sharing</p>

    <div className="flex items-center gap-2">
      <span className="px-3 py-1 bg-green-100 text-green-800 rounded-full text-sm font-medium">
        ✅ Ready
      </span>

      <span className="px-3 py-1 bg-blue-100 text-blue-800 rounded-full text-sm font-medium">
        📚 Documentation Available
      </span>
    </div>
  </div>
</div>

## Overview

Dropbox is a popular cloud storage service. Its main purpose is to let you store your files online, sync them across all your devices, and easily share them with other people.

***

## Configuration Guide

<AccordionGroup>
  <Accordion title="Understanding Dropbox API" icon="info">
    ### User & Teams Client

    **User Client** is designed to interact with an individual user's Dropbox account. Think of this as managing a personal workspace. These endpoints can also be called via the Team client, but require specifying the user to act on behalf of.

    **Team Client** is specifically for Dropbox Business or Enterprise accounts. They include endpoints that are used to manage an entire team or organization's Dropbox environment from an administrative perspective.

    ### APIs Documentation

    * **Dropbox Individual API:** [https://www.dropbox.com/developers/documentation/http/documentation](https://www.dropbox.com/developers/documentation/http/documentation)

    * **Dropbox Teams API:** [https://www.dropbox.com/developers/documentation/http/teams](https://www.dropbox.com/developers/documentation/http/teams)

    ### Concept of Cursor

    A **cursor** is a short string that acts like a bookmark for keeping track of changes in a folder.

    When you first list the contents of a folder using an endpoint like `/files/list_folder`, the API response includes a cursor. This cursor represents the exact state of that folder at that moment.

    Instead of re-downloading the entire list of files to check for changes, you can simply pass that cursor to the `/files/list_folder/continue` endpoint. The API will then return only the files and folders that have been added, modified, or deleted since you last received that cursor. This makes syncing changes highly efficient as you only process the differences.
  </Accordion>

  <Accordion title="Create Dropbox App" icon="rocket">
    This guide will walk you through the process of creating a Dropbox application and connecting it to PipesHub to fetch your files and folders.

    ### Dropbox Team Account

    #### Step 1: Create a Dropbox App

    1. Navigate to the [Dropbox App Console](https://www.dropbox.com/developers/apps) and sign in with your Dropbox credentials.

    2. Click the **Create app** button on the top right.

    <img src="https://mintcdn.com/pipeshub/Vq3u-FQEW1A2QMMd/images/connectors/dropbox/db1.png?fit=max&auto=format&n=Vq3u-FQEW1A2QMMd&q=85&s=7ba8f39a6ff84411ccb5ef5db9cc4e9f" alt="Dropbox" style={{ display: 'block', margin: '0 auto' }} width="90%" data-path="images/connectors/dropbox/db1.png" />

    3. Configure your new app with the following settings:
       * **Choose an API:** Select **Scoped access**.
       * **Type of access:** Select **Full Dropbox**.
       * **Name your app:** Enter a unique name for your application, for example, "Pipeshub Connector".

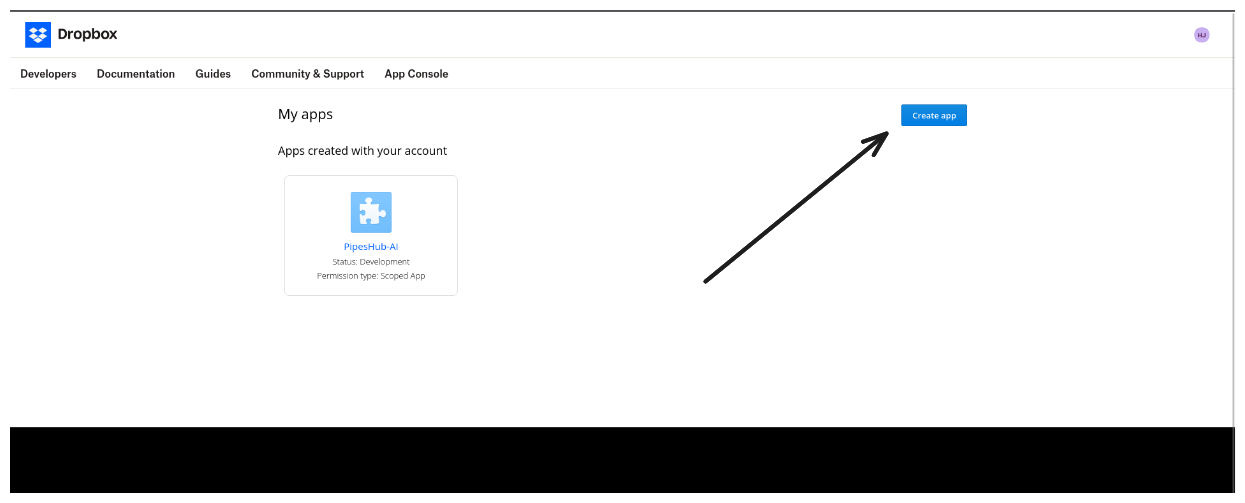
    4. Click **Create app**. You will be redirected to your new app's settings page.

    #### Step 2: Configure Permissions and Redirect URI

    1. On your app's page, navigate to the **Permissions** tab.

    <img src="https://mintcdn.com/pipeshub/Vq3u-FQEW1A2QMMd/images/connectors/dropbox/db2.png?fit=max&auto=format&n=Vq3u-FQEW1A2QMMd&q=85&s=57949a3d3f826e4bdd2879572d43b569" alt="Dropbox" style={{ display: 'block', margin: '0 auto' }} width="90%" data-path="images/connectors/dropbox/db2.png" />

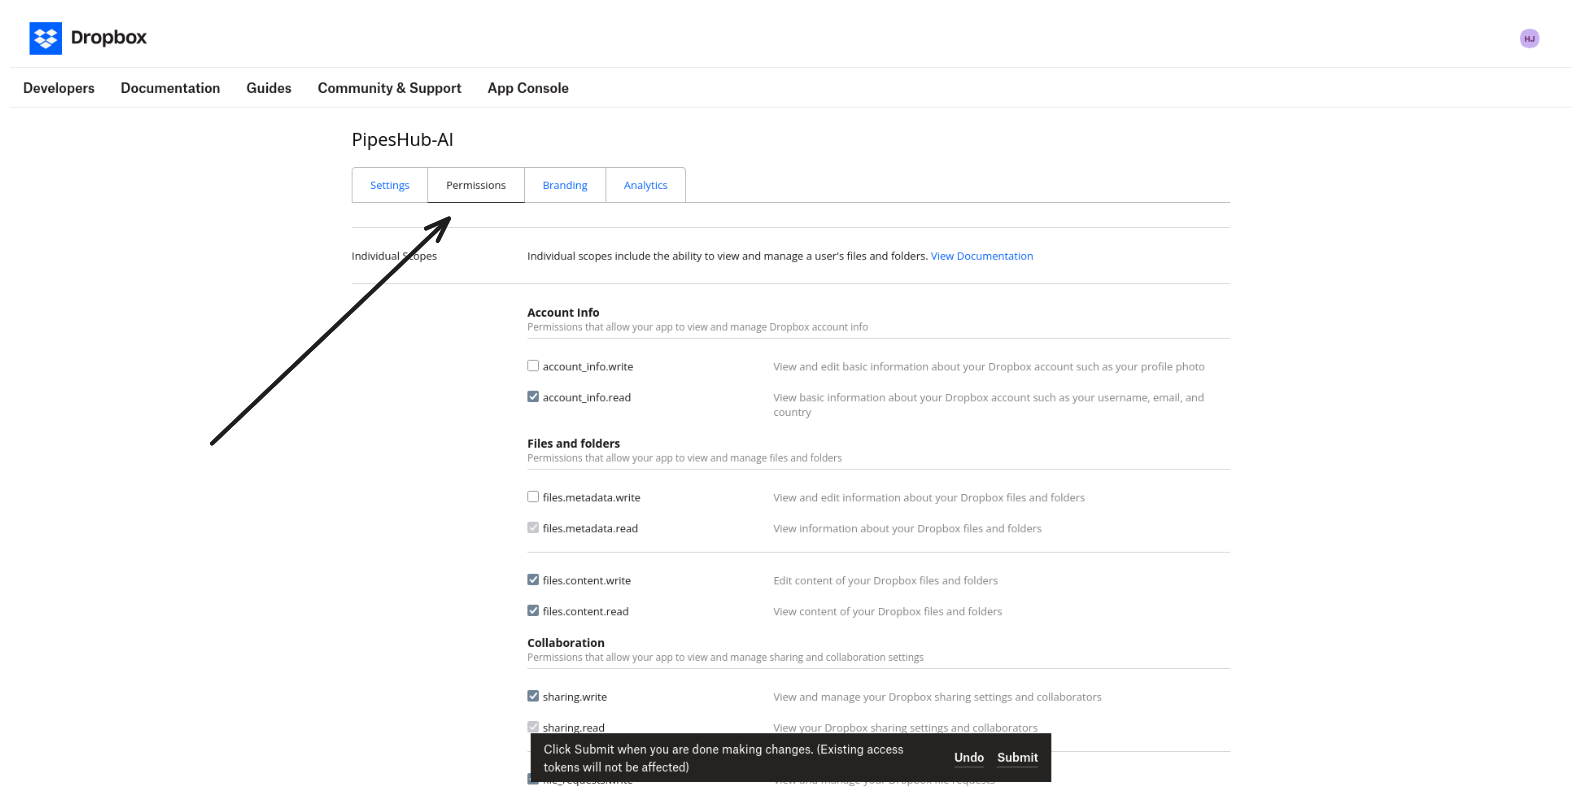
    2. Under **Individual Scopes**, check the boxes for the permissions PipesHub needs to access your data:
       * `account_info.read`
       * `files.content.read`
       * `files.metadata.read`
       * `file_requests.read`
       * `sharing.read`
       * `sharing.write`

    3. Under **Team Scopes**, check the boxes:
       * `groups.read`
       * `members.read`
       * `team_data.member`
       * `team_data.team_space`
       * `team_info.read`
       * `events.read`

    4. Click **Submit** at the bottom of the page to save your changes.

    <img src="https://mintcdn.com/pipeshub/Vq3u-FQEW1A2QMMd/images/connectors/dropbox/db5.png?fit=max&auto=format&n=Vq3u-FQEW1A2QMMd&q=85&s=20f44f4c531a028833c5532bf8d68344" alt="Dropbox" style={{ display: 'block', margin: '0 auto' }} width="90%" data-path="images/connectors/dropbox/db5.png" />

    5. Now, go to the **Settings** tab.

    6. You also need to enable **additional Development users**.

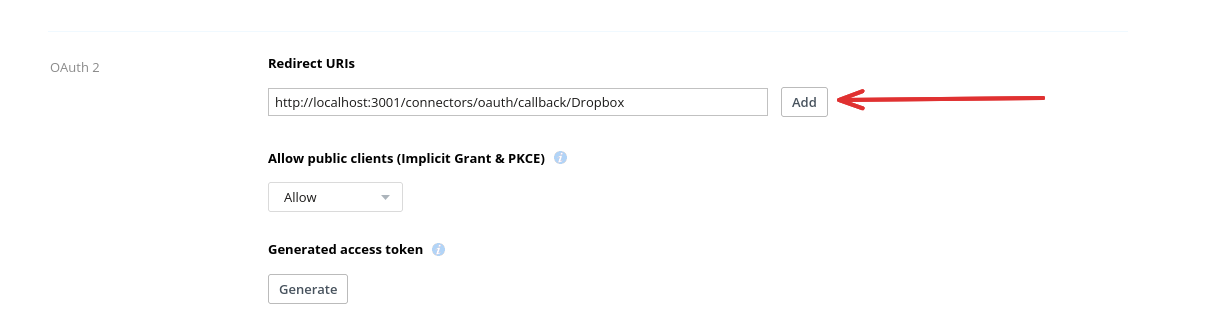
    7. Find the **OAuth 2** section and add the following URL to the **Redirect URIs** field (where {your_pipeshub_base_url} is your PipesHub instance URL):

    ```
    http://{your_pipeshub_base_url}/connectors/oauth/callback/Dropbox
    ```

    8. Click **Add** to save the URI.

    <img src="https://mintcdn.com/pipeshub/Vq3u-FQEW1A2QMMd/images/connectors/dropbox/db4.png?fit=max&auto=format&n=Vq3u-FQEW1A2QMMd&q=85&s=be96783664b5be56814a184269d66a42" alt="Dropbox" style={{ display: 'block', margin: '0 auto' }} width="90%" data-path="images/connectors/dropbox/db4.png" />

    #### Step 3: Copy App Key and Secret

    1. While still in the **Settings** tab, locate the **App key** and **App secret**.

    2. Click the **Show** button to reveal your App secret.

    3. Copy both the **App key** and the **App secret**. You will need these for the next step.
  </Accordion>

  <Accordion title="Connect Dropbox to PipesHub" icon="plug">
    ### Step 1: Configure Connection

    1. Navigate to **Workspace Settings** > Under **Workspace** section in sidebar > **Connectors** in your application.

    <div style={{ textAlign: "center" }}>
      <img src="https://mintcdn.com/pipeshub/peqXiQTHnfn36LHG/images/connectors/common/go_to_workspace_settings.png?fit=max&auto=format&n=peqXiQTHnfn36LHG&q=85&s=664212df297af991dde25b2cac7ebaef" alt="Go to Workspace Settings" style={{ display: 'block', margin: '0 auto' }} width="90%" data-path="images/connectors/common/go_to_workspace_settings.png" />
    </div>

    2. Search for the **Dropbox** connector and click on **Setup** to configure a connector instance.

    <div style={{ textAlign: "center" }}>
      <img src="https://mintcdn.com/pipeshub/5fEFsRT92LLHDL9o/images/connectors/dropbox/search_for_dropbox_connector.png?fit=max&auto=format&n=5fEFsRT92LLHDL9o&q=85&s=d1d6efb17df1cea342dd6dd7b1d761d2" alt="Search for Dropbox connector" style={{ display: 'block', margin: '0 auto' }} width="90%" data-path="images/connectors/dropbox/search_for_dropbox_connector.png" />
    </div>

    3. In the configuration dialog that opens:

       * Enter an **Instance Name** for your connector (e.g., "Dropbox Teams")
       * Enter the **App key** from your Dropbox App Console
       * Enter the **App secret** from your Dropbox App Console
       * Click on the **Next** button to save the configuration and move to Authorize page.

           <div style={{ textAlign: "center" }}>
             <img src="https://mintcdn.com/pipeshub/5fEFsRT92LLHDL9o/images/connectors/dropbox/dropbox_configuration.png?fit=max&auto=format&n=5fEFsRT92LLHDL9o&q=85&s=512d5f1fab4b76b89287d3fe99d7dadd" alt="Dropbox Configuration" width="90%" data-path="images/connectors/dropbox/dropbox_configuration.png" />
           </div>

    ### Step 2: Authorize Dropbox

    1. In the Authorize page that opens:

       * Click on **Authenticate Dropbox to Proceed** button
       * You will be redirected to Dropbox's consent screen where you need to sign in and grant permission for Dropbox and related document access

           <div style={{ textAlign: "center" }}>
             <img src="https://mintcdn.com/pipeshub/5fEFsRT92LLHDL9o/images/connectors/dropbox/dropbox_consent_screen.png?fit=max&auto=format&n=5fEFsRT92LLHDL9o&q=85&s=03a3da0e70ffa6e632fcad1f83186c71" alt="Dropbox consent screen for Dropbox connector" width="90%" data-path="images/connectors/dropbox/dropbox_consent_screen.png" />
           </div>

    <Warning>
      **Important:** Authorize using the same email address as your PipesHub account. Using a different email will cause permission issues on the PipesHub platform.
    </Warning>

    2. After giving consent, you can click on **Continue to configuration** to configure connector settings. More about it in the next section.
  </Accordion>

  <Accordion title="Connector Settings" icon="gear">
    ## Sync Settings

    Sync settings allow you to control how the connector syncs data from Dropbox.

    **Sync Strategy:**

    * **Scheduled** - The connector will automatically sync data from Dropbox at the scheduled interval.
    * **Manual** - The connector will sync data from Dropbox only when Admin manually triggers the sync from the connector settings page.

    **Sync Interval:**
    How often the connector syncs data (default: 60 minutes).

    ### Sync Filters

    Sync filters control which files are fetched from Dropbox. Files that don't match are skipped entirely. Folders are always synced regardless of these settings to preserve directory structure.

    ### Created Date

    Filters files by when they were created. Accepts operators like `Last 365 Days`, `Is After`, `Is Before`, or `Is Between` for a specific range.

    For example, set `Last 365 Days` to fetch only files created in the last year.

    ### Modified Date

    Same as Created Date but filters by the file's last modified timestamp. Use `Last 30 Days` or `Is After` to limit sync to recently updated files.

    ### File Extensions

    Extensions filter support 2 options: `In` (only sync listed extensions) or `Not In` (sync everything except listed extensions). After selecting your desired option, you can select your desired extensions from a list of supported extensions.

    <Note>
      Unsupported extensions are excluded under `In` and allowed through under `Not In`.
    </Note>

    ***

    ## Indexing Filters

    Indexing filters control which synced files are made searchable. Unlike sync filters, these don't prevent files from being fetched — files are still recorded in the system but their indexing status is set to **Manual Indexing**.

    They can be manually indexed later from the **All Records** section.

    ### Manual Indexing

    When enabled, files are synced but not automatically indexed. They won't appear in search results until explicitly indexed.

    This can allow you to explicitly control which files and folders are indexed for search, by going to the **All Records** section and indexing the records manually.

    ### Index Shared Items

    When enabled, files shared with others are indexed alongside personal files. Disable this to exclude shared content and index only files originating from a user's own drive.

    <div style={{ textAlign: "center" }}>
      <img src="https://mintcdn.com/pipeshub/5fEFsRT92LLHDL9o/images/connectors/dropbox/dropbox_filters_example.png?fit=max&auto=format&n=5fEFsRT92LLHDL9o&q=85&s=4056816c093075604199fae45b6f34c5" alt="Dropbox Configuration" width="90%" data-path="images/connectors/dropbox/dropbox_filters_example.png" />
    </div>
  </Accordion>
</AccordionGroup>

***

## Connector Workflow

<AccordionGroup>
  <Accordion title="Synchronization Process" icon="sync">
    ### How Does Dropbox Connector Work?

    Each connector, including the `DropboxConnector` is a child class (or concrete class) that inherits from `BaseConnector`. It implements the following abstract methods:

    * `init`
    * `test_connection_and_access`
    * `get_signed_url`
    * `stream_record`
    * `run_sync`
    * `run_incremental_sync`
    * `handle_webhook_notification`
    * `cleanup`
    * `create_connector` (class method)

    ### Dropbox Connector Initialization

    Workflow for Dropbox sync works like:

    **`run_sync`** - Syncs 4 items:

    1. Users
    2. User Groups
    3. Record Groups (aka Team folders + Personal folder in Dropbox)
    4. Files and Folders - for each user

    Each workflow has an **Incremental component** which only fetches events that have occurred since last sync. For that we save a **'cursor'** for that event in sync points collection in ArangoDB. e.g., `member_events`, `user_group_events`, `record_group_events`.

    **If no cursor is initialized for that event, we run full sync.**

    ***

    ## User Sync Workflow

    Users are fetched from Dropbox then converted to type `AppUser` using function `get_app_users`.

    ### First Sync

    Fetches all users from Dropbox Teams then initializes a sync point: `member_events` which saves cursor to be used for incremental sync, then sends the users to `data_entities_processor.on_new_app_users`.

    ### Incremental Sync

    Uses the saved cursor to call team logs in 'members' category and listens for `member_change_status` events.

    * **Member Added:** If a user's status changes to active, the system treats them as a new addition and processes their profile.

    * **Member Removed:** If a user's status changes to removed, they are not removed from PipesHub as they might still be part of team.

    At the end of the process, the new cursor returned by the Dropbox API is saved to the sync point.

    ***

    ## User Group Sync Workflow

    ### Full Sync (Initial Run)

    A full sync is executed when no event cursor is found in the database.

    1. **Fetch All Groups:** The system retrieves a complete list of all user groups from the Dropbox API, also handles pagination in case result exceeds limits: `team_groups_list`

    2. **Fetch Members for Each Group:** It then iterates through every group and fetches a complete list of its members: `_fetch_group_members`

    3. **Batch Processing:** Instead of processing each group individually, the system prepares a single, large batch. This batch contains all groups and their corresponding members with their assigned permissions (e.g., Owner, Write).

    4. **Single Submission:** Once all groups and members have been collected, the entire batch is sent to the data processor `data_entities_processor.on_new_user_groups`.

    ### Incremental Sync

    Once a cursor is established (like in Users events), it runs incremental sync to only process events that are new since last sync.

    1. **Fetch Events:** Using the saved cursor as a bookmark, the connector asks the Dropbox API for all group-related events that have occurred since the last run and calls `_process_group_event`.

    2. **Process Changes:** Each event is handled individually. The system processes a variety of changes, including group creation, deletion, renaming, membership adjustments, and role updates.

    3. **Update Cursor:** After processing the events, the new cursor from the API is saved, bookmarking the position for the next sync cycle.

    ***

    ## Record Groups Sync Workflow

    ### First Sync

    #### Team Folders

    The sync begins by fetching a complete list of all Team Folders in the Dropbox account. This requires a team admin user's credentials to authorize the API calls. For each active folder, the system:

    1. Fetches a complete list of all members, including both individual users and user groups.

    2. Maps the Dropbox access levels (owner, editor, viewer) to the system's internal permission types.

    3. Creates a Record Group for the folder and sends it to the processor along with the full list of member permissions.

    #### Personal Folders

    After syncing Team Folders, the system creates a "Personal Folder" Record Group for every individual user. Each user is automatically assigned OWNER permission to their own personal space. This batch of personal folders is then sent to the processor.

    ### Incremental Sync

    This incremental process only applies to **Team Folders**. It uses a saved cursor to fetch events from the Dropbox audit log related to team folder activity. The system listens for and processes specific events such as:

    * `team_folder_create`
    * `team_folder_rename`
    * `team_folder_archived`
    * `team_folder_permanently_delete`

    When a new folder is created, the system fetches its full membership list and syncs it, similar to the full sync process. For other events like renaming or deletion, it applies the appropriate change.

    **Note:** Changes to a folder's membership (e.g., adding or removing a user) are handled by a separate sharing event sync, not the record group sync.

    ***

    ## Files and Folders Sync Workflow

    ### Workflow Overview

    1. **Initiation:** The main `run_sync` function orchestrates the entire process. After handling users and groups, it calls `_process_users_in_batches` to begin the file sync.

    2. **Batch Processing:** The `_process_users_in_batches` function processes active users concurrently. For each user, it calls `_run_sync_with_yield`.

    3. **Sync Scopes:** Inside `_run_sync_with_yield`, an API call to `sharing_list_folders` identifies all sync targets for a user (their personal folder and any shared team folders). The function then loops through each target to sync it individually.

    The connector uses an incremental approach, tracking the state for each folder separately.

    ### Detailed Process

    4. **Per-Folder Tracking:** For each folder, `_run_sync_with_yield` calls `dropbox_cursor_sync_point.read_sync_point` to retrieve the last known sync cursor. This cursor determines where the sync should resume.

    5. **Data Fetching:** The function then enters a loop to fetch changes from Dropbox.

    * It calls `files_list_folder` for an initial sync or `files_list_folder_continue` if a cursor exists.
    * The results from the API are passed to `_process_dropbox_items_generator`.

    6. **Individual Item Processing:** The generator loops through each item and calls `_process_dropbox_entry` to do the main conversion work. This function:

    * Calls `tx_store.get_record_by_external_id` to check if the item already exists in the local database.
    * Calls `_convert_dropbox_permissions_to_permissions` to fetch and format the item's access rights.
    * Returns a `RecordUpdate` object summarizing the changes.

    7. **Database Updates:** Back in `_run_sync_with_yield`, the results are handled:

    * New records are batched and sent to `data_entities_processor.on_new_records`.
    * Updated or deleted items are passed to `_handle_record_updates`, which then calls specific methods like `data_entities_processor.on_record_content_update` or `on_record_deleted`.

    8. **State Management:** After a page of changes is processed, `_run_sync_with_yield` calls `dropbox_cursor_sync_point.update_sync_point` to save the new cursor for that specific folder, ensuring the next sync is incremental.

    ***

    ## Sharing & Permission Sync

    This is an incremental, event-driven process designed to keep file and folder permissions up-to-date.

    ### Workflow

    1. **Listen for Events:** Using a saved cursor, the system listens for specific sharing events in the Dropbox audit log, such as when a member is added, removed, or has their role changed on a file or folder.

    2. **Trigger Re-Sync:** An event is treated as a notification that a file or folder's permissions have changed. Instead of just applying the single change, the system triggers a full re-sync of that specific item.

    3. **Fetch Fresh Data:** It makes a new API call to Dropbox to fetch the latest, complete metadata for the affected file or folder. This ensures the system gets the current, authoritative state of all permissions on that item.

    4. **Process and Update:** The fresh data is processed, and the item's permissions are updated in the database to reflect the latest state.

    5. **Update Cursor:** Finally, the new cursor is saved to mark the position for the next sync.
  </Accordion>
</AccordionGroup>

***

## FAQ

<AccordionGroup>
  <Accordion title="Queries not returning results. What could be wrong?">
    There are three common causes:

    1. **Email mismatch** - The email used during connector authentication doesn't match your PipesHub account email. This causes permission issues preventing you from accessing synced data.
       * **Fix:** Reconfigure the connector and authenticate using the same email as your PipesHub account.

    2. **Records show in "All Records" but not in search** - Documents display in the All Records section but don't appear in search query results.
       * **Fix:** Verify sync filters in the connector settings and ensure indexing has completed. Check that the data matches your search query criteria.

    3. **Data not yet indexed** - The connector is still syncing or hasn't completed the initial indexing process.
       * **Fix:** Go to **Settings > Connectors**, check the sync status, and wait for indexing to complete.
  </Accordion>
</AccordionGroup>
