> ## Documentation Index
> Fetch the complete documentation index at: https://docs.pipeshub.com/llms.txt
> Use this file to discover all available pages before exploring further.
# OneDrive
> Cloud storage and file management connector
Microsoft OneDrive
Cloud storage and file management
✅ Ready
📚 Documentation Available
## Overview
OneDrive is Microsoft's cloud storage service that lets you store, sync, and share files across all your devices, often bundled with Microsoft 365.
The OneDrive connector uses OAuth 2.0 via Microsoft Graph API with Application Permissions, allowing background access to organizational files and folders without requiring individual user sign-ins.
***
## Configuration Setup
### Step 1: Register Application in Azure Portal
**Sign in to Azure Portal:**
* Navigate to [portal.azure.com](https://portal.azure.com) and sign in with your Microsoft 365 administrator account
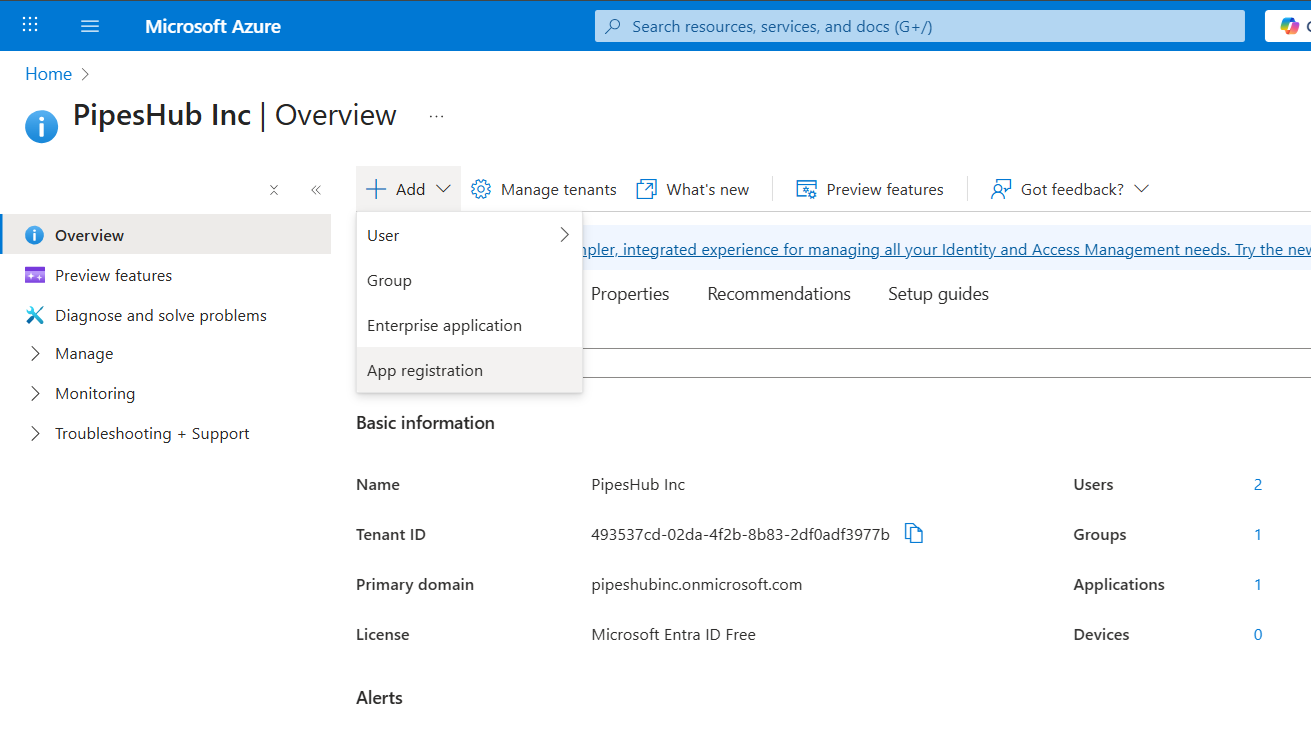
**Access App Registrations:**
* Search for "App registrations" in the top search bar
* Or navigate to Microsoft Entra ID → App registrations
**Create New Registration:**
* Click "New registration"
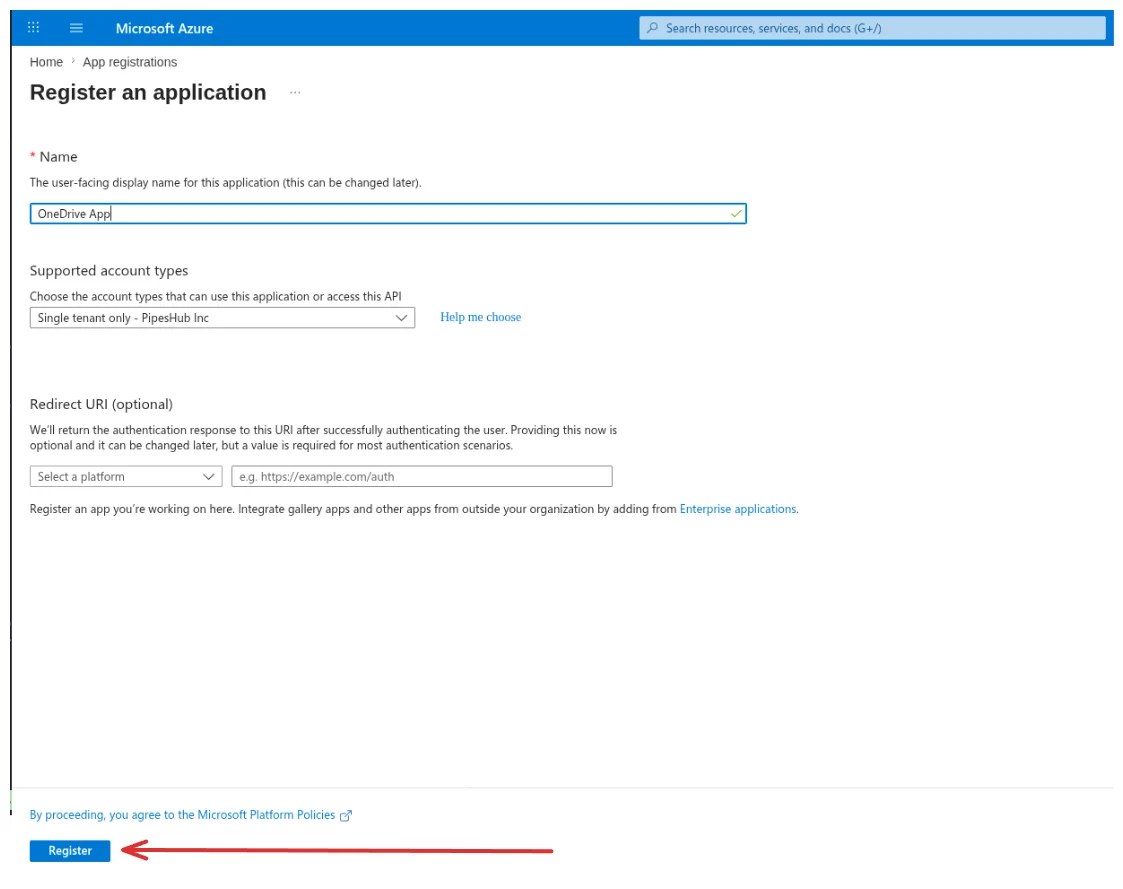
* Enter application details:
* **Name:** Enter app name (e.g., "PipesHub Connector")
* **Supported account types:** Select "Accounts in this organizational directory only (Single tenant)"
* Leave Redirect URI blank
* Click "Register"
Single-tenant configuration ensures the application only works within your organization for better security.
### Step 2: Copy Application Credentials
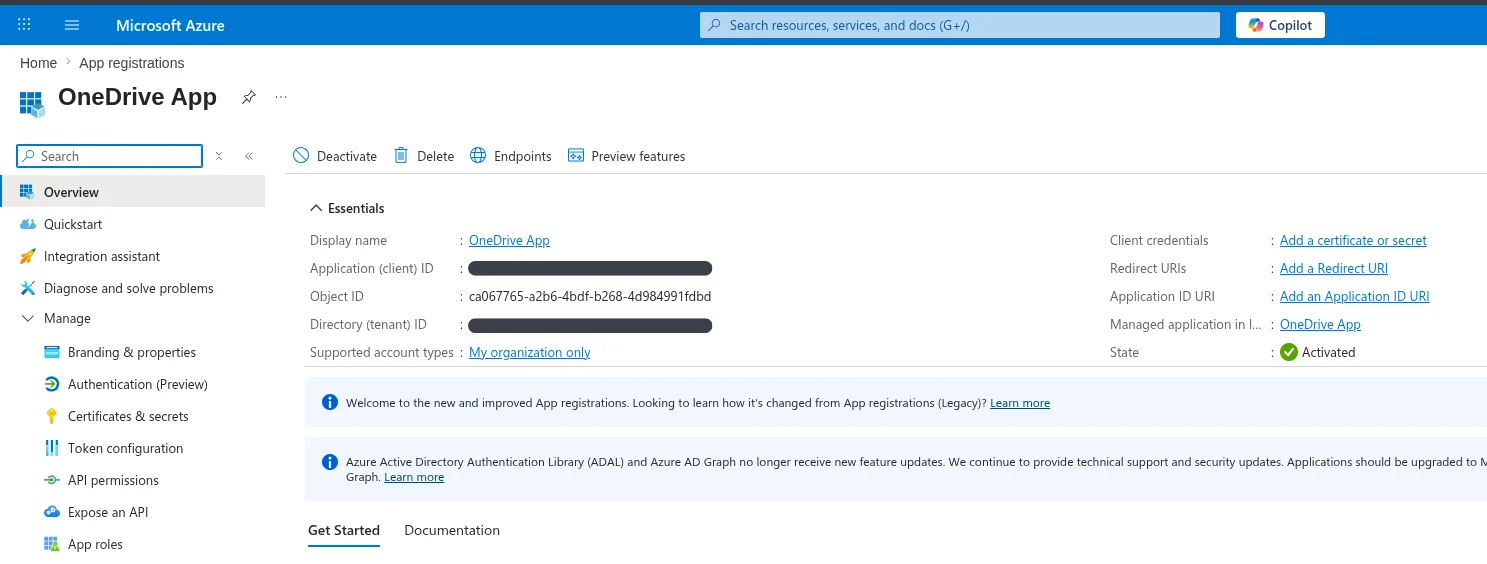
After registration, you'll see the Overview page. Copy the following values:
* **Application (client) ID:** Found under "Essentials" section
* **Directory (tenant) ID:** Found under "Essentials" section
Copy the "Application (client) ID" NOT the "Object ID". These are different values.
### Step 3: Create Client Secret
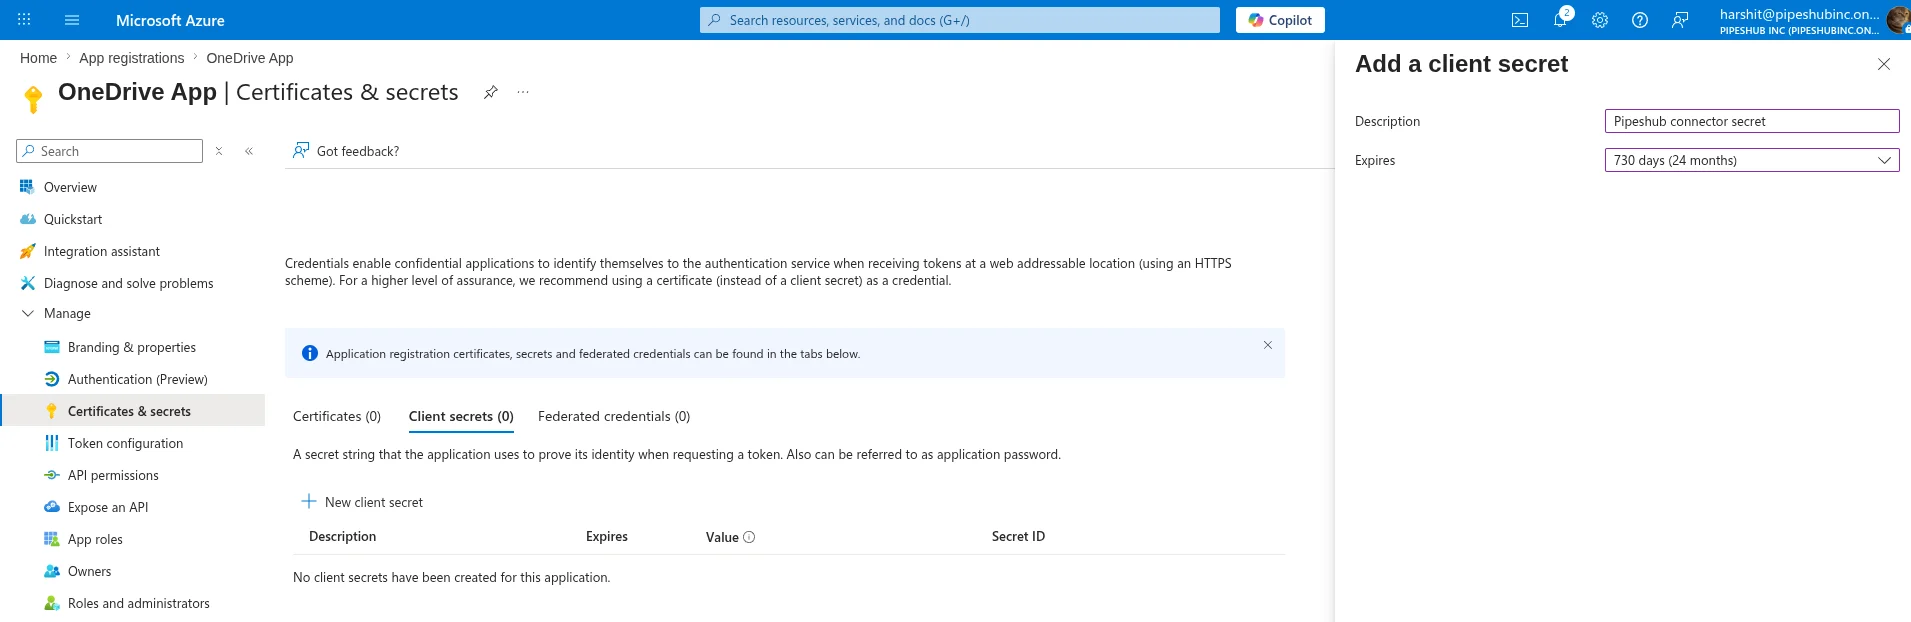
* In the left sidebar, click "Certificates & secrets"
* Click "New client secret"
* Configure the secret:
* **Description:** Enter a description (e.g., "PipesHub Connector Secret")
* **Expires:** Choose expiration period (recommended: 24 months)
* Click "Add"
* Immediately copy the secret value from the "Value" column
The client secret value is only displayed once! If you navigate away, you cannot retrieve it again and must create a new secret.
### Step 4: Configure API Permissions
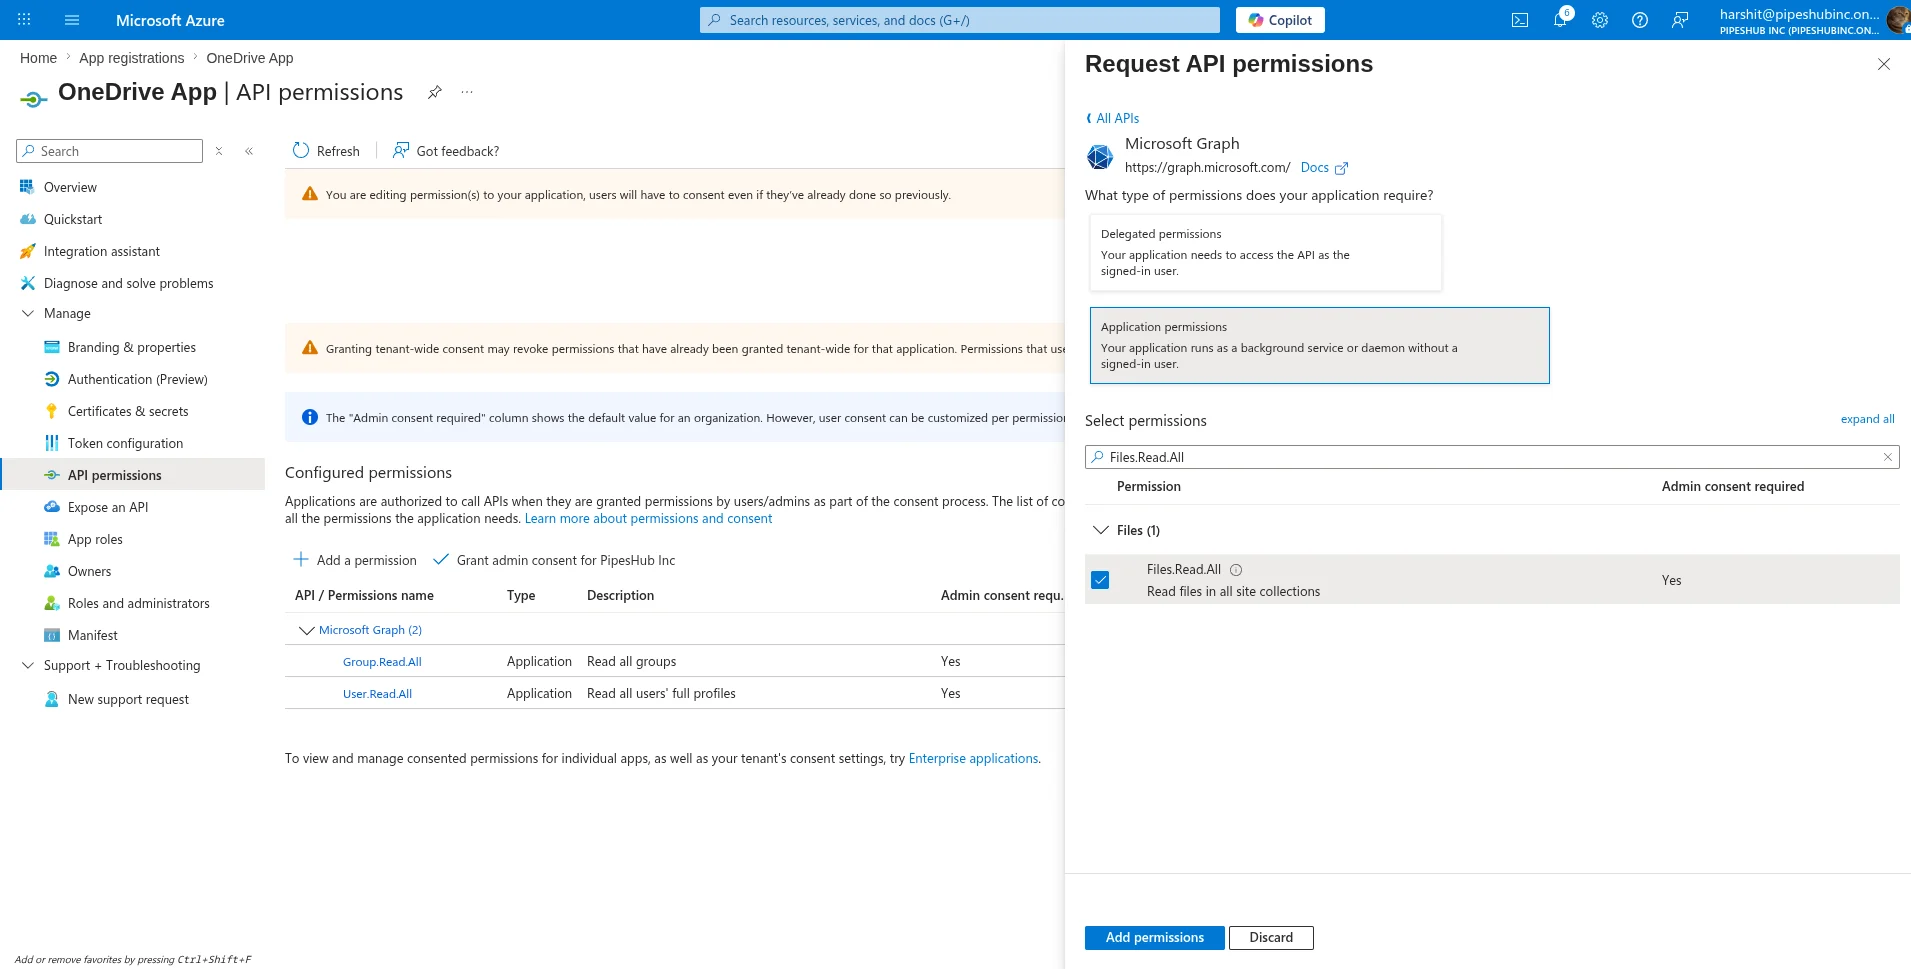
* In the left sidebar, click "API permissions"
* Click "Add a permission" → "Microsoft Graph"
* Choose "Application permissions" (not Delegated permissions)
* Add the following permissions:
* `User.Read.All`
* `Group.Read.All`
* `Files.Read.All`
* Click "Add permissions"
### Step 5: Grant Admin Consent
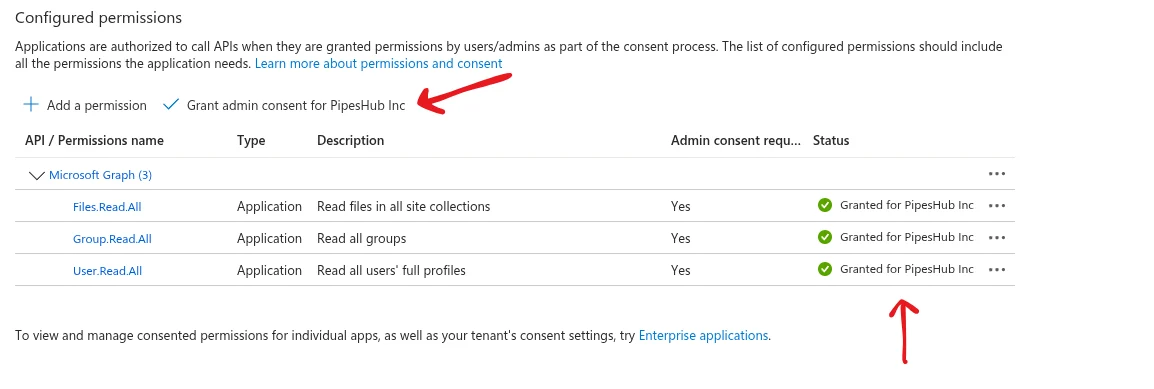
* On the API permissions page, click "Grant admin consent for \[Your Organization]"
* Confirm by clicking "Yes"
* Wait for the status to show green checkmarks
**Important:** The administrator granting consent should use the same email address as the PipesHub account configuring this connector. Using a different email will cause permission issues on the PipesHub platform.
Admin consent is required for application permissions. Only Global Administrators or Application Administrators can grant this consent.
### Step 6: Configure Connector in PipesHub
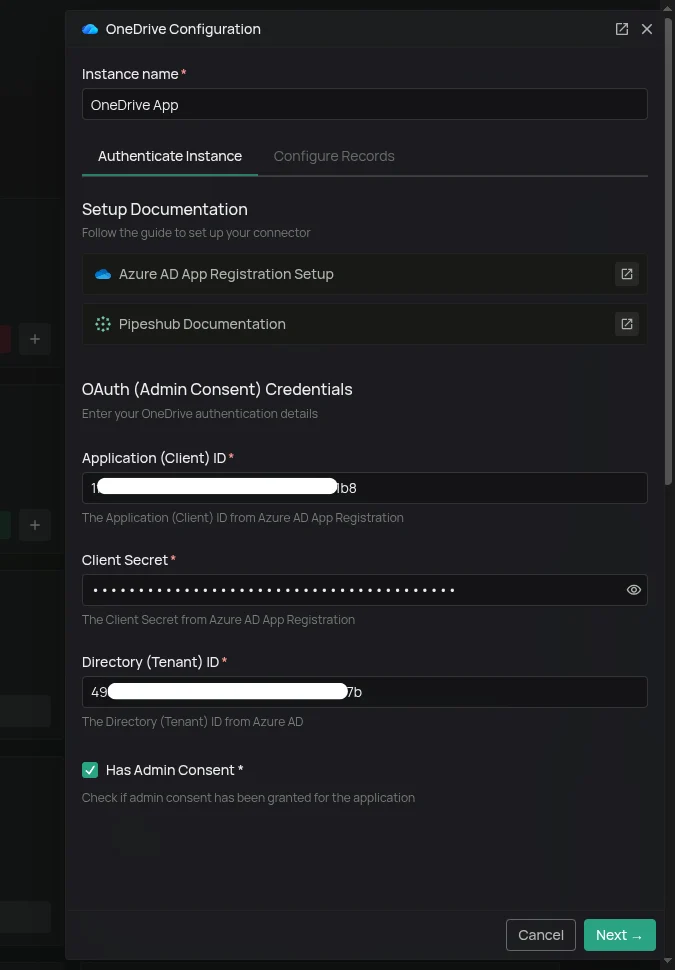
* Navigate to Settings → Connectors in PipesHub
* Find the OneDrive connector and click "Configure"
* Enter the following details:
* **Application (Client) ID:** From Step 2
* **Client Secret:** From Step 3
* **Directory (Tenant) ID:** From Step 2
* Check the "Has Admin Consent" checkbox
* Click "Next"
Unlike user-facing OAuth flows, there's no login screen because the connector uses application permissions with client credentials.
## Sync Settings
Sync settings allow you to control how the connector syncs data from OneDrive.
**Sync Strategy:**
* **Scheduled** - The connector will automatically sync data from OneDrive at the scheduled interval.
* **Manual** - The connector will sync data from OneDrive only when Admin manually triggers the sync from the connector settings page.
**Sync Interval:**
How often the connector syncs data (default: 60 minutes).
### Sync Filters
Sync filters control which files are fetched from OneDrive. Files that don't match are skipped entirely. Folders are always synced regardless of these settings to preserve directory structure.
### Created Date
Filters files by when they were created. Accepts operators like `Last 365 Days`, `Is After`, `Is Before`, or `Is Between` for a specific range.
For example, set `Last 365 Days` to fetch only files created in the last year.
### Modified Date
Same as Created Date but filters by the file's last modified timestamp. Use `Last 30 Days` or `Is After` to limit sync to recently updated files.
### File Extensions
Filters files support 2 options: `In` (only sync listed extensions) or `Not In` (sync everything except listed extensions). After selecting your desired option, you can select your desired extensions from a list of supported extensions.
Unsupported extensions are excluded under `In` and allowed through under `Not In`.
***
## Indexing Filters
Indexing filters control which synced files are made searchable. Unlike sync filters, these don't prevent files from being fetched — files are still recorded in the system but their indexing status is set to **Manual Indexing**.
They can be manually indexed later from the **All Records** section.
### Manual Indexing
When enabled, files are synced but not automatically indexed. They won't appear in search results until explicitly indexed.
This can allow you to explicitly control which files and folders are indexed for search, by going to the **All Records** section and indexing the records manually.
### Index Shared Items
When enabled, files shared with others are indexed alongside personal files. Disable this to exclude shared content and index only files originating from a user's own drive.
***
## Connector Workflow
### How Does OneDrive Connector Work?
The `run_sync` method orchestrates the complete synchronization process in three main steps:
1. **Sync Users**
2. **Sync User Groups**
3. **Sync User Drives (Records)**
***
### 1. User Synchronization
The main sync function calls `msgraph_client.get_all_users()` to interact with the Microsoft Graph API and retrieve a list of all users configured in the organization's Azure Active Directory (or Microsoft 365 tenant).
**Workflow:**
* Calls `msgraph_client.get_all_users()` to fetch all users
* Publishes new/updated users to the data store via `data_entities_processor.on_new_app_users()`
***
### 2. User Group Synchronization
Group membership is critical for accurately handling shared permissions (e.g., when a file is shared with "Everyone in Marketing").
**Workflow:**
* Calls `_sync_user_groups()` to fetch all groups and their members
* Publishes groups and their members to the data store via `data_entities_processor.on_new_user_groups()`
#### Initial Full Sync
On first run (no saved sync state):
* Starts with the base Delta API endpoint
* Processes all existing groups in pages
* Each group triggers member fetching and processing
* Saves `deltaLink` upon completion for future incremental syncs
#### Incremental Sync
On subsequent runs (with saved `deltaLink`):
* Uses saved `deltaLink` to fetch only changes since last sync
* Processes additions, updates, and deletions
* Updates sync state with new `deltaLink` for next run
#### Change Detection
The system handles three types of changes:
**Group Changes:**
* **ADD/UPDATE:** Creates or updates group metadata and syncs all members
* **DELETE:** Removes group from system when `@removed` marker is present
**Member Changes:**
* Processes member additions and removals via `members@delta` field
* Fetches user email for each member change
* Removes the group member if `@remove` field is present
* Member addition is handled as part of the group's ADD/UPDATE process.
***
### 3. Records Synchronization
#### Processing Users in Batches
The initial list of all Microsoft 365 users is filtered against the application's internal list of active users. Only users with active accounts in the core system proceed to the drive sync stage.
**Workflow:**
* Calls `_process_users_in_batches(users)`
* Filtered users are divided into small batches (controlled by `max_concurrent_batches = 3`)
* Each batch is processed in parallel using `asyncio.gather`
* A short delay is introduced between batches to rate limit API calls
#### Sync Drive Items for Each User
This function manages the synchronization of a single user's OneDrive content using the Delta API for incremental changes.
**Process:**
1. The connector checks the persistent sync point (`drive_delta_sync_point`) for the last token (either `deltaLink` or `nextLink`)
2. If a token exists, the sync is incremental; otherwise, it initiates a full scan
3. The connector calls the Delta API endpoint to retrieve all drive items that have changed
4. Fetched items are passed to `_process_delta_items_generator` to extract metadata and changes
5. The `_process_delta_items_generator` yields a `RecordUpdate` item along with permissions for each change.
6. New file records and permissions are collected into batches (`batch_size`)
7. Once a batch is full, it's published via `data_entities_processor.on_new_records`
8. Updated records are handled via `_handle_record_updates`
9. After all items are processed, the `deltaLink` is stored as the starting point for the next sync
***
## FAQ
There are three common causes:
1. **Email mismatch** - The email used during connector authentication doesn't match your PipesHub account email. This causes permission issues preventing you from accessing synced data.
* **Fix:** Reconfigure the connector and authenticate using the same email as your PipesHub account.
2. **Records show in "All Records" but not in search** - Documents display in the All Records section but don't appear in search query results.
* **Fix:** Verify sync filters in the connector settings and ensure indexing has completed. Check that the data matches your search query criteria.
3. **Data not yet indexed** - The connector is still syncing or hasn't completed the initial indexing process.
* **Fix:** Go to **Settings > Connectors**, check the sync status, and wait for indexing to complete.
Azure AD client secrets expire based on the duration set during creation. Once expired, the connector will fail to authenticate and sync will stop.
1. Go to your app registration in the [Azure Portal](https://portal.azure.com)
2. Navigate to **Certificates & secrets** → **New client secret**
3. Set a new expiry and copy the secret **Value** immediately (it won't be shown again).
4. Go to **Settings > Connectors** in PipesHub, open the OneDrive connector, and update the **Client Secret** field with the new value
To avoid disruption, set a calendar reminder before your secret's expiry date. The recommended duration is 24 months.
The initial sync performs a full scan of all users' drives across your organization. The connector fetches every file, folder, and permission from scratch before it has a delta checkpoint to work from. Depending on the size of your organization and number of files, this can take a significant amount of time.
All subsequent syncs are incremental — only changes since the last run are fetched, making them considerably faster.
Permission changes are picked up automatically on the next sync cycle. The connector compares current permissions from the Microsoft Graph API against what's stored and updates accordingly.
If your sync is set to **Scheduled**, the change will reflect within the configured sync interval. If set to **Manual**, trigger a sync from **Settings > Connectors** to pull the latest permissions immediately.