> ## Documentation Index
> Fetch the complete documentation index at: https://docs.pipeshub.com/llms.txt
> Use this file to discover all available pages before exploring further.

# Outlook

> Email and calendar management connector

<div className="max-w-2xl mx-auto mt-12">
  <div className="p-6 border border-gray-200 dark:border-gray-700 rounded-lg bg-blue-50 dark:bg-gray-800">
    <div className="flex items-center mb-4">
      <img src="https://mintcdn.com/pipeshub/8k-iBPRh1yJZHQe1/logo/outlook.png?fit=max&auto=format&n=8k-iBPRh1yJZHQe1&q=85&s=37ff6ac6639405a093435524f4e9c5f8" alt="Microsoft Outlook Logo" className="w-8 h-8 mr-3 object-contain flex-shrink-0" width="128" height="120" data-path="logo/outlook.png" />

      <h2 className="text-2xl font-semibold m-0">Microsoft Outlook</h2>
    </div>

    <p className="text-lg text-gray-700 dark:text-gray-300 mb-4">Email and calendar management</p>

    <div className="flex items-center gap-2">
      <span className="px-3 py-1 bg-green-100 dark:bg-green-900 text-green-800 dark:text-green-200 rounded-full text-sm font-medium">
        ✅ Ready
      </span>

      <span className="px-3 py-1 bg-blue-100 dark:bg-blue-900 text-blue-800 dark:text-blue-200 rounded-full text-sm font-medium">
        📖 Documentation Available
      </span>
    </div>
  </div>
</div>

## Overview

The Microsoft Outlook connector provides access to organizational email data through Microsoft Graph. It syncs users, messages, attachments, and mail folders across your Microsoft 365 organization for search and retrieval in PipesHub.

### What gets synced

| Entity           | Description                                                       |
| ---------------- | ----------------------------------------------------------------- |
| **Users**        | User profiles and mailbox context used for permissions and scope  |
| **Emails**       | Messages from organizational mailboxes (subject to sync filters)  |
| **Attachments**  | Files attached to email messages (when indexing is enabled)       |
| **Mail folders** | Standard and custom folder structure (Inbox, Sent, Archive, etc.) |
| **Group mail**   | Microsoft 365 group conversations (when enabled for indexing)     |

### Authentication

The connector uses **OAuth 2.0** with Microsoft Graph **application permissions** (client credentials plus **admin consent**). It runs as a background integration—no per-user interactive sign-in inside PipesHub for this connector.

<Warning>
  Registering the app, granting admin consent, and entering secrets in PipesHub requires appropriate **Microsoft Entra ID** (Azure AD) and **Microsoft 365** admin privileges. Use the same administrator identity in Azure and PipesHub when configuring consent-related steps to avoid permission mismatches.
</Warning>

***

## Configuration Guide

Follow the steps below: first register an app in Azure and grant permissions, then add the Outlook connector under **Workspace Settings** in PipesHub.

### How to configure and enable the Outlook connector

#### Step 1: Register an application in Azure Portal

1. **Sign in to Azure Portal:**\
   Navigate to [portal.azure.com](https://portal.azure.com) and sign in with your Microsoft 365 administrator account.

2. **Access App Registrations:**
   * Search for **App registrations** in the top search bar
   * Or go to **Microsoft Entra ID** → **App registrations**

3. **Create a new registration:**
   * Click **New registration**

<div className="text-center">
  <img src="https://mintcdn.com/pipeshub/OCt1NDmDOZs4qefv/images/connectors/outlook/enterprise/new_app.png?fit=max&auto=format&n=OCt1NDmDOZs4qefv&q=85&s=6866d7e738202db0ebf4ade28d8d6ab4" alt="Azure App registrations — New registration" className="block mx-auto w-11/12" width="1311" height="752" data-path="images/connectors/outlook/enterprise/new_app.png" />
</div>

4. Enter application details:
   * **Name** — A meaningful name (e.g. `PipesHub Outlook Connector`)
   * **Supported account types** — **Accounts in this organizational directory only (Single tenant)**
5. You do **not** need a **Redirect URI** for this connector; it uses application credentials and admin consent, not an interactive redirect flow in PipesHub.
6. Click **Register**

<div className="text-center">
  <img src="https://mintcdn.com/pipeshub/OCt1NDmDOZs4qefv/images/connectors/outlook/enterprise/register_app.png?fit=max&auto=format&n=OCt1NDmDOZs4qefv&q=85&s=9f4d529421f186a3723e185c9abc3af6" alt="Azure — completed app registration" className="block mx-auto w-11/12" width="1261" height="1089" data-path="images/connectors/outlook/enterprise/register_app.png" />
</div>

<Info>
  Single-tenant registration limits the app to your directory, which is the typical setup for an internal connector.
</Info>

#### Step 2: Copy application credentials

1. After registration, open the app **Overview** page.
2. Copy (you will paste these into PipesHub later):
   * **Application (client) ID** — in **Essentials**
   * **Directory (tenant) ID** — in **Essentials**

<div className="text-center">
  <img src="https://mintcdn.com/pipeshub/lE9R60WdchGr08Mr/images/connectors/outlook/enterprise/app_overview.png?fit=max&auto=format&n=lE9R60WdchGr08Mr&q=85&s=c3ca36e49162e0eeae0abf11b959bc42" alt="Azure app registration Overview with client and tenant IDs" className="block mx-auto w-11/12" width="1579" height="700" data-path="images/connectors/outlook/enterprise/app_overview.png" />
</div>

<Warning>
  Copy the **Application (client) ID**, not the **Object ID** — they are different values.
</Warning>

#### Step 3: Create a client secret

1. In the left sidebar, open **Certificates & secrets**.
2. Click **New client secret**.
3. Set **Description** (e.g. `PipesHub Connector Secret`) and **Expires** (24 months is a common choice).
4. Click **Add**, then **copy the secret Value immediately** from the table (not the Secret ID).

<div className="text-center">
  <img src="https://mintcdn.com/pipeshub/OCt1NDmDOZs4qefv/images/connectors/outlook/enterprise/client_secret.png?fit=max&auto=format&n=OCt1NDmDOZs4qefv&q=85&s=a799e38b9e7f46ab3b355de28ec3bcee" alt="Azure — new client secret" className="block mx-auto w-11/12" width="1919" height="1089" data-path="images/connectors/outlook/enterprise/client_secret.png" />
</div>

<Warning>
  The secret **value** is shown only once. If you leave the page without copying it, create a new secret.
</Warning>

#### Step 4: Configure API permissions

1. Open **API permissions** → **Add a permission** → **Microsoft Graph**.
2. Choose **Application permissions** (not Delegated).
3. Add:
   * `User.Read.All`
   * `Mail.Read`
   * `MailboxSettings.Read`
4. Click **Add permissions**.

<div className="text-center">
  <img src="https://mintcdn.com/pipeshub/lE9R60WdchGr08Mr/images/connectors/outlook/enterprise/api_permissions.png?fit=max&auto=format&n=lE9R60WdchGr08Mr&q=85&s=a68ede5105cffbdfe40e1e0016bb4d2d" alt="Azure — Microsoft Graph application permissions" className="block mx-auto w-11/12" width="1919" height="1089" data-path="images/connectors/outlook/enterprise/api_permissions.png" />
</div>

<Info>
  Application permissions let the connector access org mail data without each user signing in interactively.
</Info>

#### Step 5: Grant admin consent

1. On **API permissions**, click **Grant admin consent for \[your organization]** and confirm **Yes**.
2. Wait until each permission shows **Granted for \[organization]** with a green state.

<div className="text-center">
  <img src="https://mintcdn.com/pipeshub/lE9R60WdchGr08Mr/images/connectors/outlook/enterprise/admin_consent.png?fit=max&auto=format&n=lE9R60WdchGr08Mr&q=85&s=aeb261927458249ae16a566a9a519b7e" alt="Azure — admin consent granted for API permissions" className="block mx-auto w-11/12" width="1308" height="433" data-path="images/connectors/outlook/enterprise/admin_consent.png" />
</div>

<Warning>
  Admin consent is required for application permissions. Only **Global Administrators** or **Application Administrators** (per your tenant’s role assignments) can grant this consent.
</Warning>

#### Step 6: Open Connectors and start Outlook setup

1. In the main app, open your **user profile** menu at the bottom of the left sidebar → **Workspace Settings**.
2. Under **Workspace**, select **Connectors**.
3. Find **Outlook** and start setup (**+ Setup** on the card), or open an existing instance to edit.

<div className="text-center">
  <img src="https://mintcdn.com/pipeshub/TPga-a_y69DA_EbI/images/connectors/outlook/enterprise/outlook-connector-home-nav.png?fit=max&auto=format&n=TPga-a_y69DA_EbI&q=85&s=5add3673ef49451c0af9768036e25321" alt="User profile menu with Workspace Settings" className="block mx-auto w-11/12" width="827" height="667" data-path="images/connectors/outlook/enterprise/outlook-connector-home-nav.png" />
</div>

<div className="text-center">
  <img src="https://mintcdn.com/pipeshub/TPga-a_y69DA_EbI/images/connectors/outlook/enterprise/outlook-connector-connectors-page.png?fit=max&auto=format&n=TPga-a_y69DA_EbI&q=85&s=6b4e4b3aa37fb80f2eac9cf952909ce1" alt="Workspace Connectors page with Outlook" className="block mx-auto w-11/12" width="1109" height="677" data-path="images/connectors/outlook/enterprise/outlook-connector-connectors-page.png" />
</div>

#### Step 7: Authenticate the Outlook instance

1. In **Outlook Configuration**, open the **Authenticate Instance** tab.
2. Set **Instance name** (e.g. `Outlook connector`).
3. Under **OAuth (Admin Consent) Credentials**, enter:
   * **Application (Client) ID** — from Step 2
   * **Client Secret** — from Step 3
   * **Directory (Tenant) ID** — from Step 2
4. Enable **Has Admin Consent** if consent was granted in Azure (Step 5).
5. Click **Next →**. Use the in-product **Setup Documentation** links if you want Azure steps side-by-side.

<div className="text-center">
  <img src="https://mintcdn.com/pipeshub/TPga-a_y69DA_EbI/images/connectors/outlook/enterprise/outlook-connector-config.png?fit=max&auto=format&n=TPga-a_y69DA_EbI&q=85&s=6fd517c53ab892c8045a2a175f660e32" alt="Outlook Configuration — Authenticate Instance tab" className="block mx-auto w-11/12" width="1192" height="1088" data-path="images/connectors/outlook/enterprise/outlook-connector-config.png" />
</div>

#### Step 8: Configure records (sync strategy and filters)

On **Configure Records**, you control sync cadence and scope. **Indexing filters** always apply; **sync filters** are optional—add only the constraints you need (each filter uses an operator and value where applicable).

<div className="text-center">
  <img src="https://mintcdn.com/pipeshub/TPga-a_y69DA_EbI/images/connectors/outlook/enterprise/outlook-connector-sync-str.png?fit=max&auto=format&n=TPga-a_y69DA_EbI&q=85&s=9823954fe5da371dbe39ee0bcfa9a0f4" alt="Outlook Configuration — Configure Records, sync strategy" className="block mx-auto w-11/12" width="655" height="1077" data-path="images/connectors/outlook/enterprise/outlook-connector-sync-str.png" />
</div>

**Sync settings**

* **Sync Strategy** — e.g. **Scheduled** or **Manual** (exact options depend on your workspace).
* **Sync Interval** — When scheduled, set the refresh interval (e.g. **1 Hour**).

**Enable Manual Indexing**

When on, automatic indexing is disabled for synced records so you control indexing separately. Leave off for normal automatic indexing.

**Sync filters**

Use **+ Add filter** to limit what is synced. Types include **Users**, **Standard Folders**, **Custom Folders**, **Groups**, and **Received Date**. Remove a constraint with **Clear**.

<div className="text-center">
  <img src="https://mintcdn.com/pipeshub/TPga-a_y69DA_EbI/images/connectors/outlook/enterprise/outlook-connector-filters.png?fit=max&auto=format&n=TPga-a_y69DA_EbI&q=85&s=1f15da48bd8299234d5808c2ed55a386" alt="Outlook Configuration — indexing and sync filters" className="block mx-auto w-11/12" width="677" height="1076" data-path="images/connectors/outlook/enterprise/outlook-connector-filters.png" />
</div>

**Indexing filters**

* **Index Emails** — Message bodies and metadata for search.
* **Index Attachments** — Attachment content where supported.
* **Index Group Conversations** — Microsoft 365 group mail threads.

Click **Save Configuration** when finished, or **← Back** to return to **Authenticate Instance**.

**Examples**

* **Recent mail only** — **Received Date** with an operator such as **Is After** and your cutoff date.
* **Specific mailboxes** — **Users** with operator **In** and selected users (leave empty for all).
* **Fewer attachments in search** — Turn off **Index Attachments**, keep **Index Emails** on.

<div className="text-center">
  <img src="https://mintcdn.com/pipeshub/qVDOfi6eKVplVCKA/images/connectors/outlook/enterprise/outlook_inboxes.png?fit=max&auto=format&n=qVDOfi6eKVplVCKA&q=85&s=69b5bd2e9a3fef79e2befc7be29f8ea1" alt="Outlook folder structure reference" className="block mx-auto w-11/12" width="435" height="637" data-path="images/connectors/outlook/enterprise/outlook_inboxes.png" />
</div>

<Info>
  You can change filters later; effects apply on subsequent syncs per connector behavior.
</Info>

#### Step 9: Enable sync and monitor

<Warning>
  The administrator who grants consent in Azure should align with the **PipesHub account** used to configure this connector; mismatched identities often cause permission issues in PipesHub.
</Warning>

After saving, you may see **Instance is configured and ready to sync** — choose **Start Syncing Now** or **I'll do it later**.

<div className="text-center">
  <img src="https://mintcdn.com/pipeshub/TPga-a_y69DA_EbI/images/connectors/outlook/enterprise/outlook-connector-sync-modal.png?fit=max&auto=format&n=TPga-a_y69DA_EbI&q=85&s=12c8e89ad0da96e5e558effc3adcd165" alt="Instance ready to sync confirmation dialog" className="block mx-auto w-11/12" width="1256" height="873" data-path="images/connectors/outlook/enterprise/outlook-connector-sync-modal.png" />
</div>

On the **Outlook** connector page, turn **Sync Enabled** on when ready. Use **Sync**, **Full sync**, or **Retry failed** on the instance card as needed. Open the instance (**Overview**) for counts such as **Total**, **Completed**, **Failed**, and types like **MAIL** / **GROUP\_MAIL**.

<div className="text-center">
  <img src="https://mintcdn.com/pipeshub/TPga-a_y69DA_EbI/images/connectors/outlook/enterprise/outlook-connector-stats.png?fit=max&auto=format&n=TPga-a_y69DA_EbI&q=85&s=5d7fd4b38391edc19212b222eeeaeef4" alt="Outlook connector instances and Overview stats" className="block mx-auto w-11/12" width="1271" height="1082" data-path="images/connectors/outlook/enterprise/outlook-connector-stats.png" />
</div>

<Note>
  There is no separate interactive “Sign in to Microsoft” step inside PipesHub for this connector after admin consent—access is via application permissions and client credentials.
</Note>

## Supported Features

The Outlook connector syncs the following data:

* **Users** — User profiles and mailbox context used for the integration
* **Emails** — Messages from organizational mailboxes (within sync filter scope)
* **Attachments** — Files attached to messages (when attachment indexing is enabled)
* **Mail folders** — Standard and custom folder hierarchy
* **Group conversations** — When **Index Group Conversations** is enabled

## Useful Links

* **Azure Portal:** [portal.azure.com](https://portal.azure.com)
* **Register an app (Microsoft Entra):** [Quickstart: Register an app](https://learn.microsoft.com/en-us/entra/identity-platform/quickstart-register-app)
* **Application permissions:** [Microsoft Graph permissions reference](https://learn.microsoft.com/en-us/graph/permissions-reference)
* **Admin consent:** [Grant tenant-wide admin consent](https://learn.microsoft.com/en-us/entra/identity/enterprise-apps/grant-admin-consent)

***

## Troubleshooting

<AccordionGroup>
  <Accordion title="Troubleshooting" icon="circle-exclamation">
    ### Common issues

    **Invalid client credentials**

    * Verify **Application (Client) ID**, **Client Secret**, and **Directory (Tenant) ID** with no extra spaces.
    * Confirm the secret has not expired; create a new secret in Azure and update PipesHub if needed.

    **Insufficient privileges**

    * Ensure `User.Read.All`, `Mail.Read`, and `MailboxSettings.Read` are added as **application** permissions.
    * Confirm **admin consent** shows as granted; allow several minutes for propagation.

    **Tenant / account type**

    * The connector targets **Microsoft 365 (work or school)** tenants with a **Directory (Tenant) ID**.
    * Consumer-only mailboxes without a tenant suitable for app-only Graph access are not supported.

    **Secret expired**

    * Create a new client secret in Azure → **Certificates & secrets**, then update the **Authenticate Instance** tab in PipesHub.

    <Info>
      Personal Microsoft accounts (e.g. outlook.com as a consumer identity without the right tenant model for this flow) are not a supported target for this enterprise connector pattern.
    </Info>
  </Accordion>
</AccordionGroup>

## Data sync behavior

<AccordionGroup>
  <Accordion title="Synchronization process" icon="sync">
    ### Initial sync

    * Processes existing mail and folder scope according to your filters
    * Duration depends on mailbox volume and API throttling
    * Runs in the background

    ### Incremental sync

    * **Polling-based** — Refreshes on your **Sync Interval** when using a scheduled strategy
    * Uses Microsoft Graph change tracking / delta patterns where applicable so only new or changed items are fetched after the initial pass
  </Accordion>
</AccordionGroup>

***

## FAQ

<AccordionGroup>
  <Accordion title="Queries not returning results. What could be wrong?">
    There are three common causes:

    1. **Email mismatch** — The email used during connector authentication does not match your PipesHub account email. That causes permission issues and can hide synced data.
       * **Fix:** Reconfigure the connector and complete the flow using the **same email** as your PipesHub account (see the warning in Step 9).

    2. **Records show in "All Records" but not in search** — Documents appear in All Records but not in search results.
       * **Fix:** Verify sync filters and indexing toggles on **Configure Records**, and ensure indexing has finished for those items.

    3. **Data not yet indexed** — The connector is still syncing or has not finished initial indexing.
       * **Fix:** Open **Workspace Settings** → **Connectors**, select **Outlook**, check the instance **Overview** and sync status, and wait for indexing to complete.
  </Accordion>
</AccordionGroup>

***

<div className="text-center mt-12 p-6 bg-gray-50 dark:bg-gray-800 border border-gray-200 dark:border-gray-700 rounded-lg max-w-2xl mx-auto">
  <h3 className="text-lg font-semibold mb-2">Ready to get started?</h3>

  <p className="text-gray-600 dark:text-gray-400">
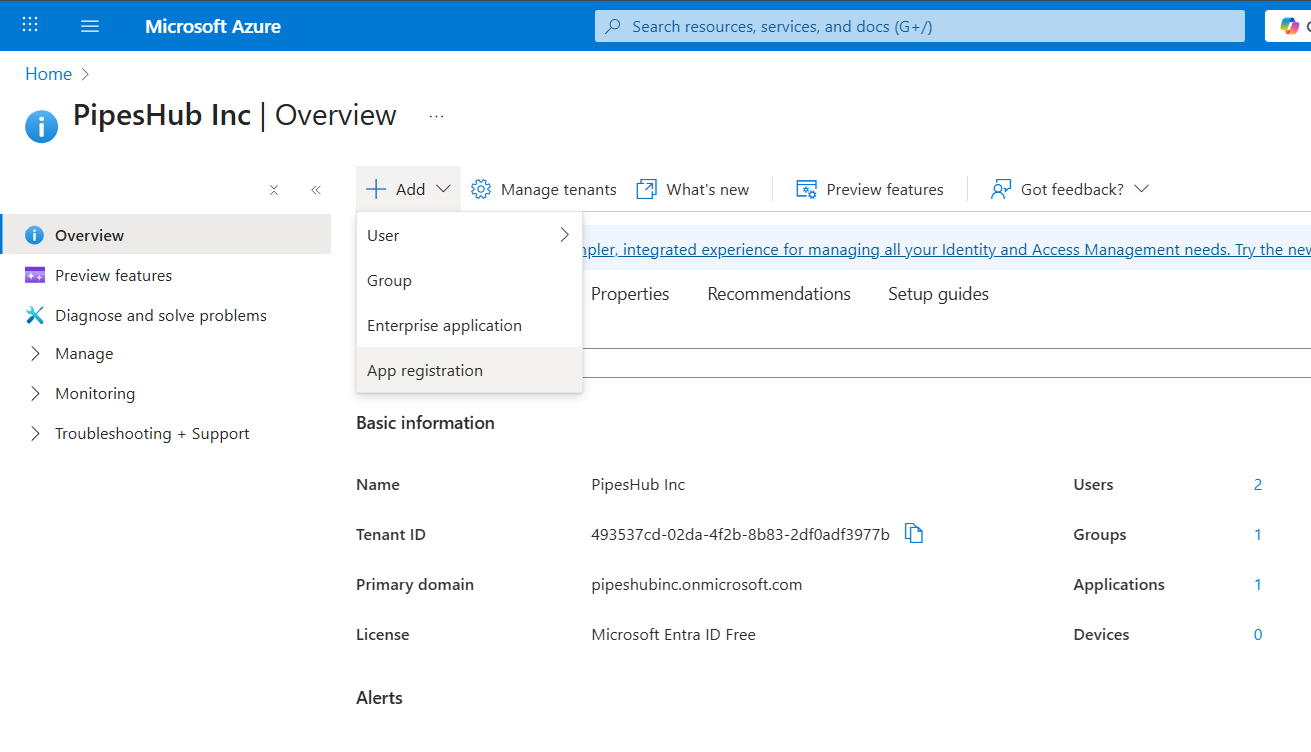
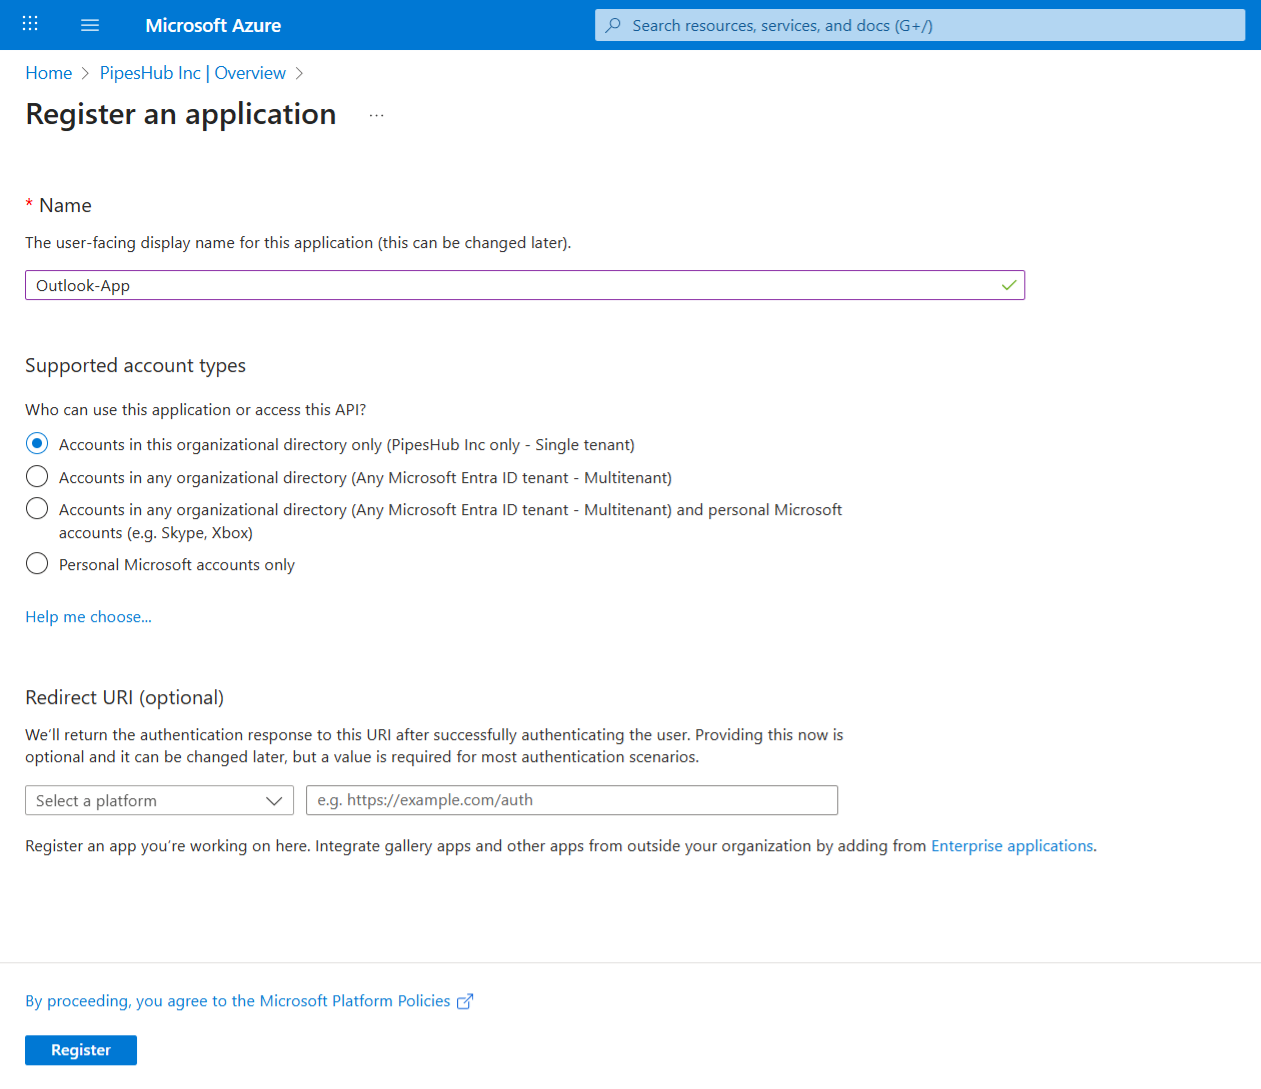
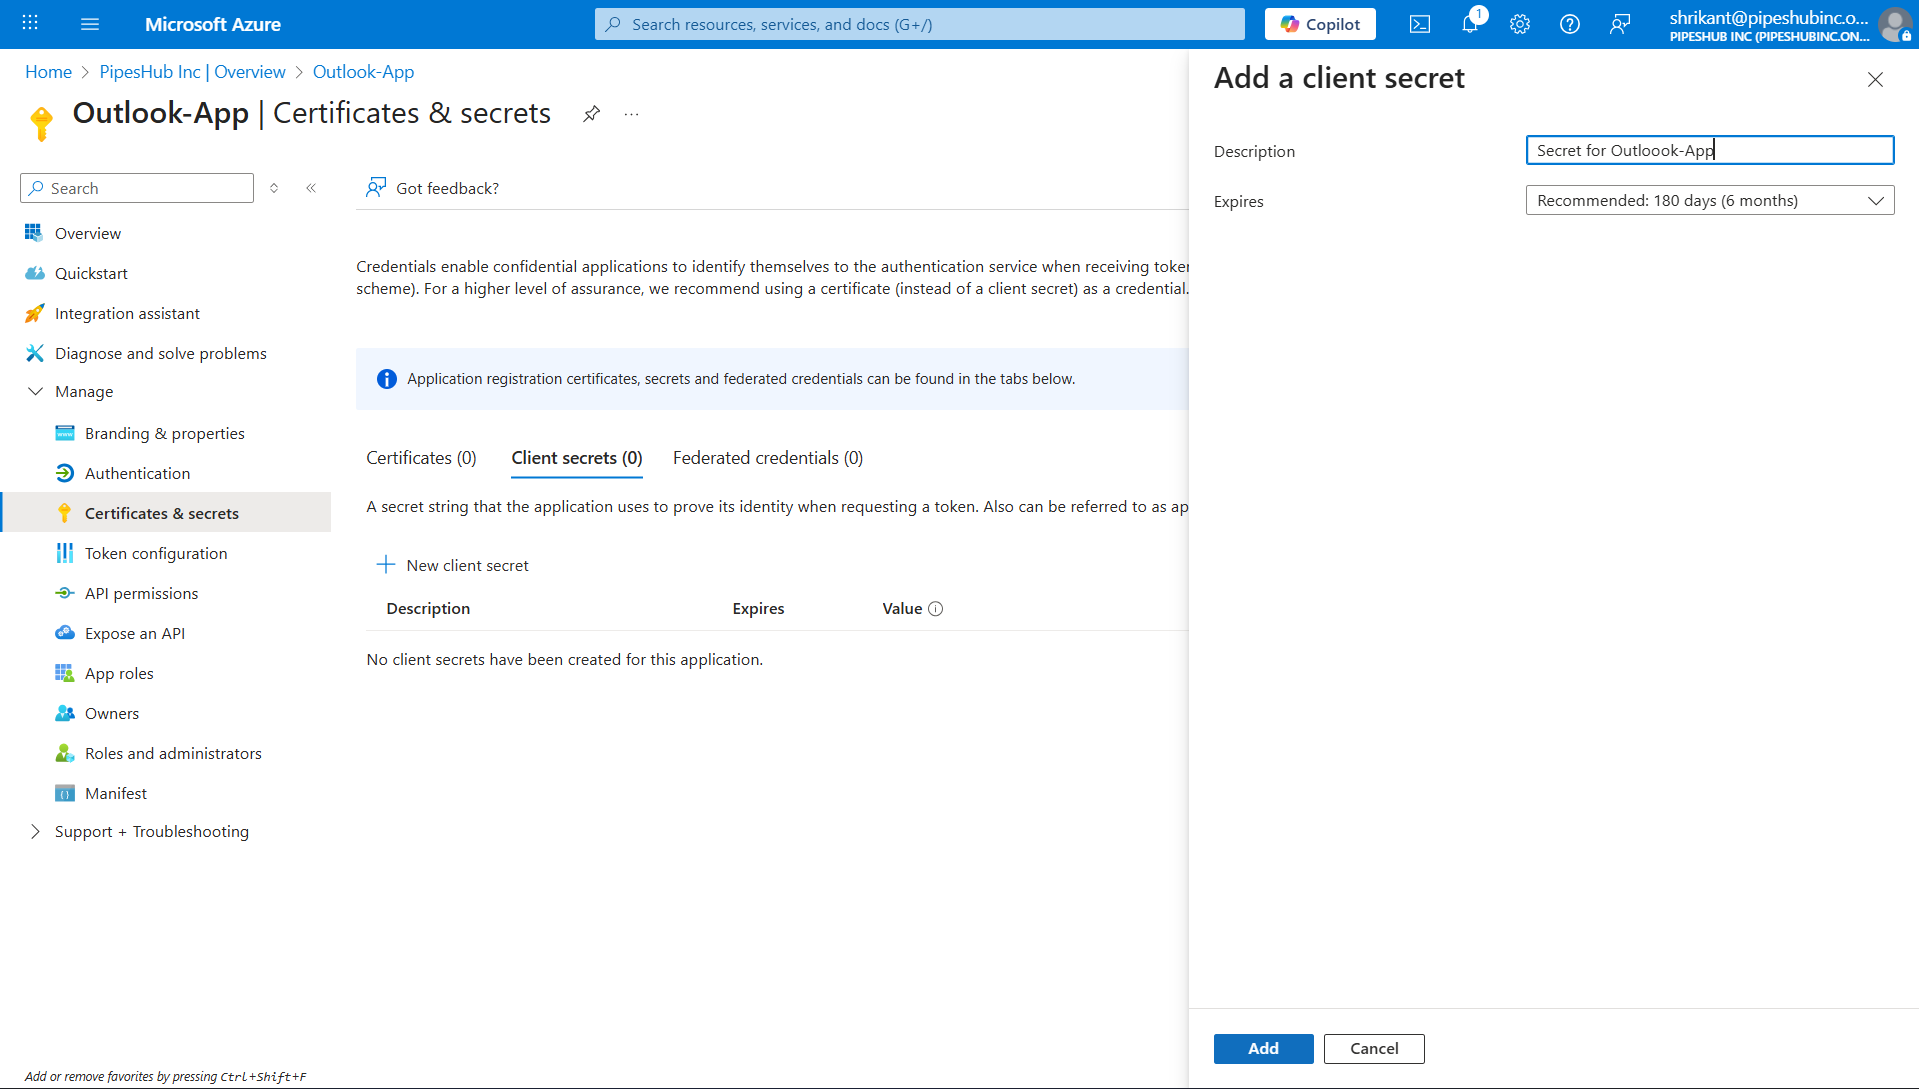
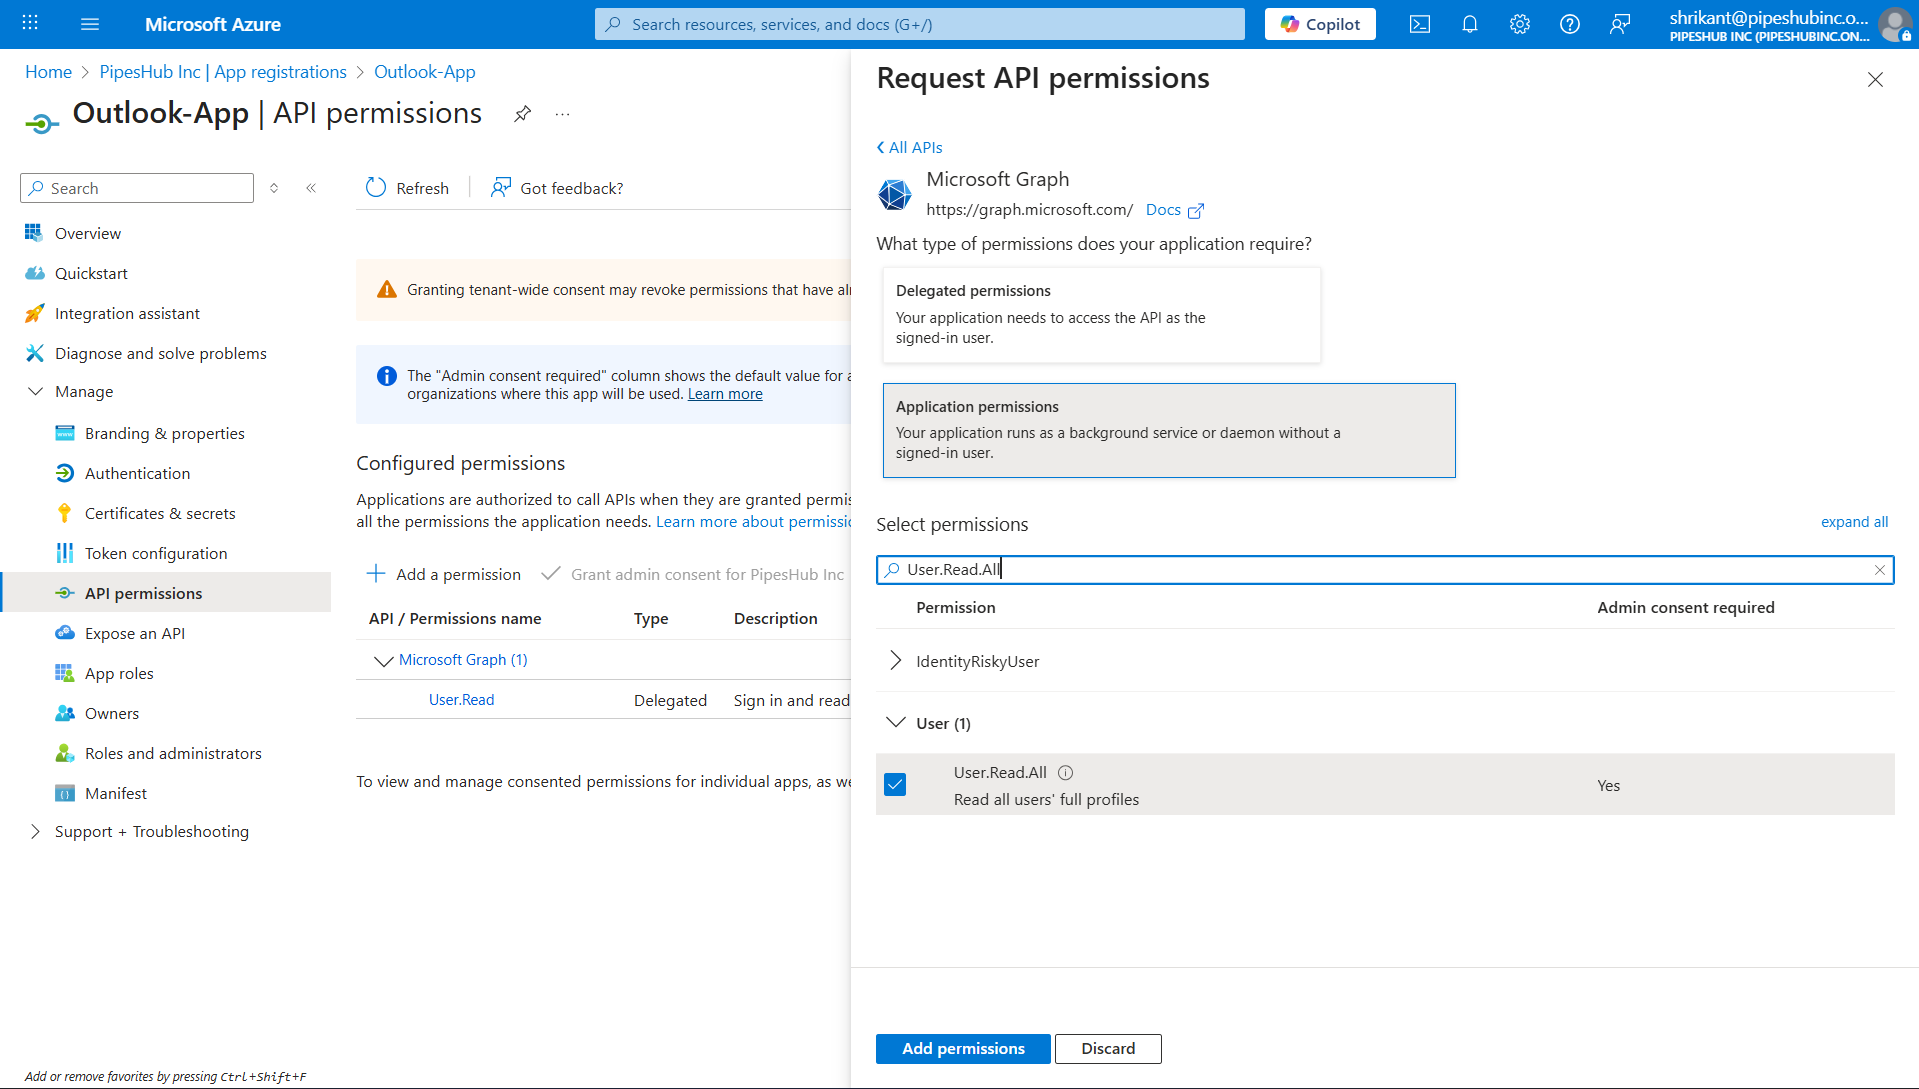
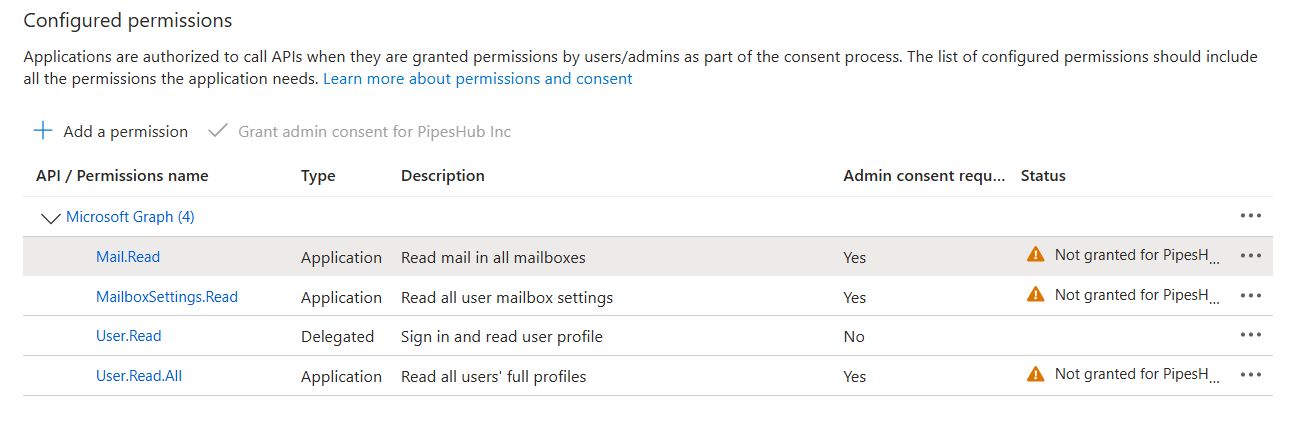
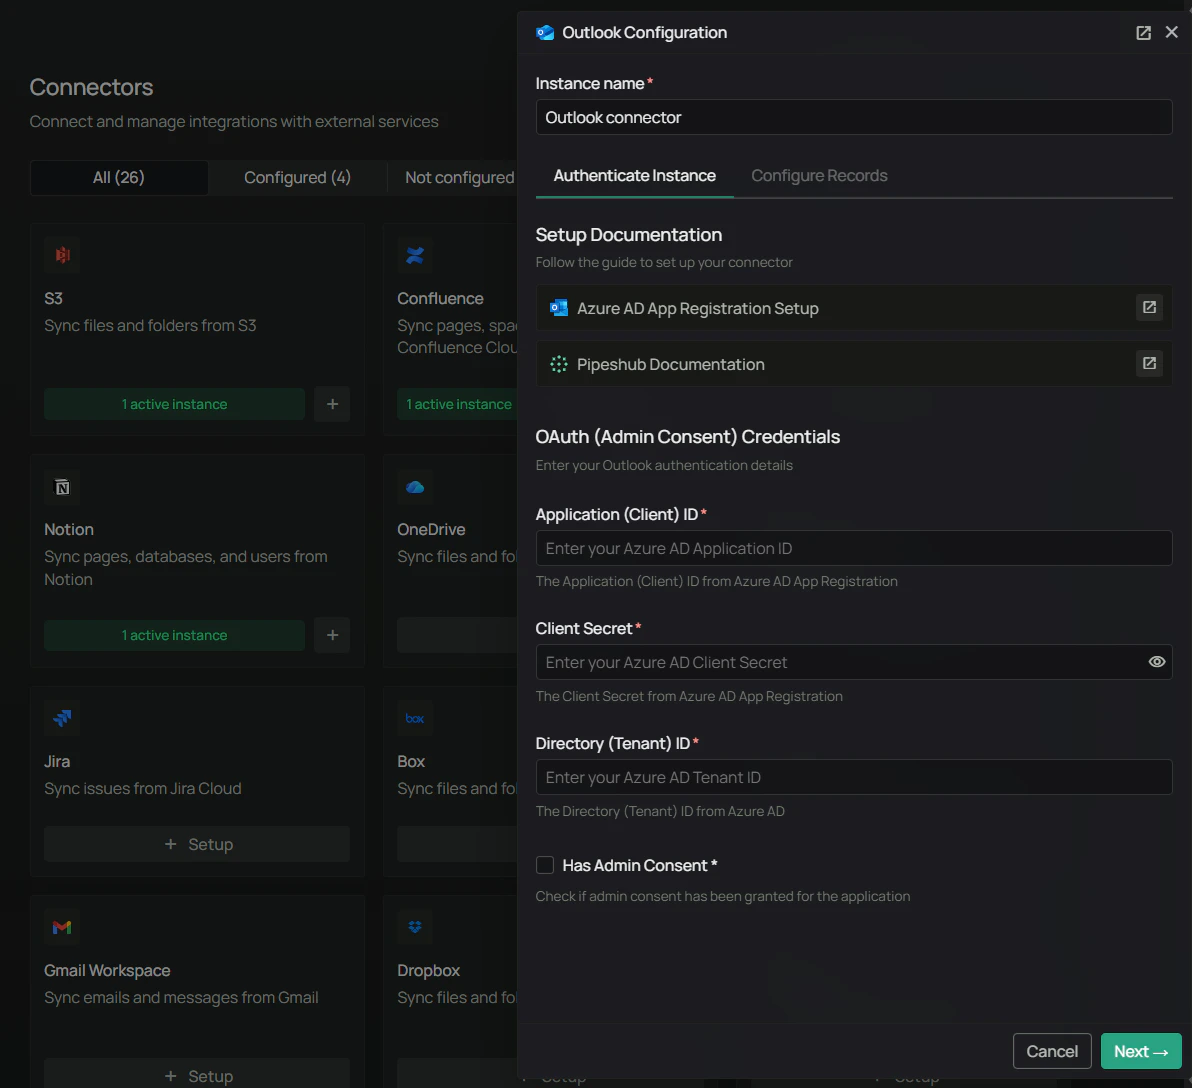
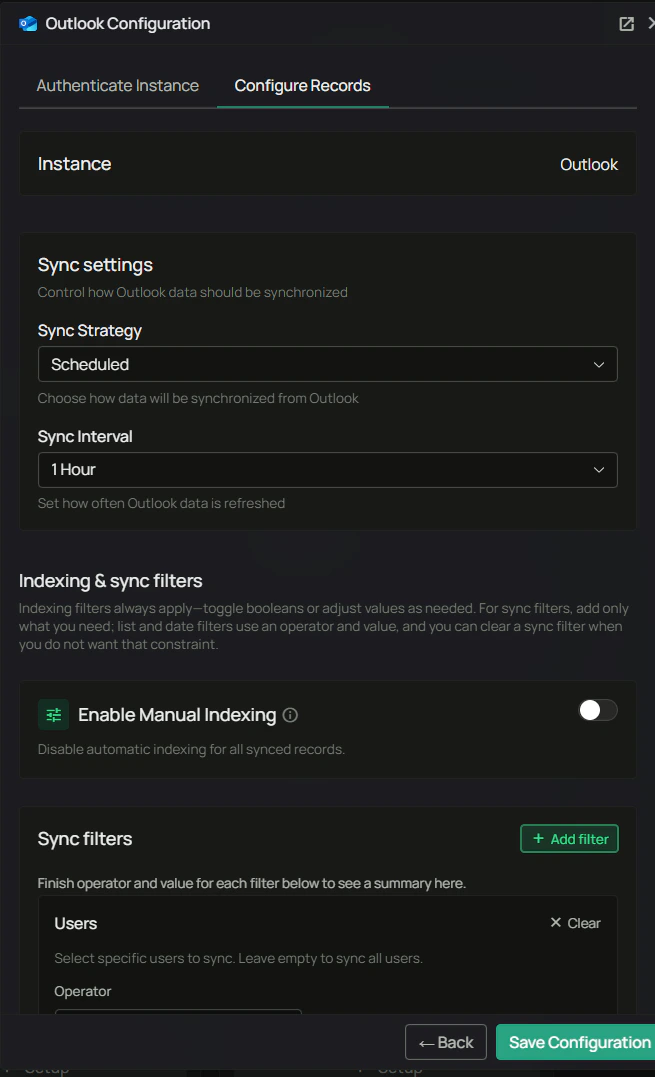
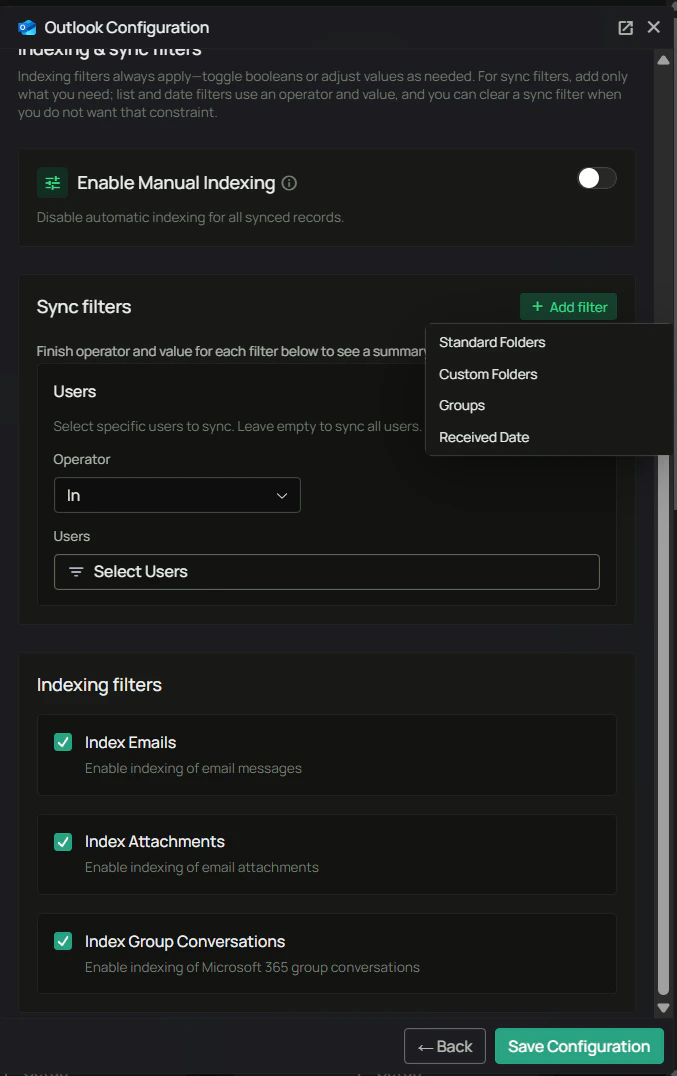
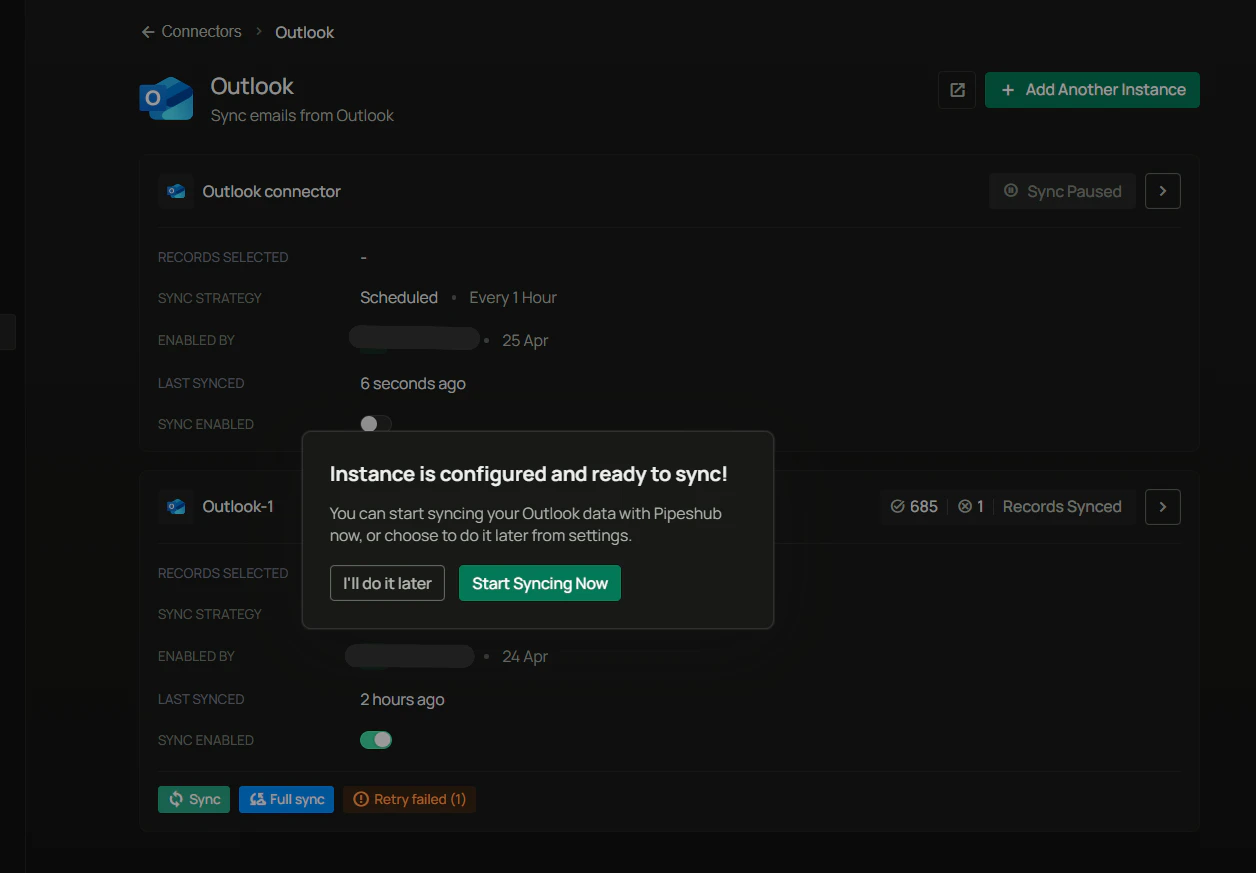
    The Outlook connector is ready for production use. Follow the configuration guide above, or contact support if you need help.
  </p>
</div>
