> ## Documentation Index
> Fetch the complete documentation index at: https://docs.pipeshub.com/llms.txt
> Use this file to discover all available pages before exploring further.
# Onboarding
> This guide walks through setting up the system when first time logging in, starting with AI model configuration, followed by optional configurations for storage, connectors, and SMTP.
## Step 1: Configure AI Model (Required)
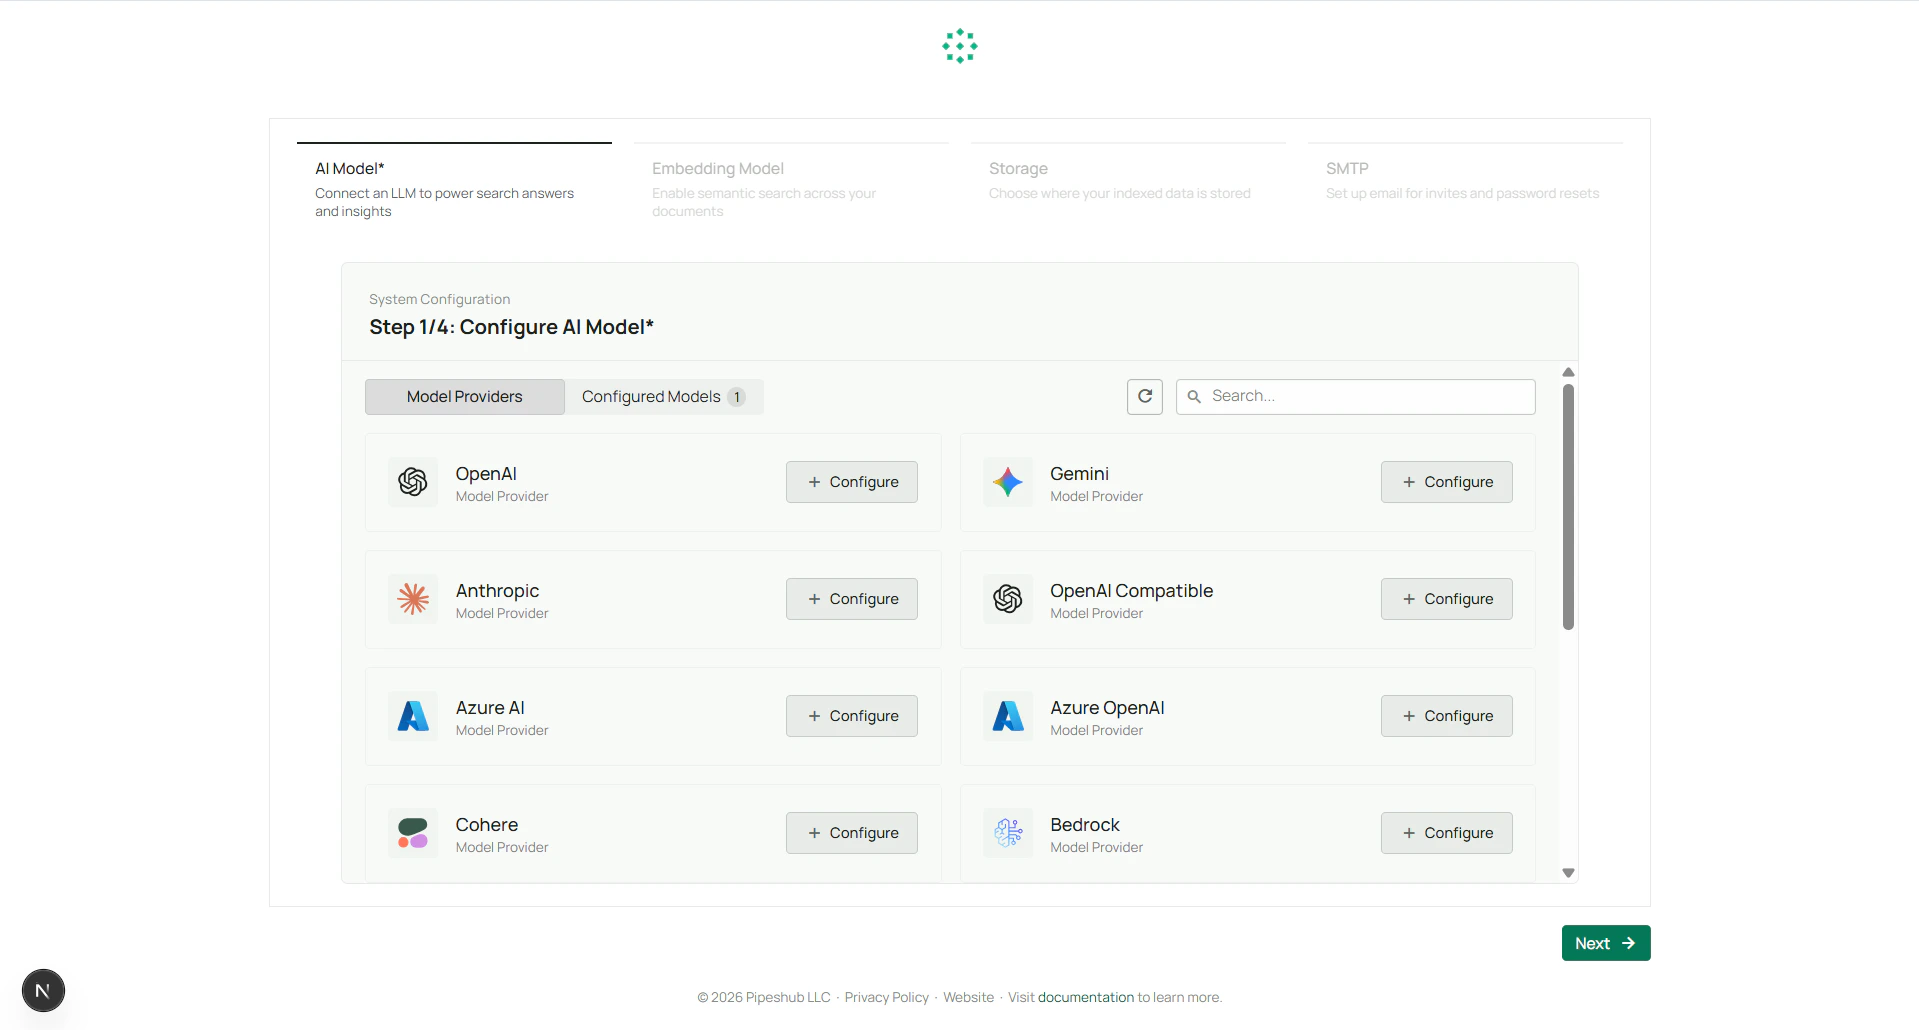
Before proceeding with the setup, configuring an AI model is mandatory.
1. Select the AI Provider (OpenAI or Azure OpenAI).
2. Enter the Client ID (if applicable).
3. Provide the API Key to authenticate the AI model.
4. Specify the Model Name (e.g., gpt-4-turbo).
5. Click **Continue** to proceed.
 ### For more info, refer to [AI models Configuration Guide](/ai-models/overview).
AI model configuration is required to enable AI-powered features.
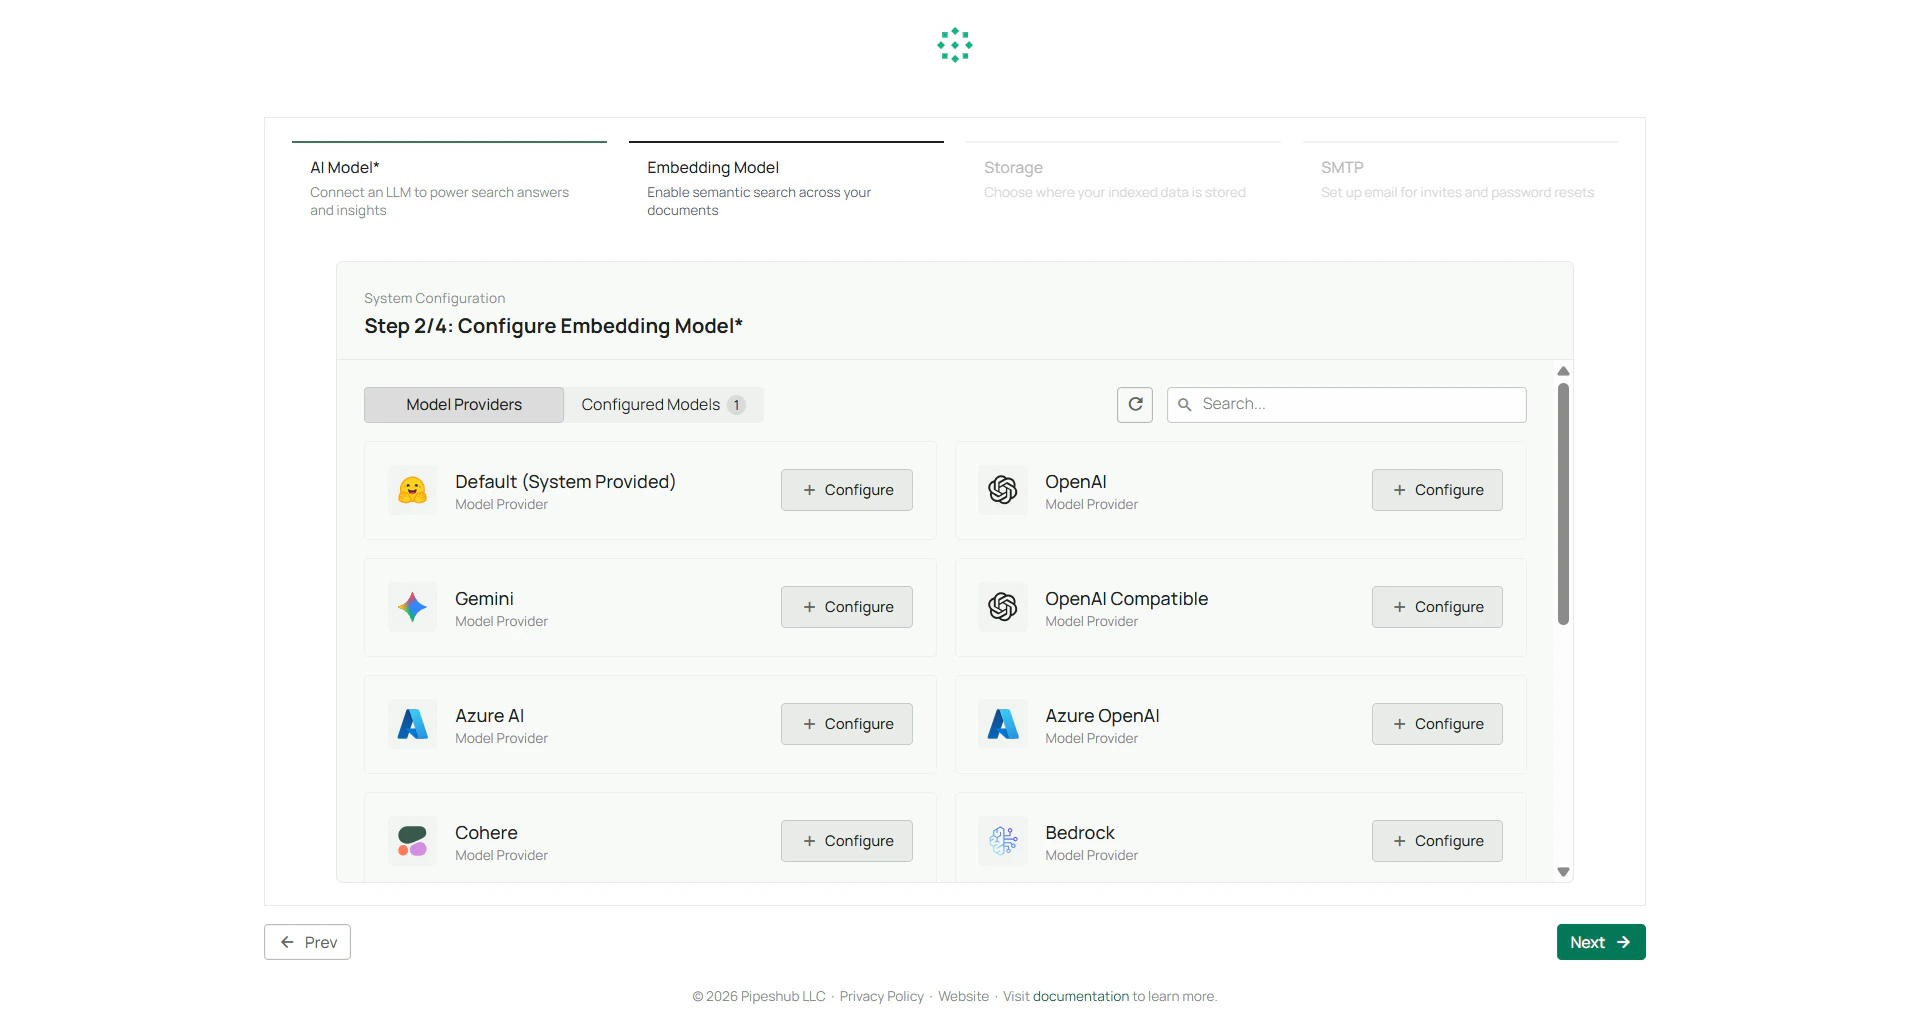
## Step 2: Configure Embeddings Model (Optional)
The Embeddings Configuration section is part of the System Setup workflow for
enabling semantic search and document retrieval features in your application.
This configuration step allows you to define the embedding provider and
specify the model used for generating vector representations of textual
content.
1. Select the Embeddings Provider (OpenAI, Azure OpenAI or Sentence Tranformer).
2. Enter the Endpoint (if applicable).
3. Provide the API Key to authenticate the AI model (if applicable).
4. Specify the Model Name (e.g., gpt-4-turbo).
5. Click **Continue** to proceed.
### For more info, refer to [AI models Configuration Guide](/ai-models/overview).
AI model configuration is required to enable AI-powered features.
## Step 2: Configure Embeddings Model (Optional)
The Embeddings Configuration section is part of the System Setup workflow for
enabling semantic search and document retrieval features in your application.
This configuration step allows you to define the embedding provider and
specify the model used for generating vector representations of textual
content.
1. Select the Embeddings Provider (OpenAI, Azure OpenAI or Sentence Tranformer).
2. Enter the Endpoint (if applicable).
3. Provide the API Key to authenticate the AI model (if applicable).
4. Specify the Model Name (e.g., gpt-4-turbo).
5. Click **Continue** to proceed.
 You can skip this step.
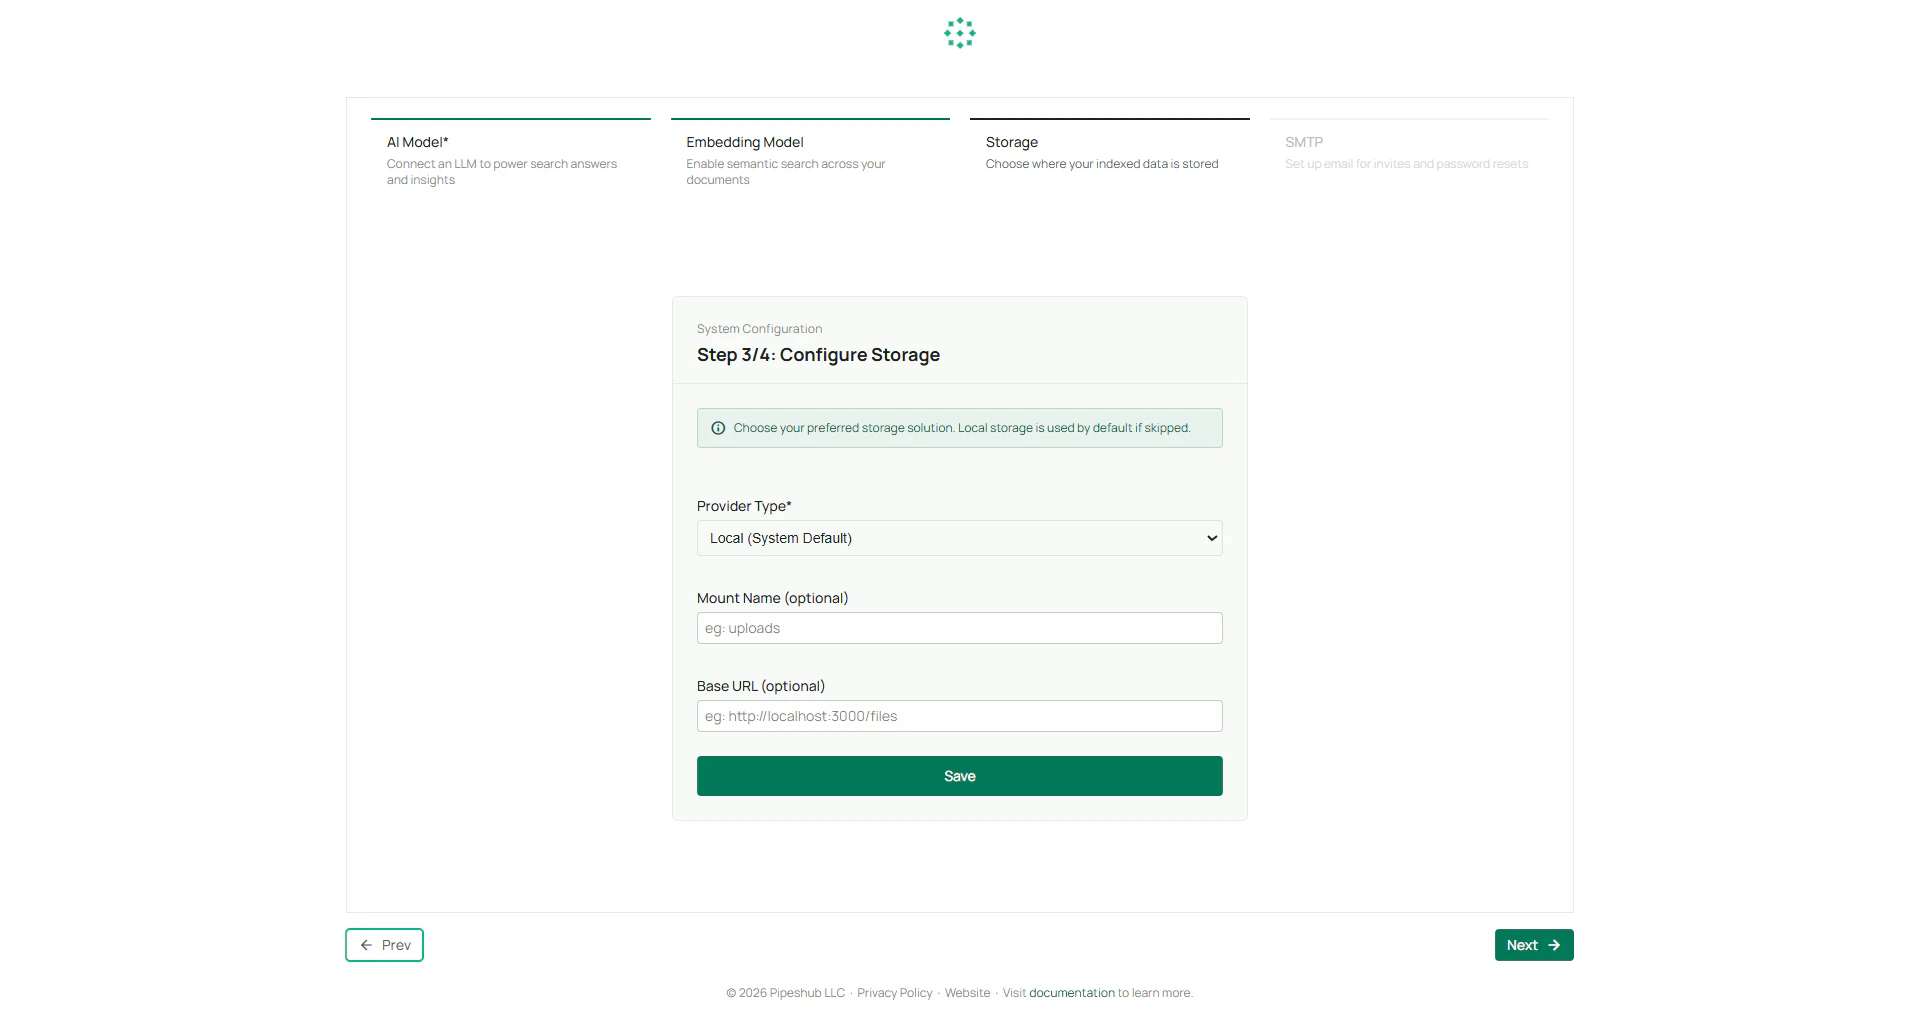
## Step 3: Configure Storage (Optional)
Setting up storage allows the system to save and retrieve data efficiently.
By default, local storage (local machine) will be used to store the files.
1. Choose a Storage Provider (e.g., AWS S3, Local, Azure Blob Storage).
2. Enter the corresponding configuration.
* Mount Name and Base Url for **Local Storage**.
* Access Key and Secret Key for authentication and bucket Name or storage container details for **Amazon S3**.
* Account name, container name,account key, protocol and endpoint suffix for **Azure Blob**.
Click **Continue** to save the configuration.
You can skip this step.
## Step 3: Configure Storage (Optional)
Setting up storage allows the system to save and retrieve data efficiently.
By default, local storage (local machine) will be used to store the files.
1. Choose a Storage Provider (e.g., AWS S3, Local, Azure Blob Storage).
2. Enter the corresponding configuration.
* Mount Name and Base Url for **Local Storage**.
* Access Key and Secret Key for authentication and bucket Name or storage container details for **Amazon S3**.
* Account name, container name,account key, protocol and endpoint suffix for **Azure Blob**.
Click **Continue** to save the configuration.
 ### For more info, refer to [Storage Configuration Guide](/storage).
You can skip this step. By default Local storage will be chosen.
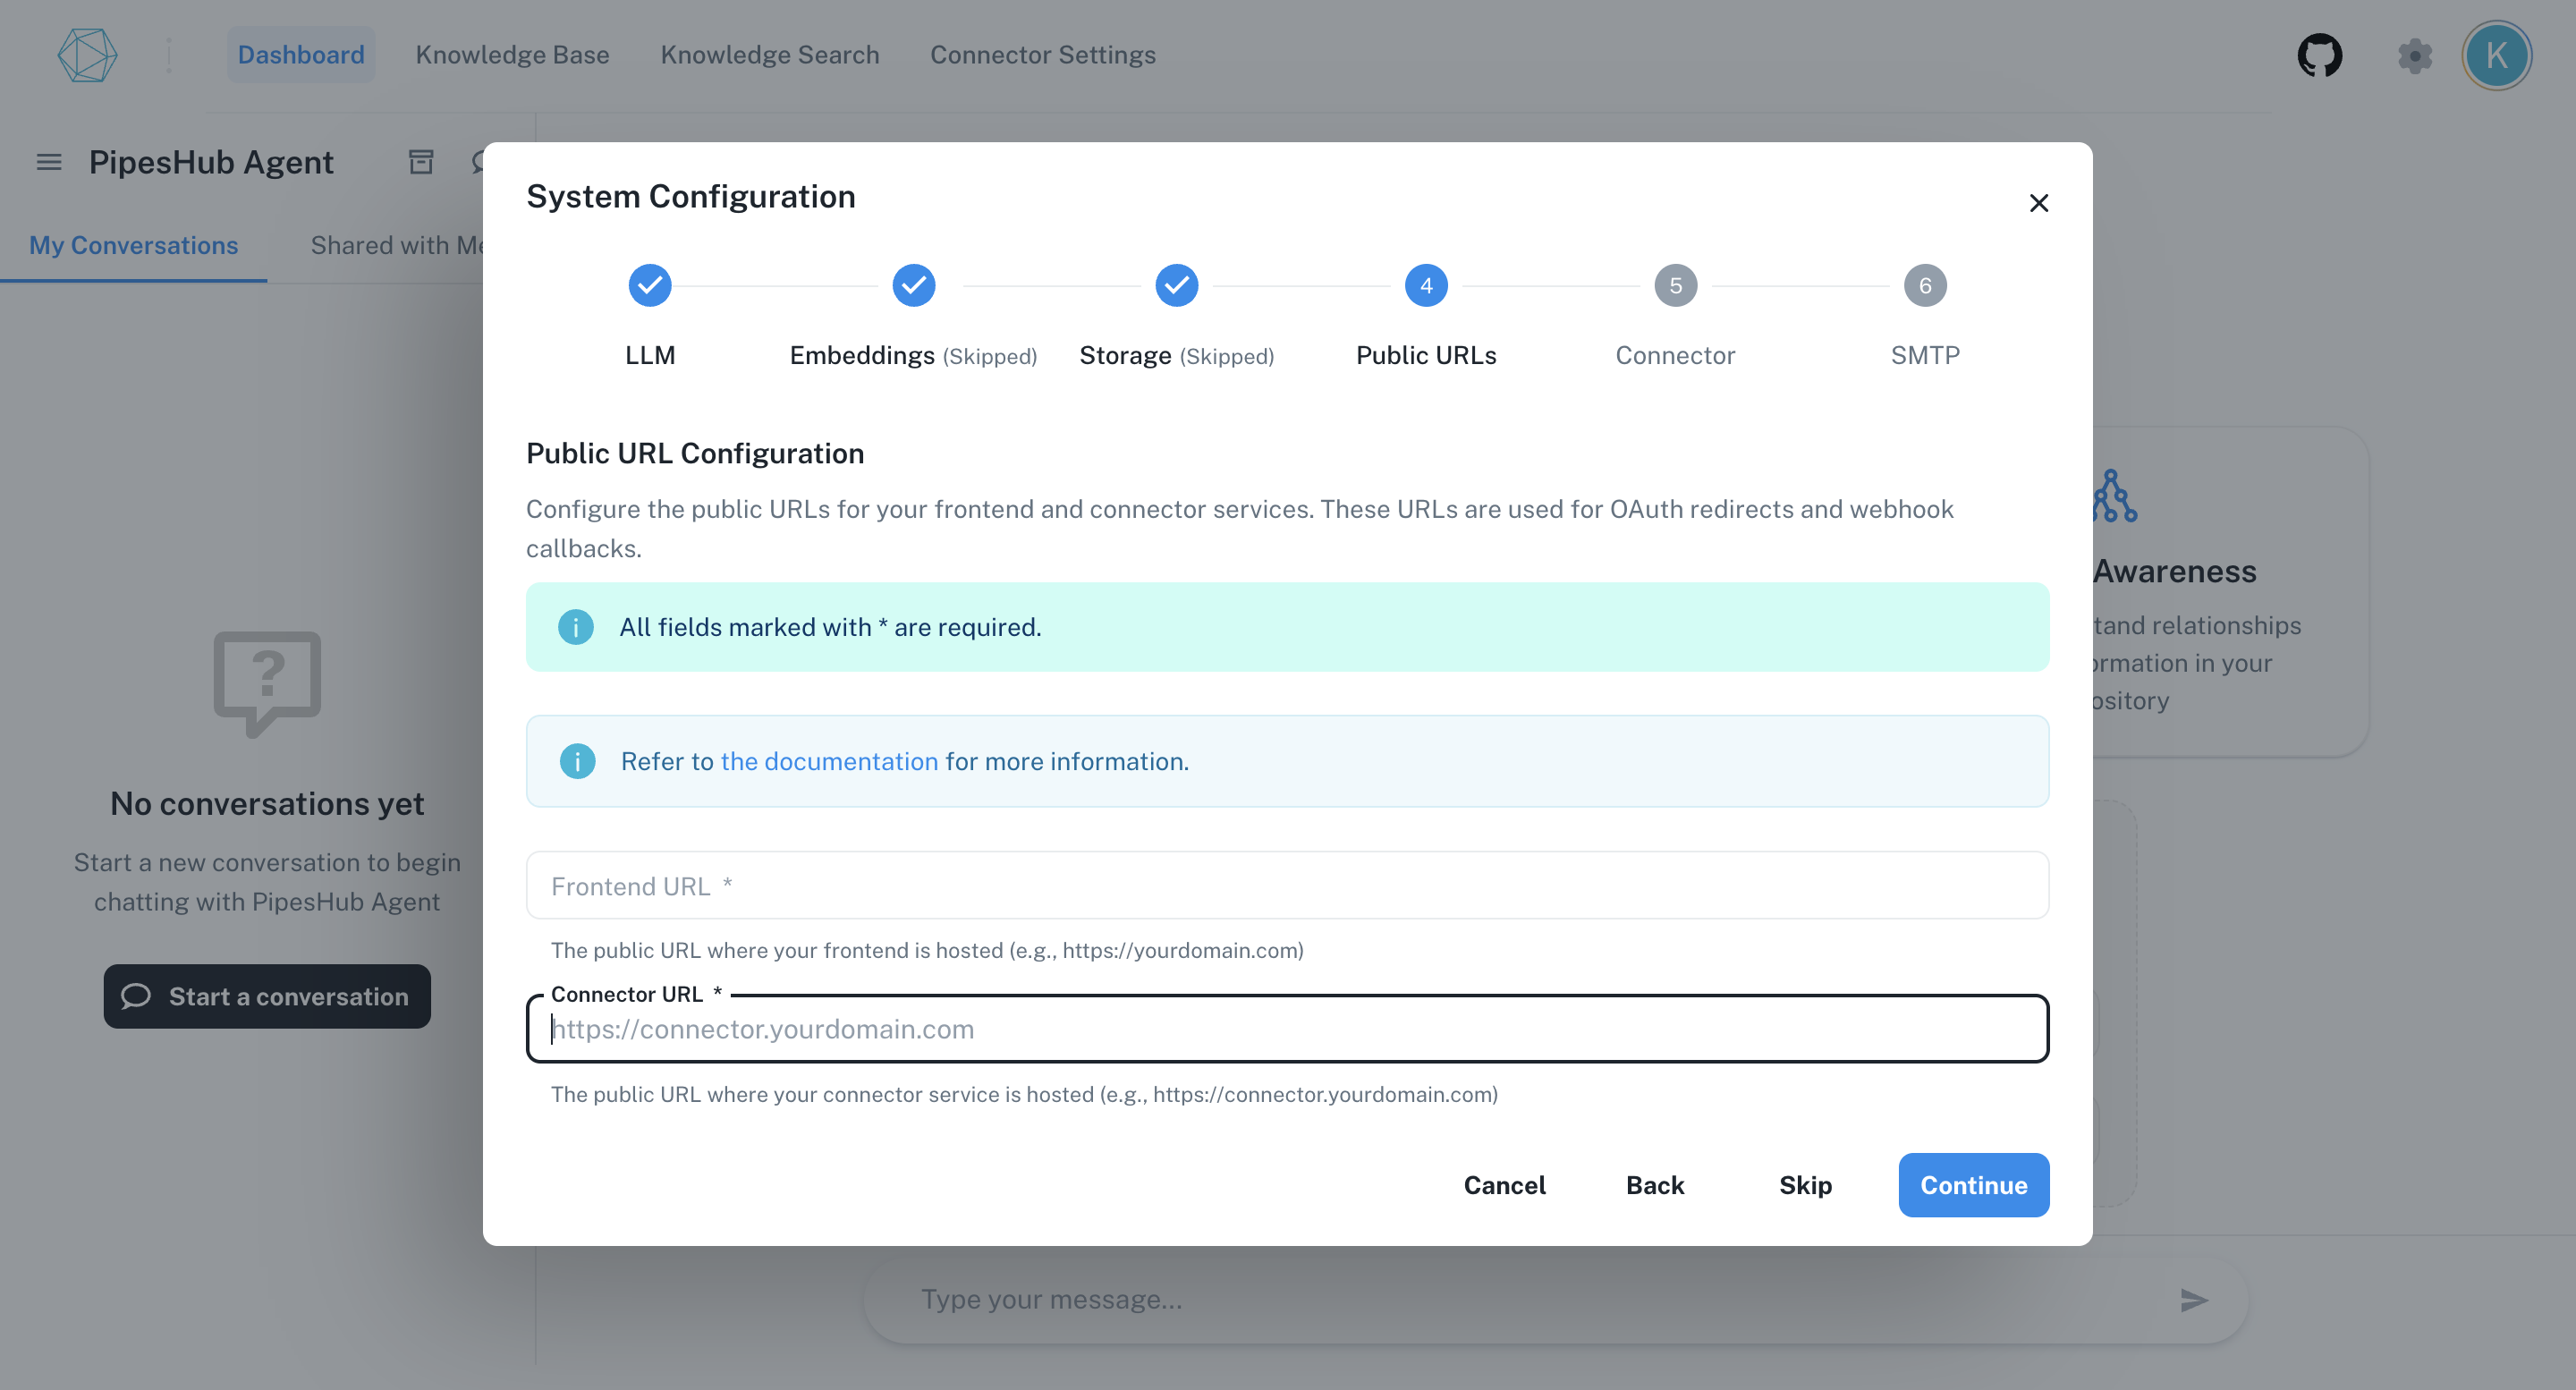
## Step 4: Configure Public URLs (Optional)
The Public URL Configuration step allows you to define the publicly accessible URLs for your frontend and connector services. These URLs are critical for operations like OAuth authentication, redirect flows, and webhook callbacks in your system.
1. Enter the Frontend Endpoint (if applicable).
2. Enter the Connector Endpoint (if applicable).
3. Click **Continue** to save the configuration.
### For more info, refer to [Storage Configuration Guide](/storage).
You can skip this step. By default Local storage will be chosen.
## Step 4: Configure Public URLs (Optional)
The Public URL Configuration step allows you to define the publicly accessible URLs for your frontend and connector services. These URLs are critical for operations like OAuth authentication, redirect flows, and webhook callbacks in your system.
1. Enter the Frontend Endpoint (if applicable).
2. Enter the Connector Endpoint (if applicable).
3. Click **Continue** to save the configuration.
 ### For more info, refer to [Internal Services Configuration Guide](/system-overview/internal-services).
You can skip this step.
## Step 5: Configure Connectors (Optional)
Connectors help integrate third-party services with the system.
Enter the necessary API credentials to authenticate the connection.
### - Enterprise
Service credentials (json file) is required and Admin Email of your google admin account.
For more information, refer to [Connectors Enterprise](/enterprise/connectors/googleWorkspace).
### - Individual
Google Client Id and Client Secret are required, set Redirect Uri in Google Cloud Console as given in the window.
For more information, refer to [Connectors Individual](/individual/connectors/googleWorkspace).
### For more info, refer to [Internal Services Configuration Guide](/system-overview/internal-services).
You can skip this step.
## Step 5: Configure Connectors (Optional)
Connectors help integrate third-party services with the system.
Enter the necessary API credentials to authenticate the connection.
### - Enterprise
Service credentials (json file) is required and Admin Email of your google admin account.
For more information, refer to [Connectors Enterprise](/enterprise/connectors/googleWorkspace).
### - Individual
Google Client Id and Client Secret are required, set Redirect Uri in Google Cloud Console as given in the window.
For more information, refer to [Connectors Individual](/individual/connectors/googleWorkspace).
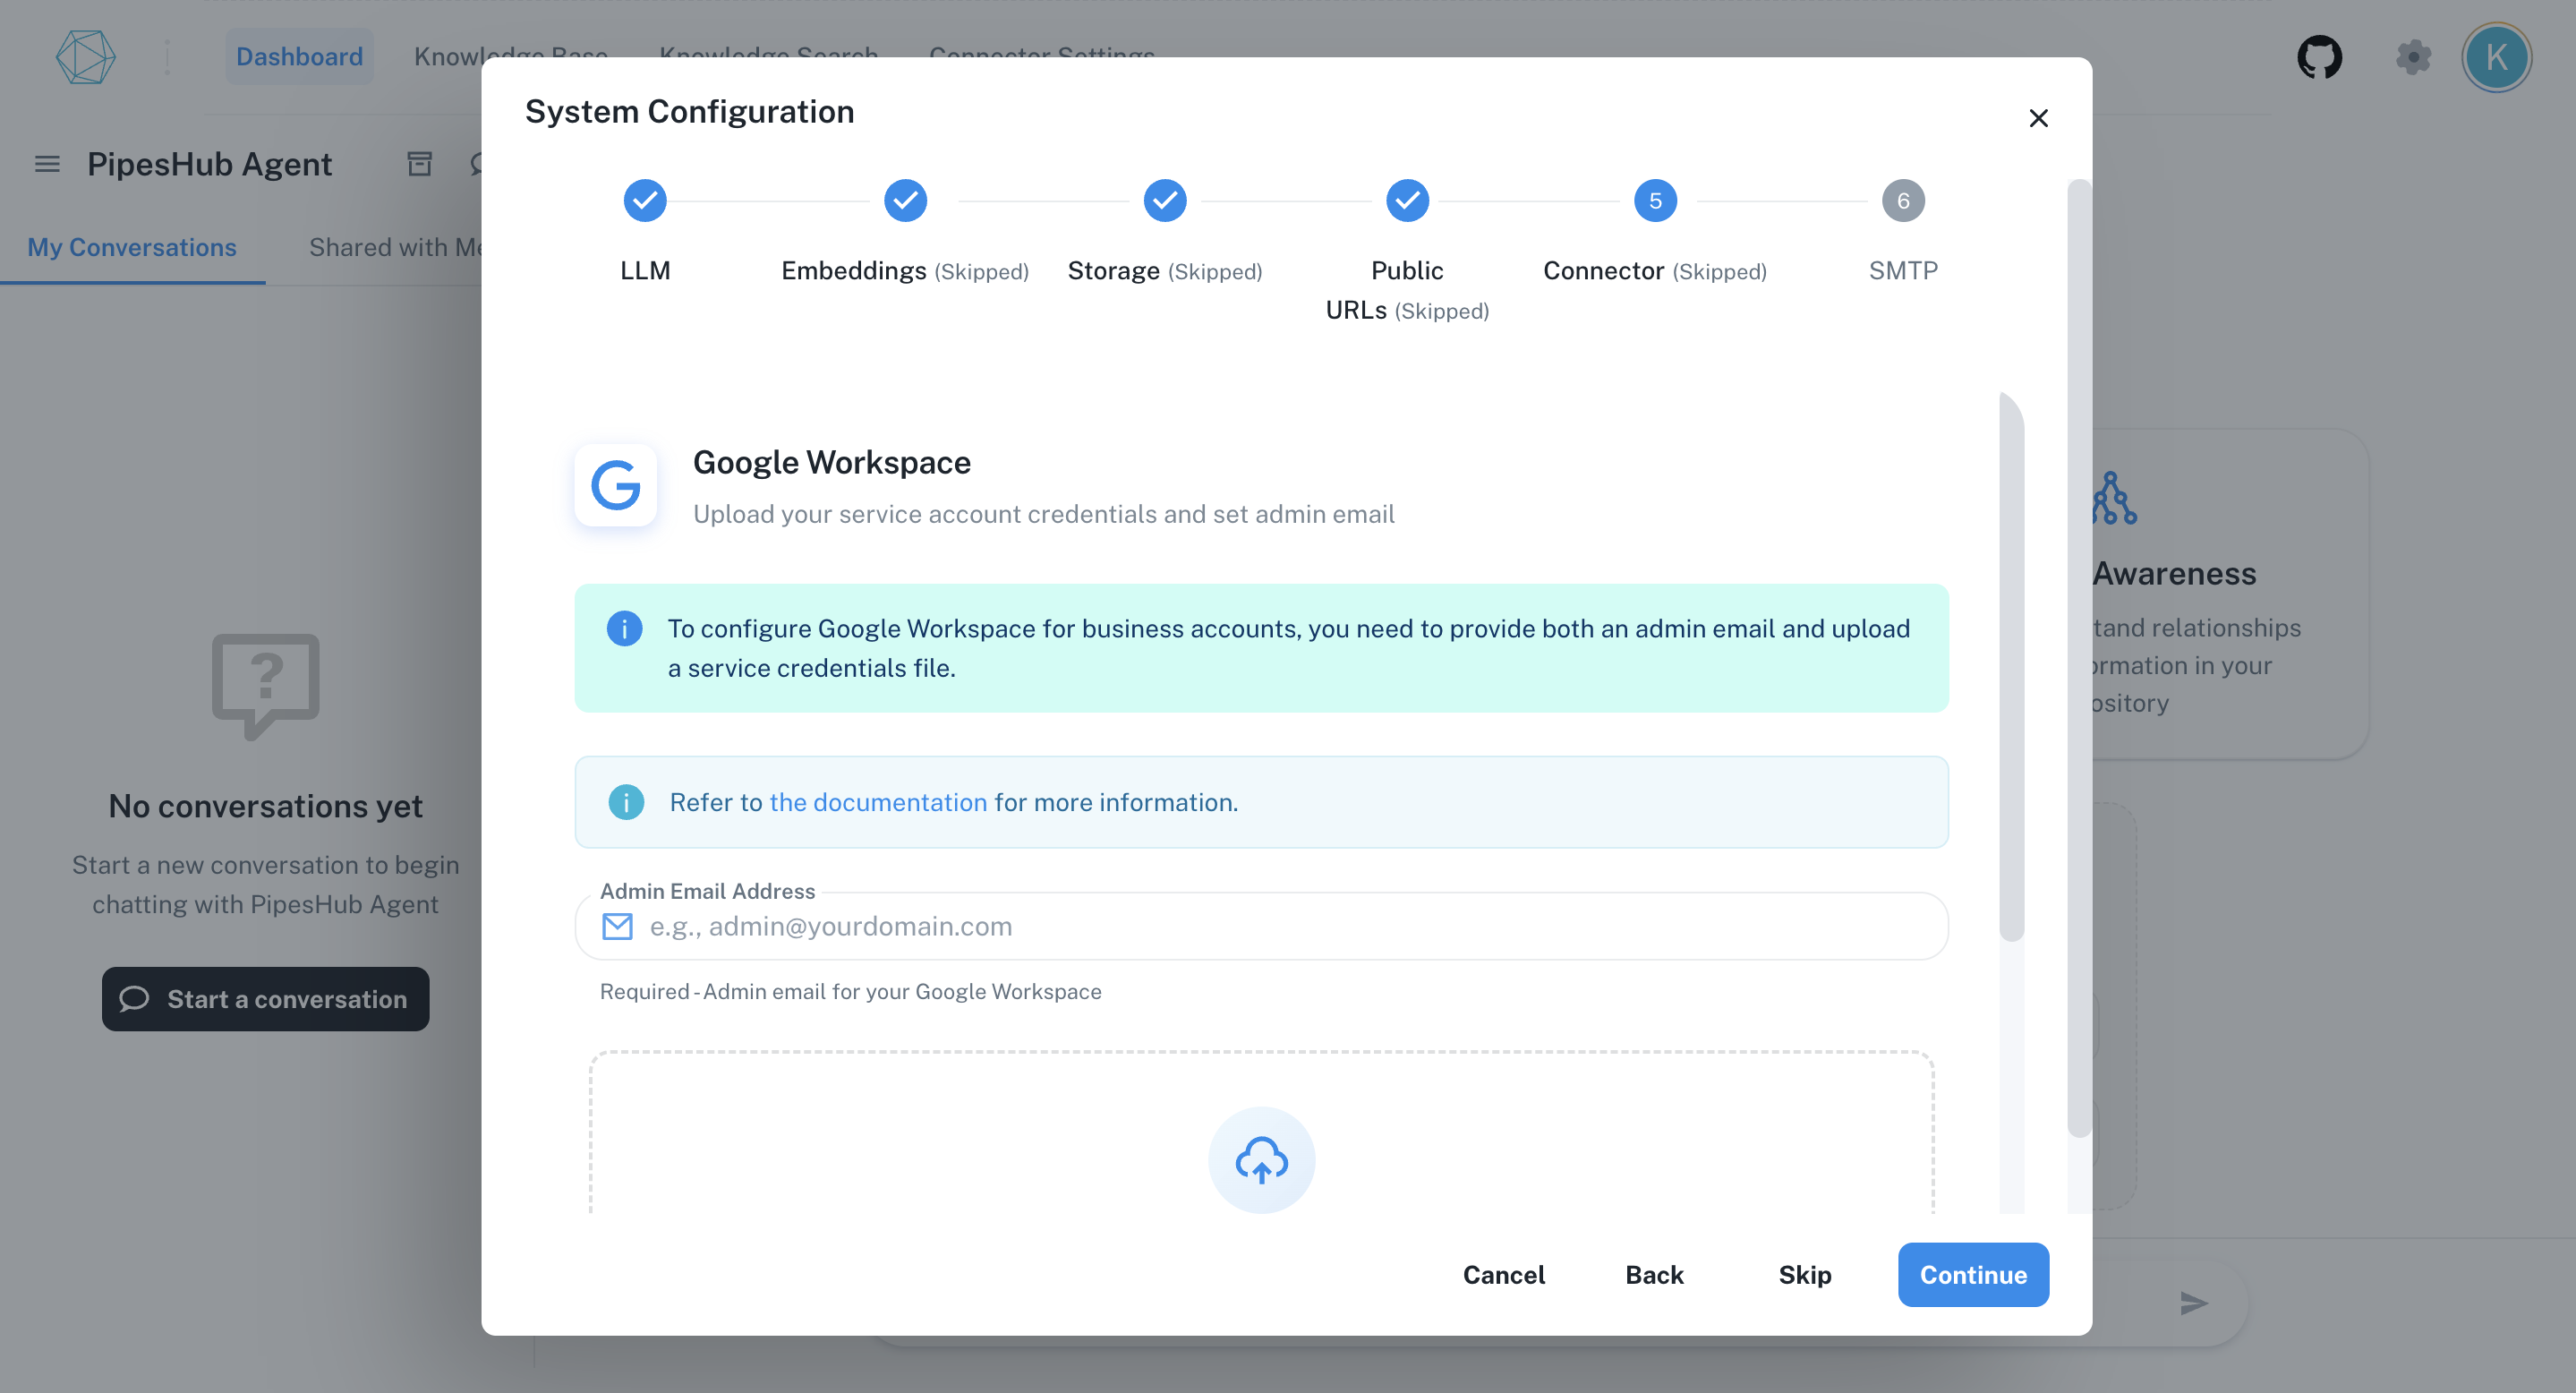 Click **Continue** to save the configuration.
You can skip this step and later configure them in settings under profile tab.
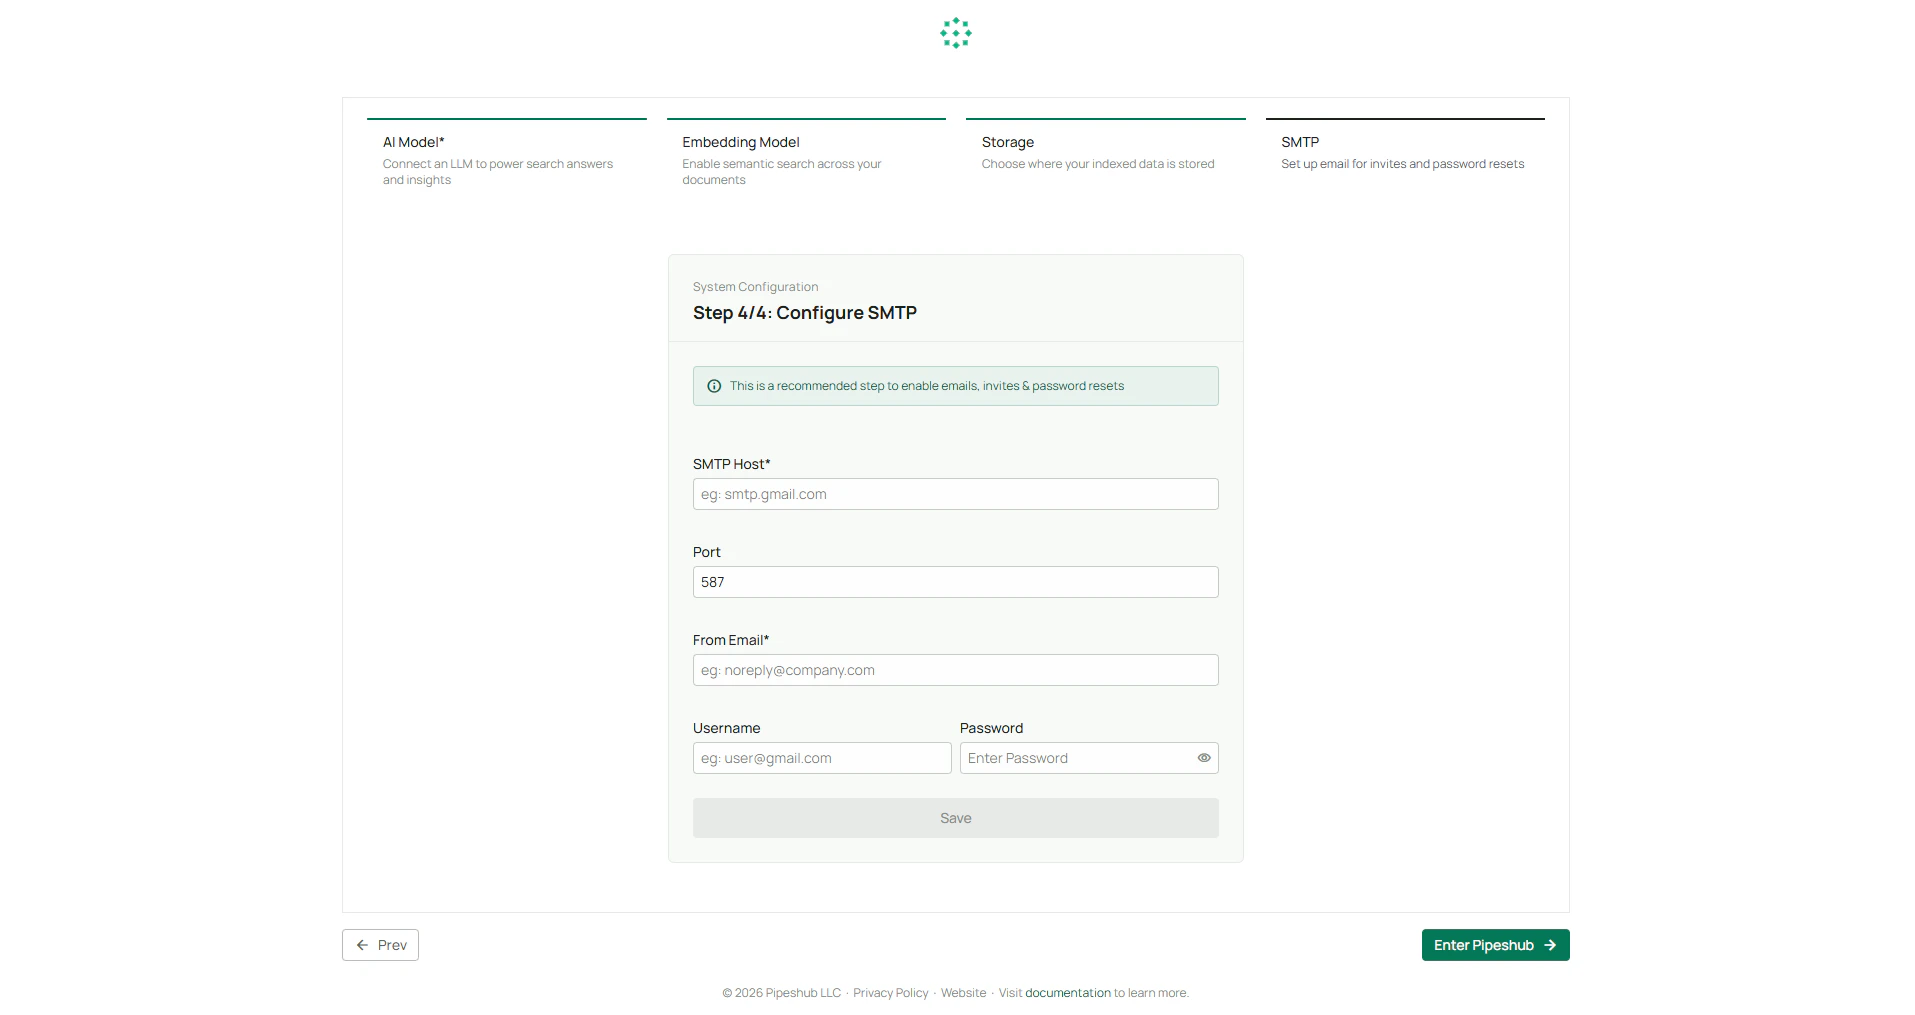
## Step 6: Configure SMTP (Optional)
SMTP configuration allows the system to send emails (invite new users, forgot password etc).
1. Enter the SMTP Server Address (e.g., smtp.example.com).
2. Provide the Port Number (e.g., 587 for TLS).
3. Enter the Username and Password for authentication.
4. Set up the From Email Address (e.g., [noreply@example.com](mailto:noreply@example.com)).
Click **Save** to finalize the setup and then proceed.
Click **Continue** to save the configuration.
You can skip this step and later configure them in settings under profile tab.
## Step 6: Configure SMTP (Optional)
SMTP configuration allows the system to send emails (invite new users, forgot password etc).
1. Enter the SMTP Server Address (e.g., smtp.example.com).
2. Provide the Port Number (e.g., 587 for TLS).
3. Enter the Username and Password for authentication.
4. Set up the From Email Address (e.g., [noreply@example.com](mailto:noreply@example.com)).
Click **Save** to finalize the setup and then proceed.
 ### For Smtp Configuration, refer to [SMTP Configuration Guide](/smtp).
You can skip this step if email functionality is not needed and later add in
authentication tab in settings.
Finalizing Setup Once you complete the AI model setup (required) and any optional
configurations, the system will be ready for use.
✅ Required: AI Model Configuration
⚡ Optional: Storage, Connectors, SMTP
### For Smtp Configuration, refer to [SMTP Configuration Guide](/smtp).
You can skip this step if email functionality is not needed and later add in
authentication tab in settings.
Finalizing Setup Once you complete the AI model setup (required) and any optional
configurations, the system will be ready for use.
✅ Required: AI Model Configuration
⚡ Optional: Storage, Connectors, SMTP