> ## Documentation Index
> Fetch the complete documentation index at: https://docs.pipeshub.com/llms.txt
> Use this file to discover all available pages before exploring further.
# Jira Toolset
> Issue tracking and project management integration for AI agents
Jira Toolset
Issue tracking, project management, and team collaboration
Ready
Atlassian
## Overview
The Jira toolset enables AI agents to interact with your Jira workspace. Agents can create issues, search tickets, add comments, update issues, and more. This toolset is ideal for automating project management workflows and integrating Jira into conversational AI experiences.
### Key Capabilities
* **Create and manage issues** - Create new tickets, update existing ones, change status
* **Search with JQL** - Find issues using Jira Query Language
* **Comment management** - Add and retrieve comments on issues
* **Project operations** - List projects, get project metadata
* **User operations** - Search users, get current user info
***
## Available Tools
| Tool | Description | Type |
| ---------------------- | ----------------------------------------------------------------------- | ------- |
| `create_issue` | Create a new Jira issue | Action |
| `update_issue` | Update an existing issue (summary, description, status, assignee, etc.) | Action |
| `get_issue` | Get details of a specific issue | Search |
| `get_issues` | Get issues from a project | Search |
| `search_issues` | Search issues using JQL queries | Search |
| `add_comment` | Add a comment to an issue | Action |
| `get_comments` | Get comments for an issue | Search |
| `get_projects` | Get all Jira projects | Search |
| `get_project` | Get details of a specific project | Search |
| `get_project_metadata` | Get project metadata (issue types, components) | Search |
| `search_users` | Search users by name or email | Search |
| `get_current_user` | Get current authenticated user info | Search |
| `validate_connection` | Validate Jira connection status | Utility |
| `convert_text_to_adf` | Convert plain text to Atlassian Document Format | Utility |
***
## Configuration Guide
The Jira toolset supports **two authentication methods**. In both, an admin first configures the shared instance under **Workspace Settings → Actions**, then each user connects their personal account under **Your actions**.
| Method | Best for |
| ------------------- | ----------------------------------------------------------------------------------------------------------------------------- |
| **OAuth 2.0 (3LO)** | Multi-user / org-wide rollouts. One Atlassian app, per-user consent via OAuth popup. |
| **API Token** | When you cannot register an Atlassian OAuth app, or you want per-user tokens. Each user provides their own Email + API Token. |
#### Step 1: Access the Atlassian Developer Console
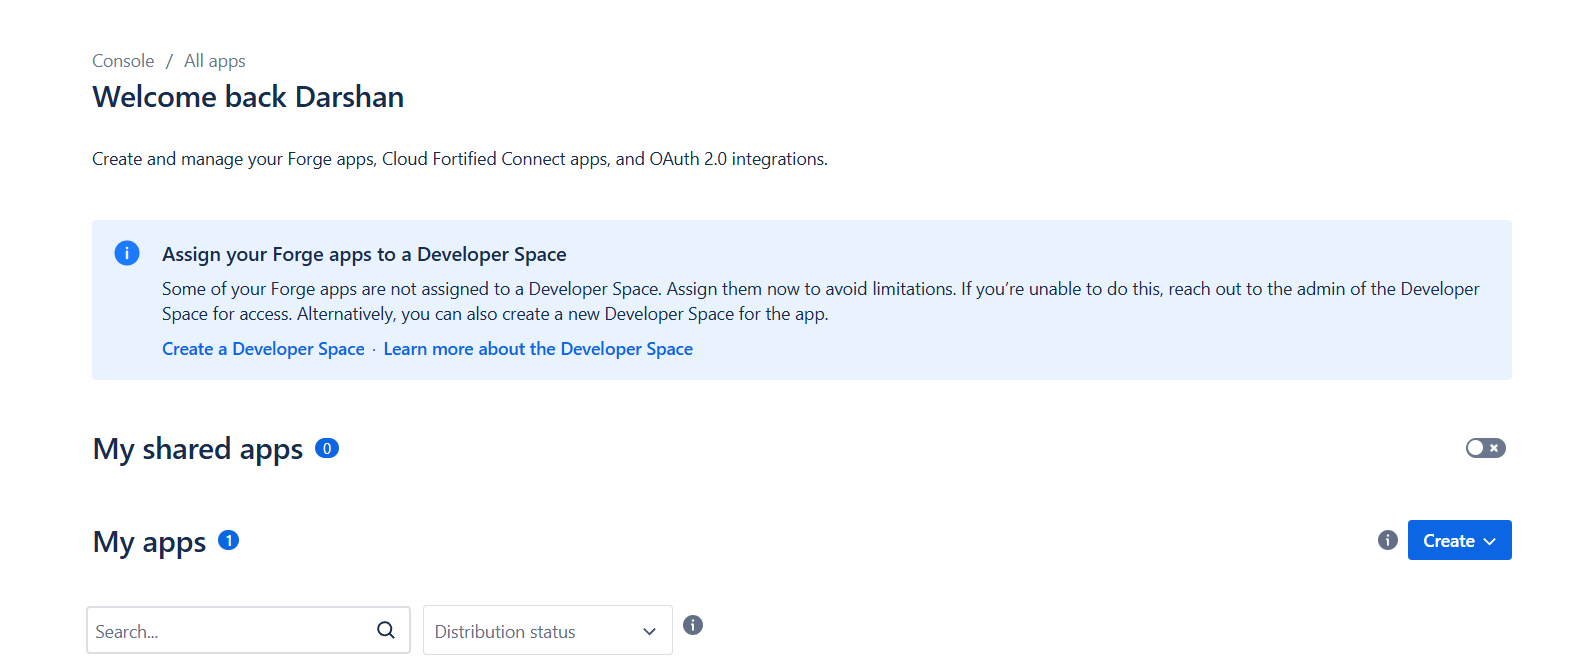
1. Go to [developer.atlassian.com/console/myapps/](https://developer.atlassian.com/console/myapps/) and sign in with your Atlassian account (must have admin access to your Jira workspace).
#### Step 2: Create an OAuth 2.0 integration
1. Click **Create** in the top-right corner.
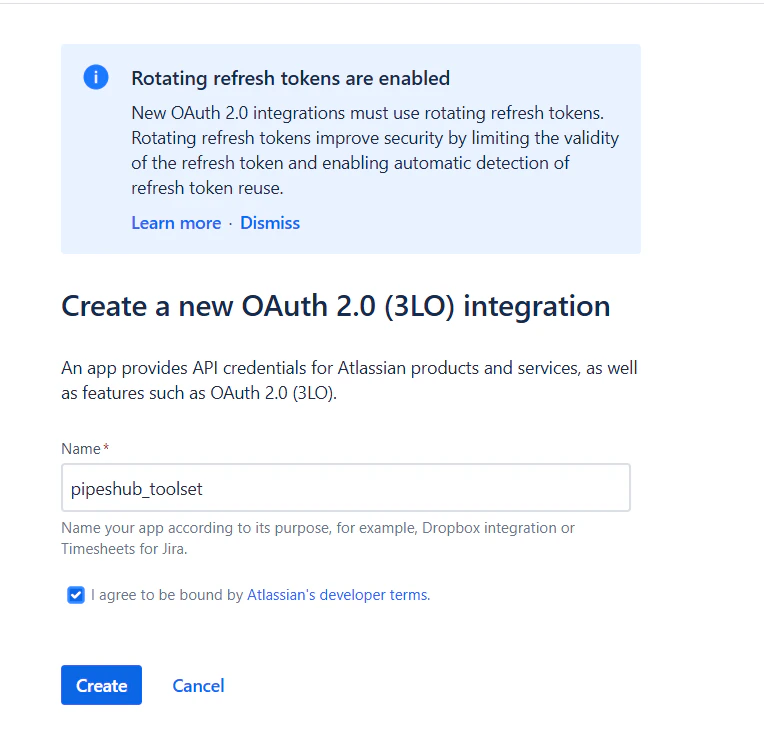
2. Select **OAuth 2.0 integration**.
3. Enter a name (e.g., `PipesHub Jira Toolset`) and accept the developer terms.
4. Click **Create**.
#### Step 3: Get the Redirect URI from PipesHub
Before configuring the Callback URL in Atlassian, copy the Redirect URI from PipesHub.
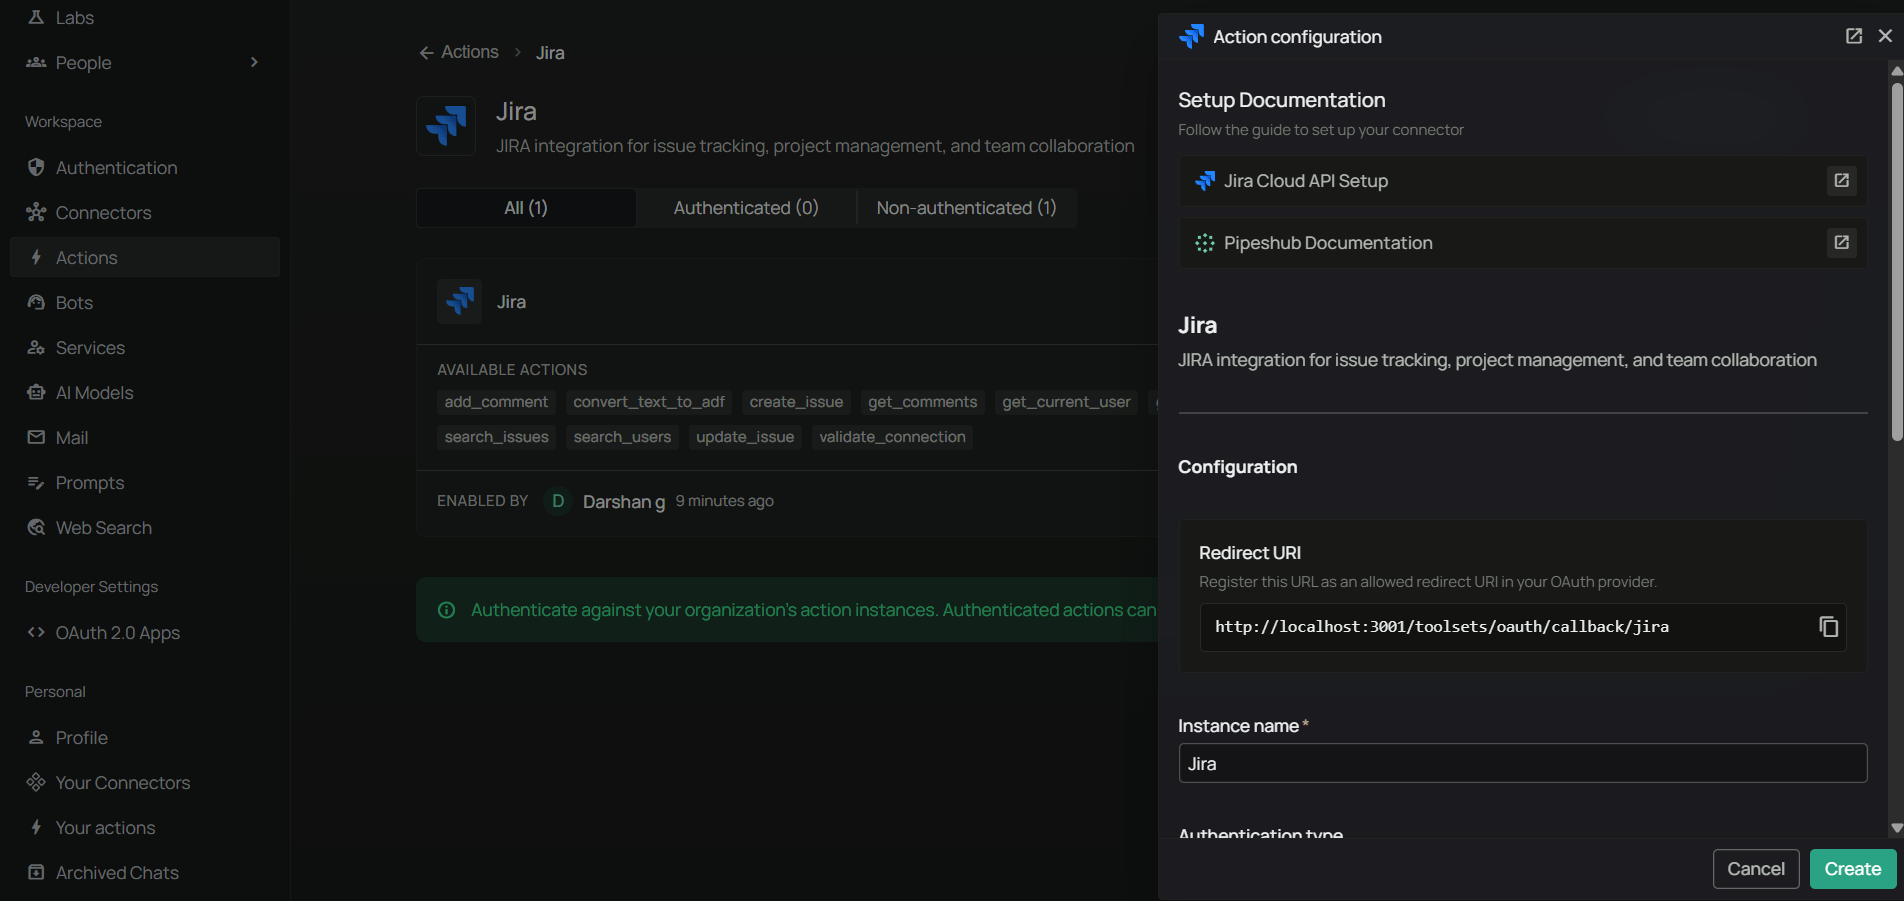
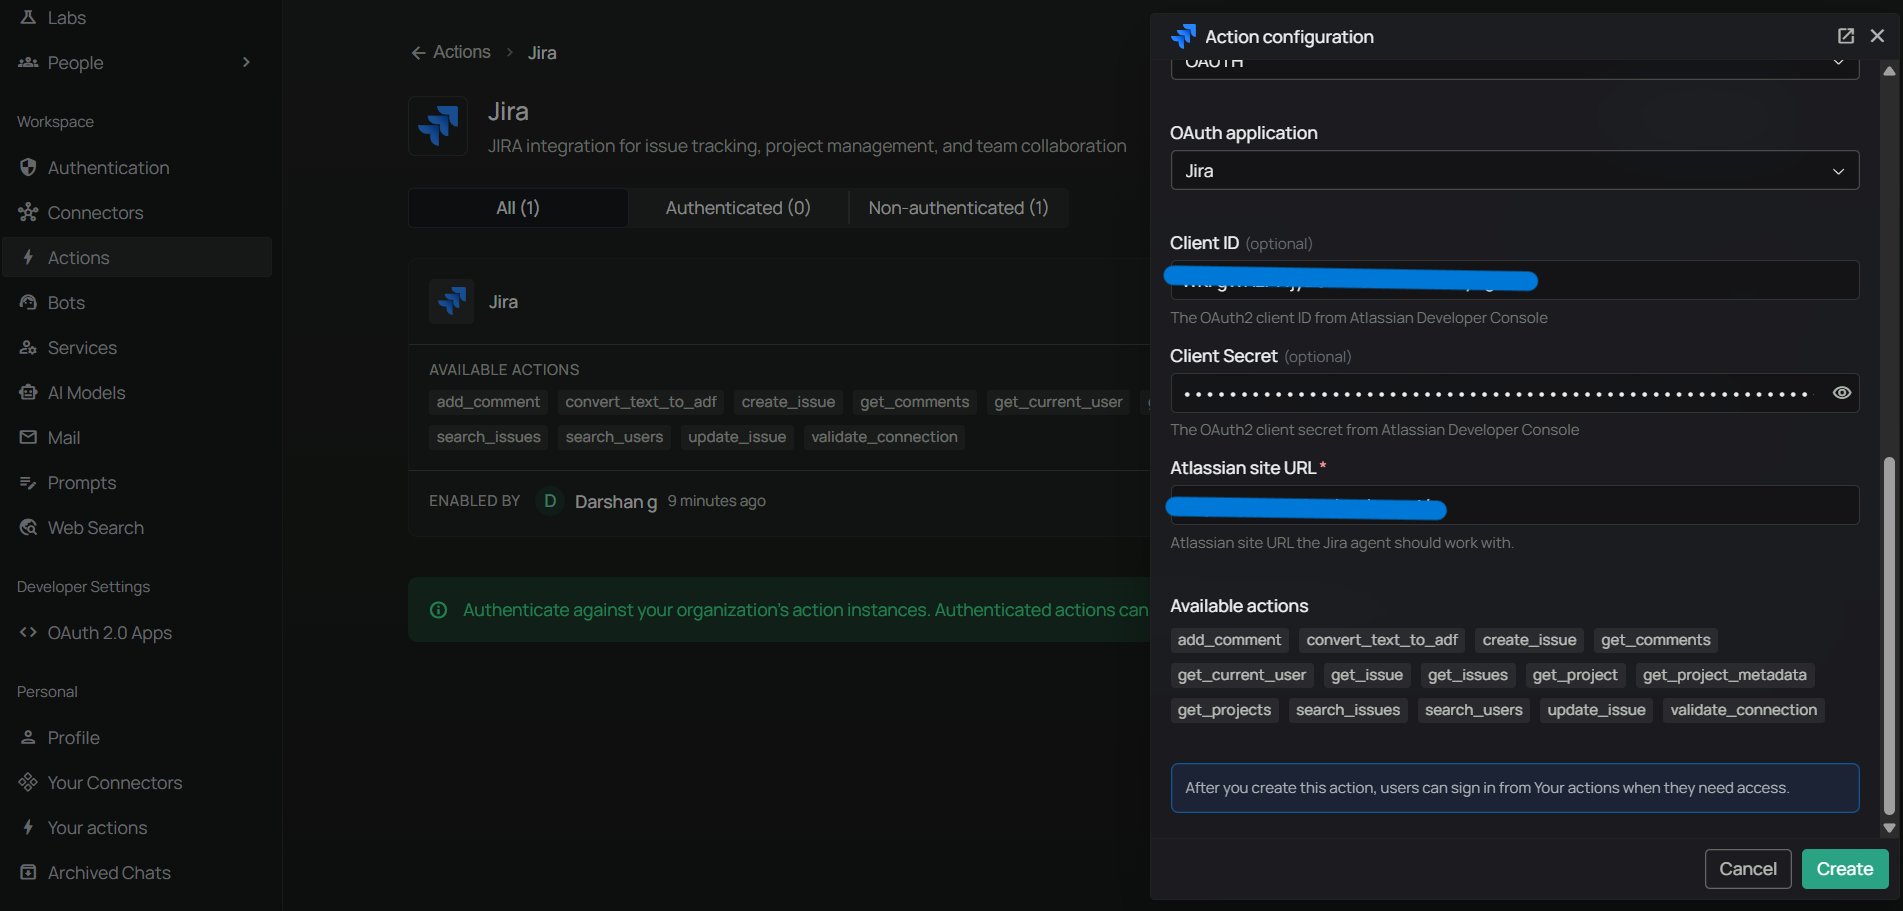
1. In PipesHub, go to **Workspace Settings** → **Actions**.
2. Find **Jira** in the list and click **+ Setup** for a new instance.
3. Copy the **Redirect URI** shown in the dialog.
#### Step 4: Configure the Callback URL in Atlassian
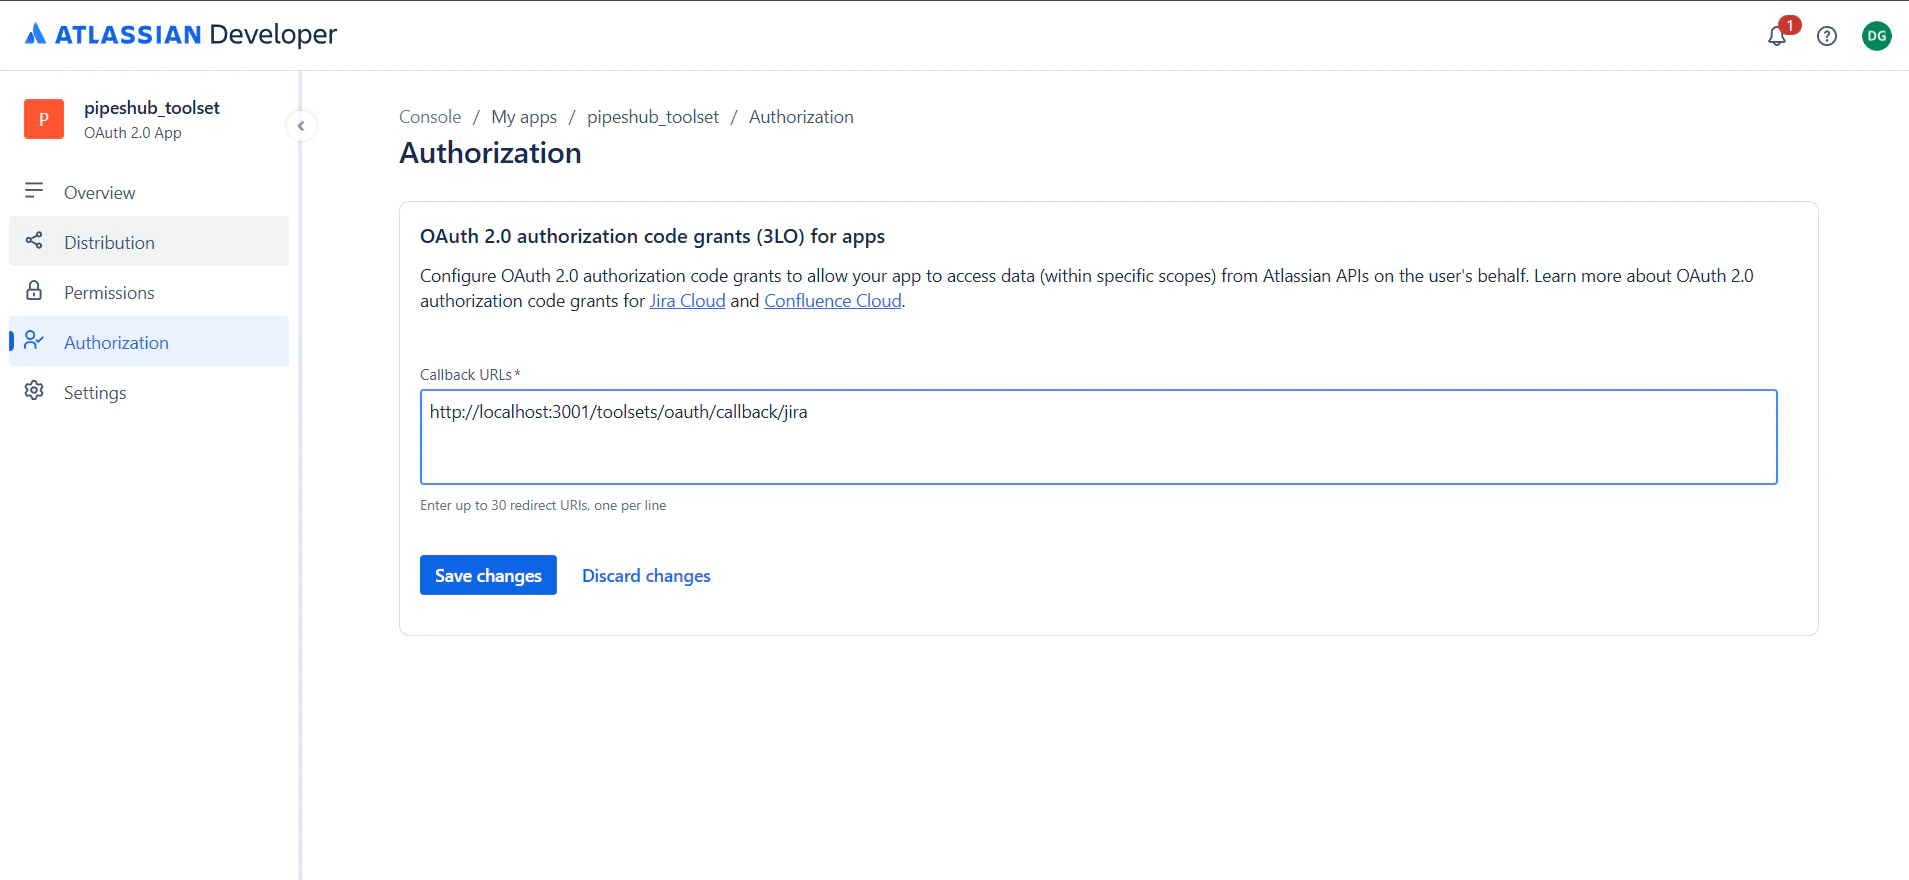
1. In Atlassian Developer Console, click **Authorization** in the left sidebar.
2. Click **Add** under **OAuth 2.0 (3LO)**.
3. Paste the Redirect URI from PipesHub into the **Callback URL** field.
4. Click **Save changes**.
The Callback URL must match exactly. Any mismatch — trailing slash, protocol, casing — will cause authentication to fail.
#### Step 5: Add required scopes
1. In the left sidebar, click **Permissions**.
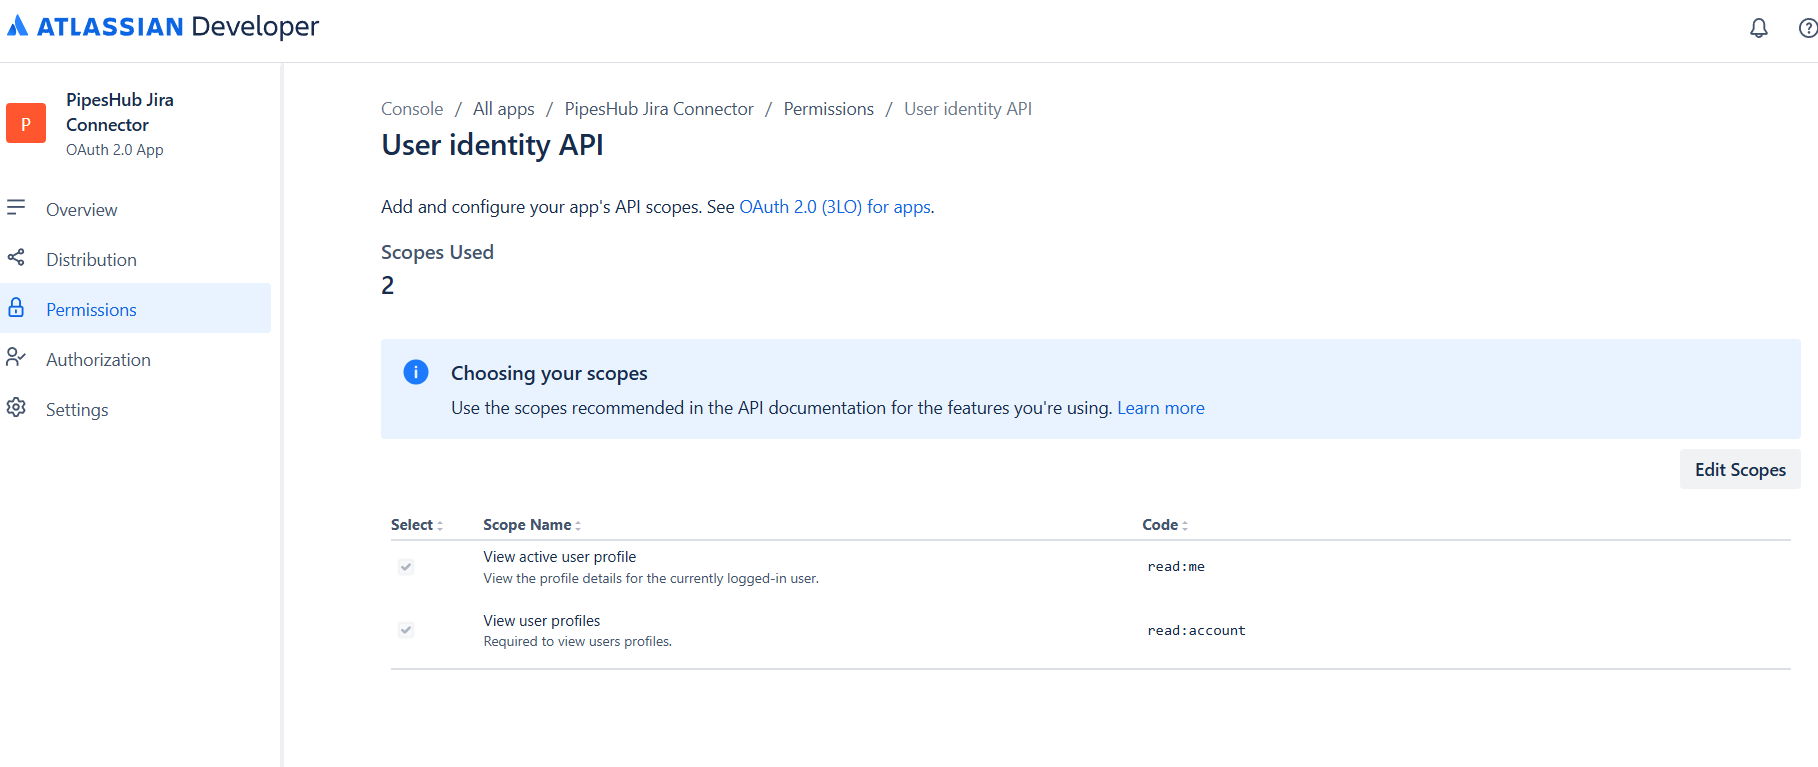
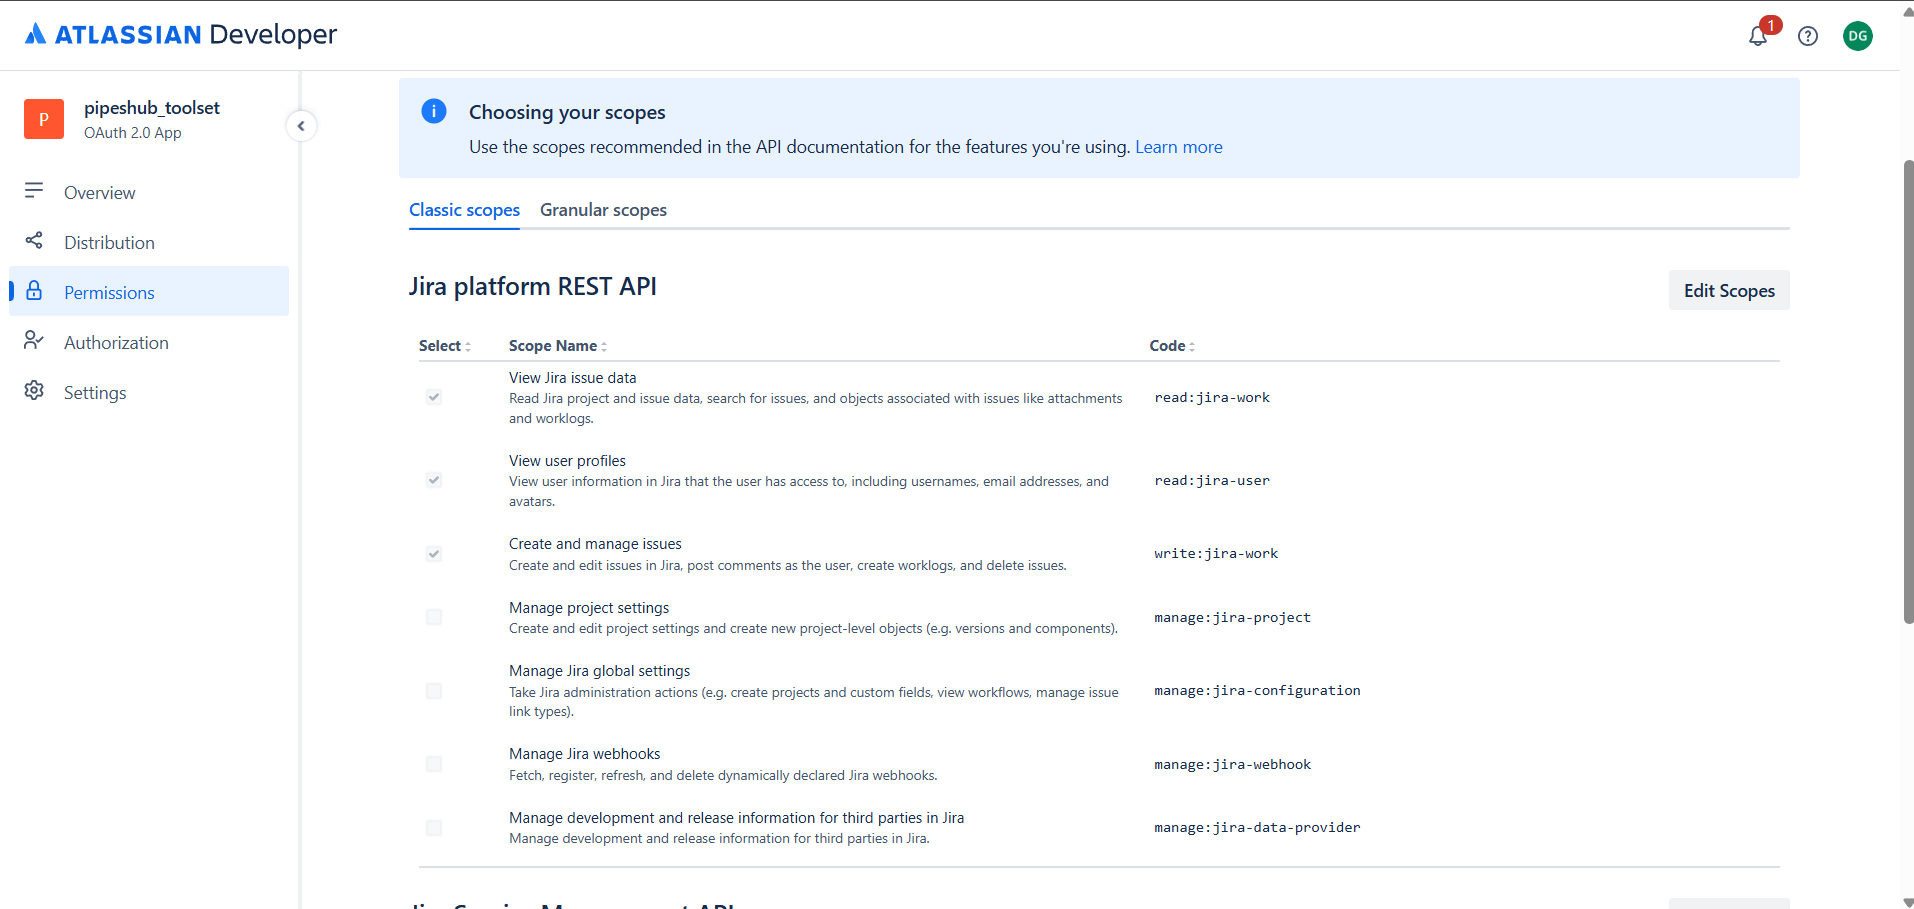
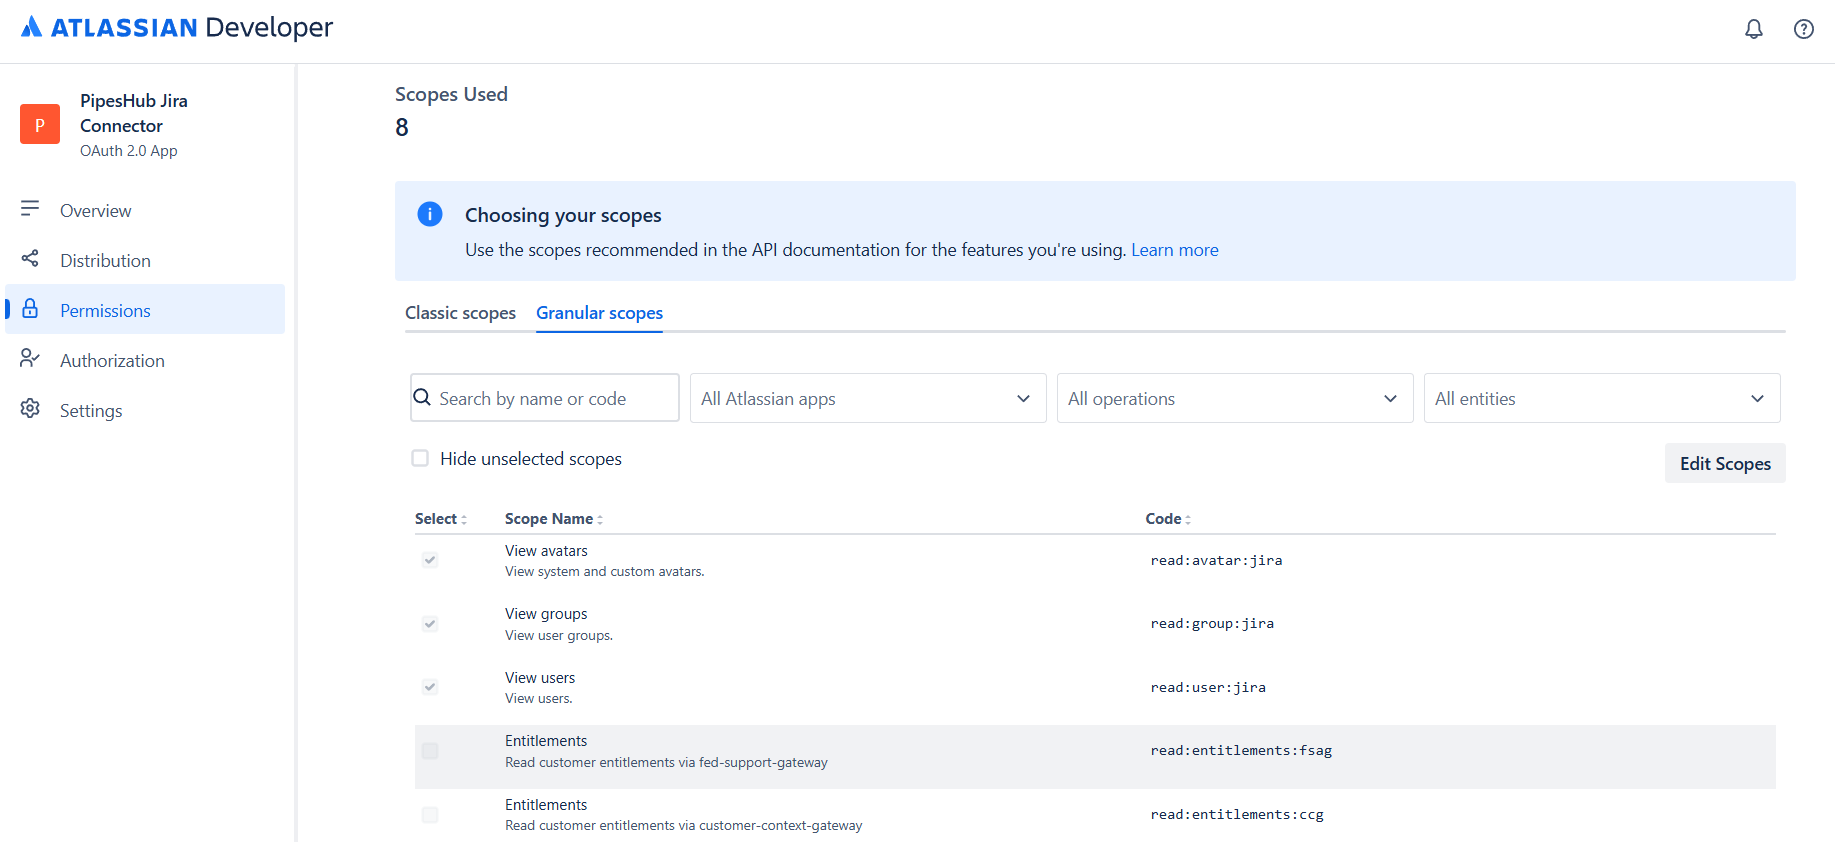
2. Add scopes for both **User identity API** and **Jira API**.
**User Identity API**
| Scope | Description |
| -------------- | ----------------------------------------------------- |
| `read:account` | View user profiles (required for user identification) |
**Jira API — Classic scopes**
| Scope | Description |
| ----------------- | -------------------------------------- |
| `read:jira-work` | Read Jira project and issue data |
| `write:jira-work` | Create and update issues, add comments |
| `read:jira-user` | Read user information |
**Jira API — Granular scopes**
| Scope | Description |
| ---------------------------- | --------------------------------------- |
| `read:user:jira` | View user details |
| `read:group:jira` | View groups and group members |
| `read:avatar:jira` | View user and project avatars |
| `read:audit-log:jira` | Read audit logs |
| `read:application-role:jira` | Read application roles |
| `read:project-role:jira` | Read project roles and role assignments |
#### Step 6: Copy Client ID and Client Secret
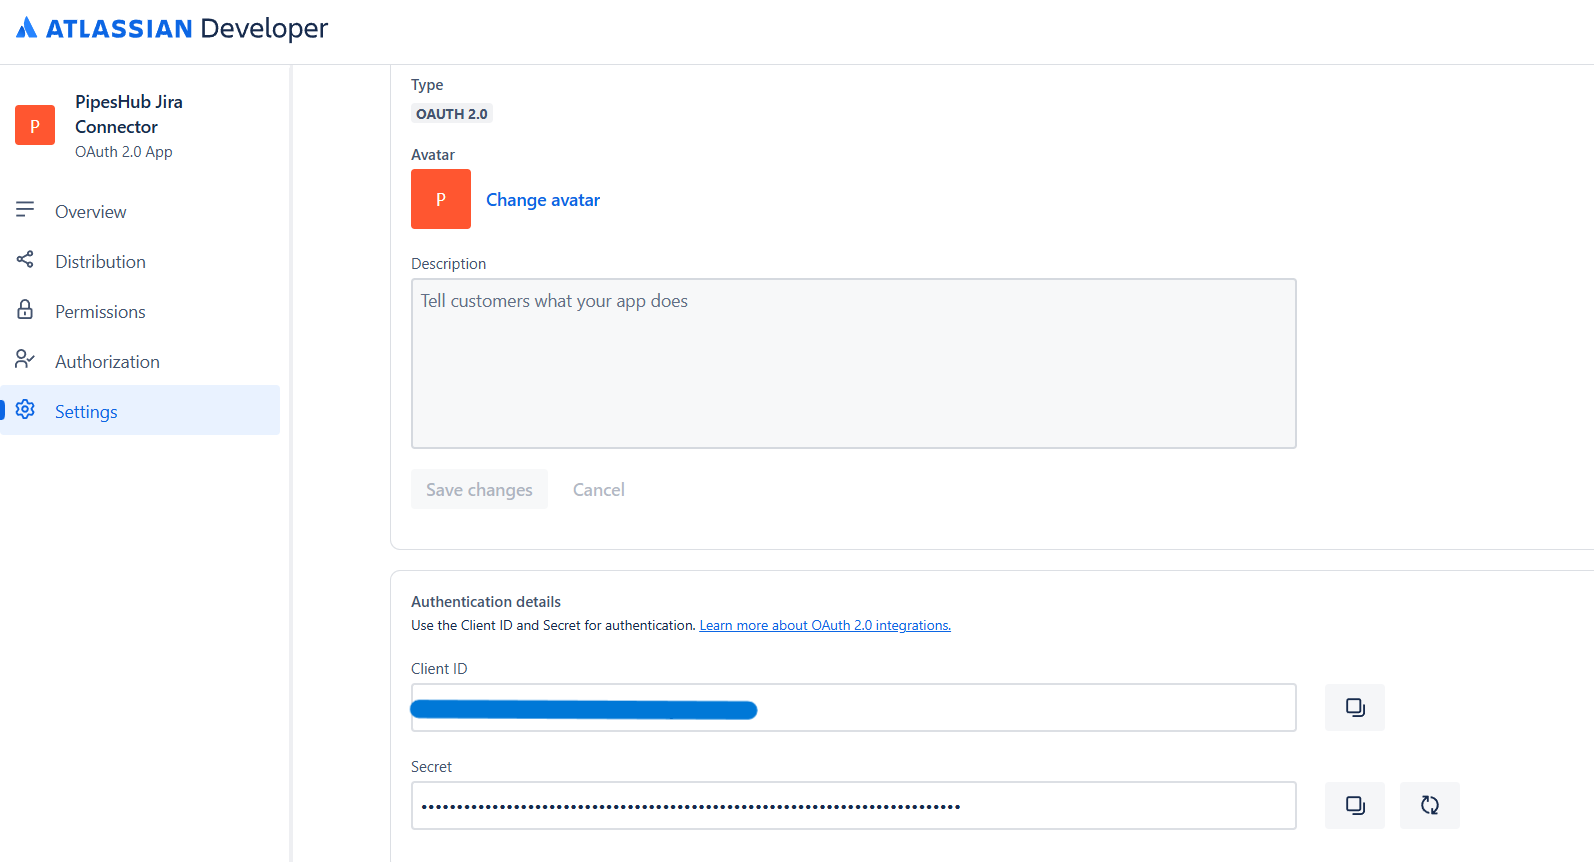
1. In the left sidebar, click **Settings**.
2. Under **Authentication details**, copy:
* **Client ID** — used as **Client ID** in PipesHub.
* **Secret** — used as **Client Secret** in PipesHub.
#### Step 7: Admin — configure the toolset in Actions
1. In PipesHub, return to **Workspace Settings** → **Actions**, find **Jira**, and reopen the setup dialog.
2. Confirm the **Redirect URI** matches the Callback URL you saved in Atlassian in Step 4.
3. Enter:
* **Instance Name** (e.g., `Jira Production`)
* **Client ID** — from Step 6
* **Client Secret** — from Step 6
* **Atlassian Site URL** — your Jira site URL (e.g., `https://your-domain.atlassian.net`; no trailing slash)
4. Click **Create**.
**Atlassian Site URL** is an org-level field — it points to the specific Jira Cloud site this toolset instance will act on. Client ID and Client Secret are the org's OAuth app credentials. Per-user tokens are issued by Atlassian when each user authenticates in the next step.
#### Step 8: Authenticate the toolset
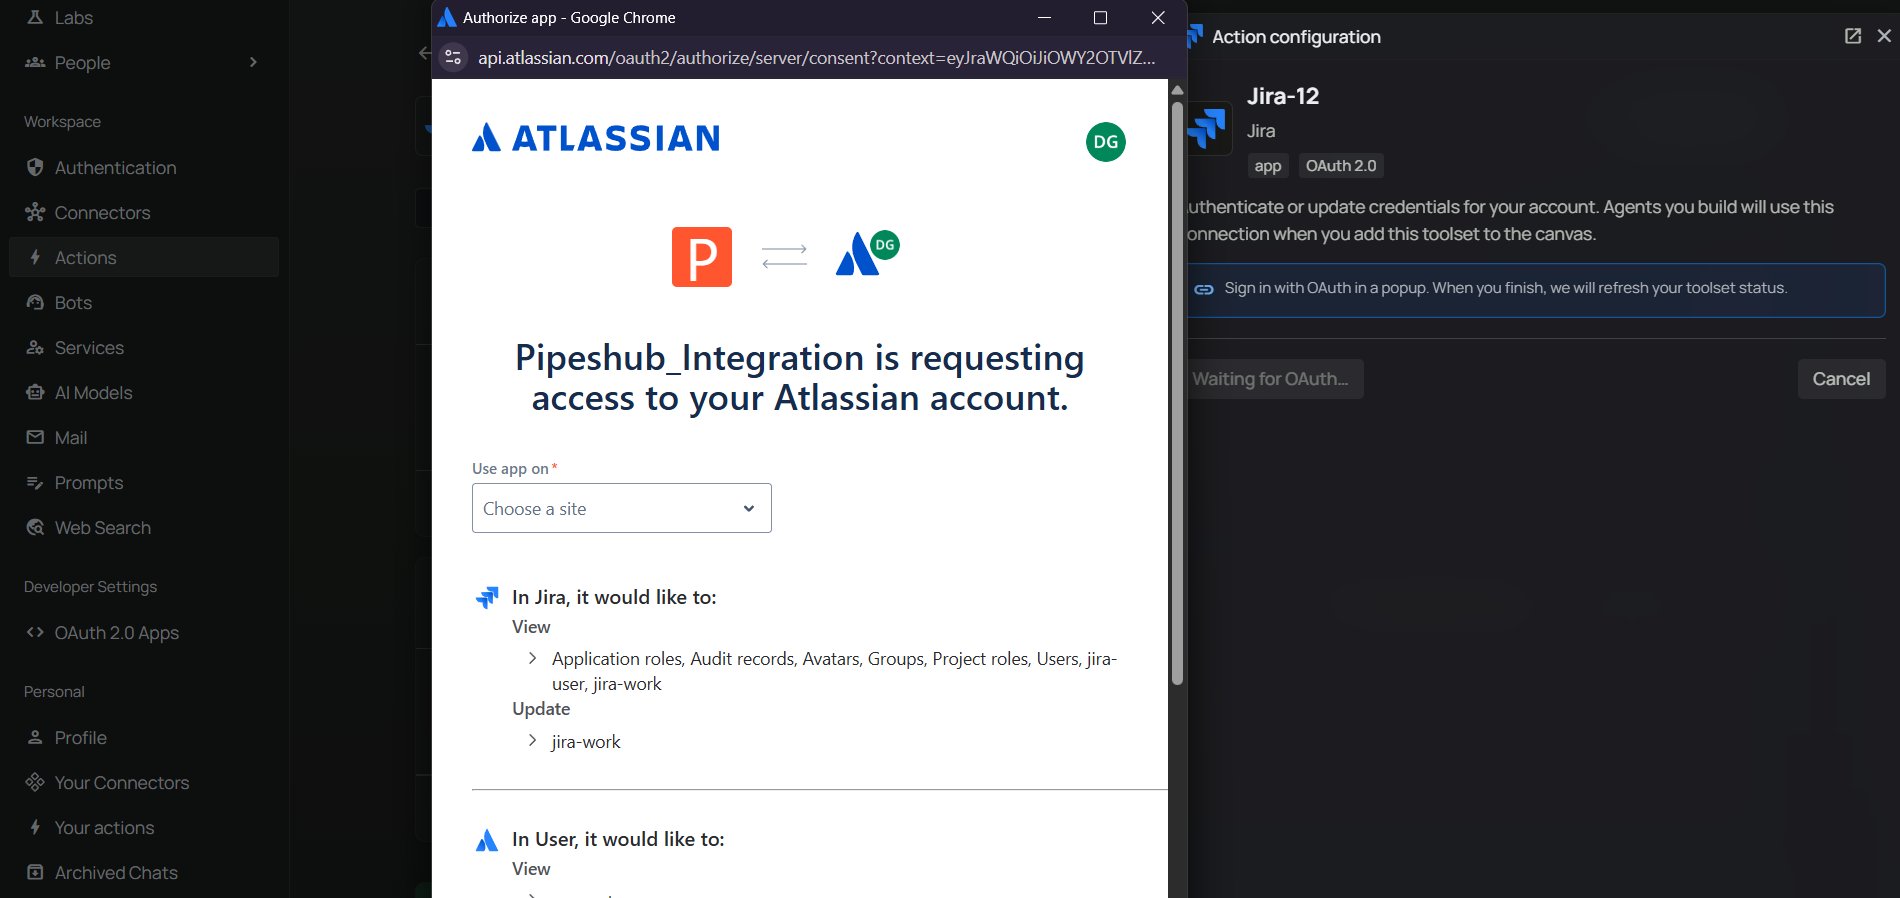
Authentication uses the same OAuth flow in either location:
* **Admins** can authenticate the shared instance directly under **Workspace Settings → Actions**.
* **Users** can authenticate their own personal instance under **Your actions** (in the **Personal** section of the sidebar).
1. On the Jira tile (in **Actions** or **Your actions**), click **Authenticate with OAuth**.
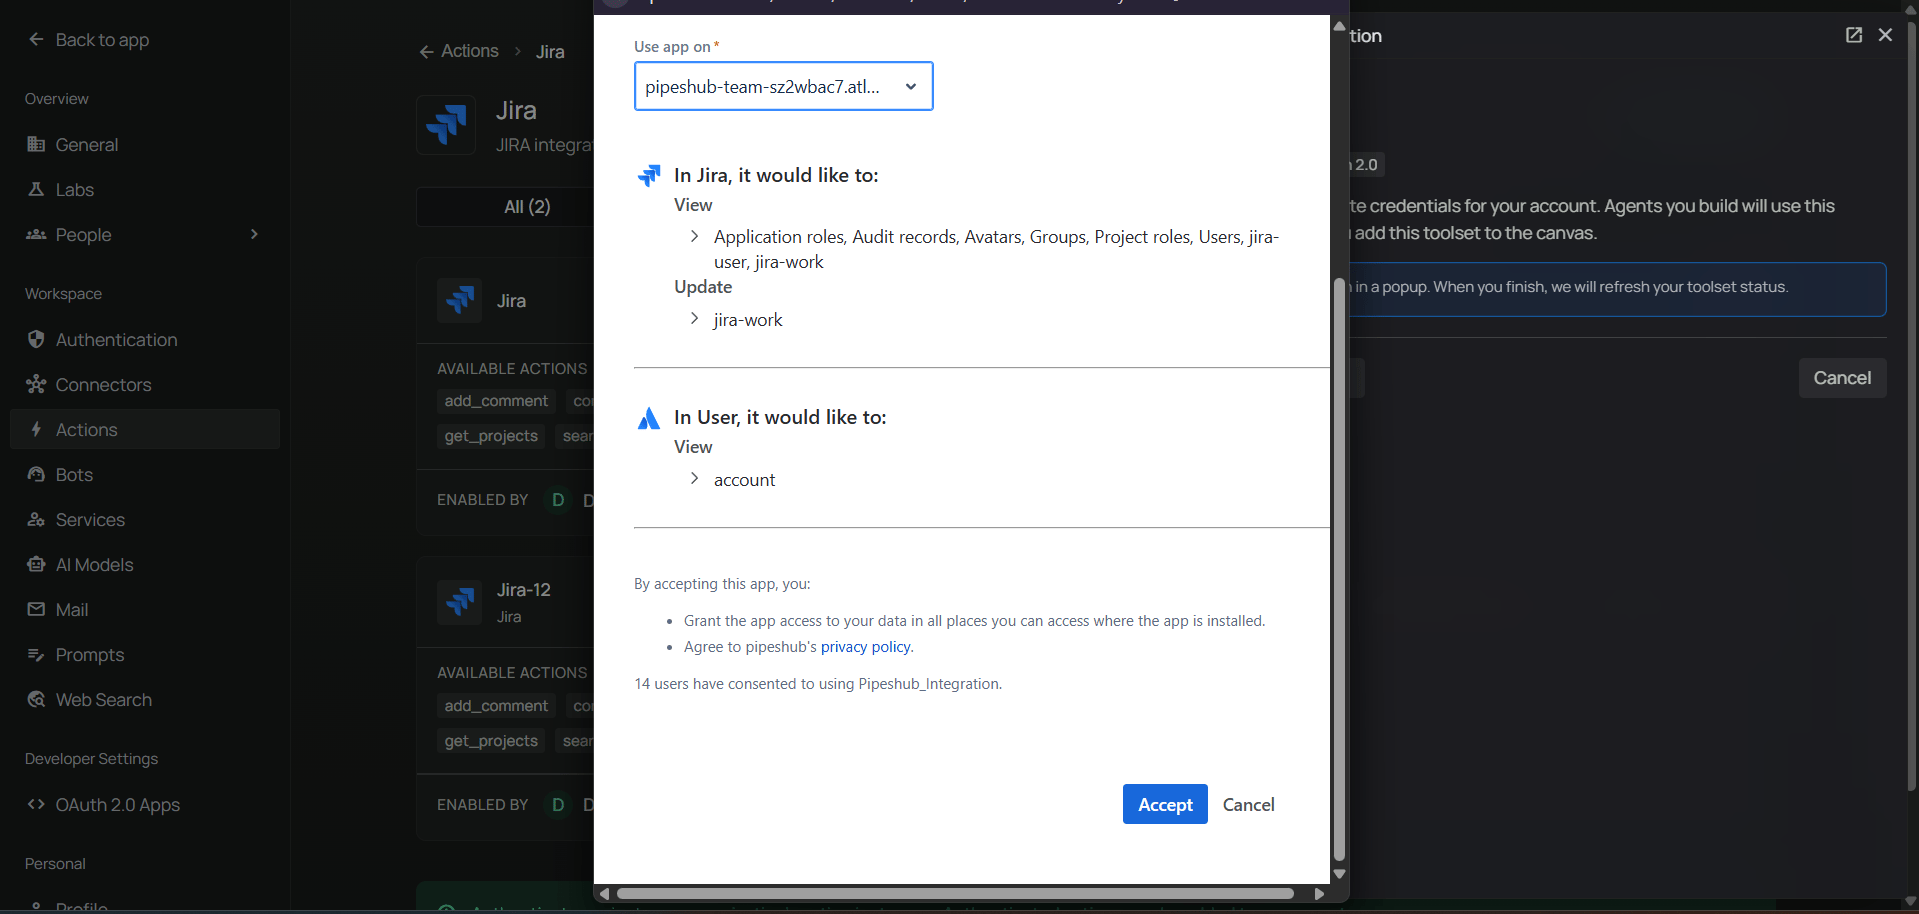
2. A popup opens to Atlassian's authorization page — select your Jira site from the dropdown.
3. Review the permissions and click **Accept**.
4. The popup closes and the Jira tile shows **Authenticated** status.
**Authorize using the same email as your PipesHub account.** Using a different email causes permission issues on the PipesHub platform.
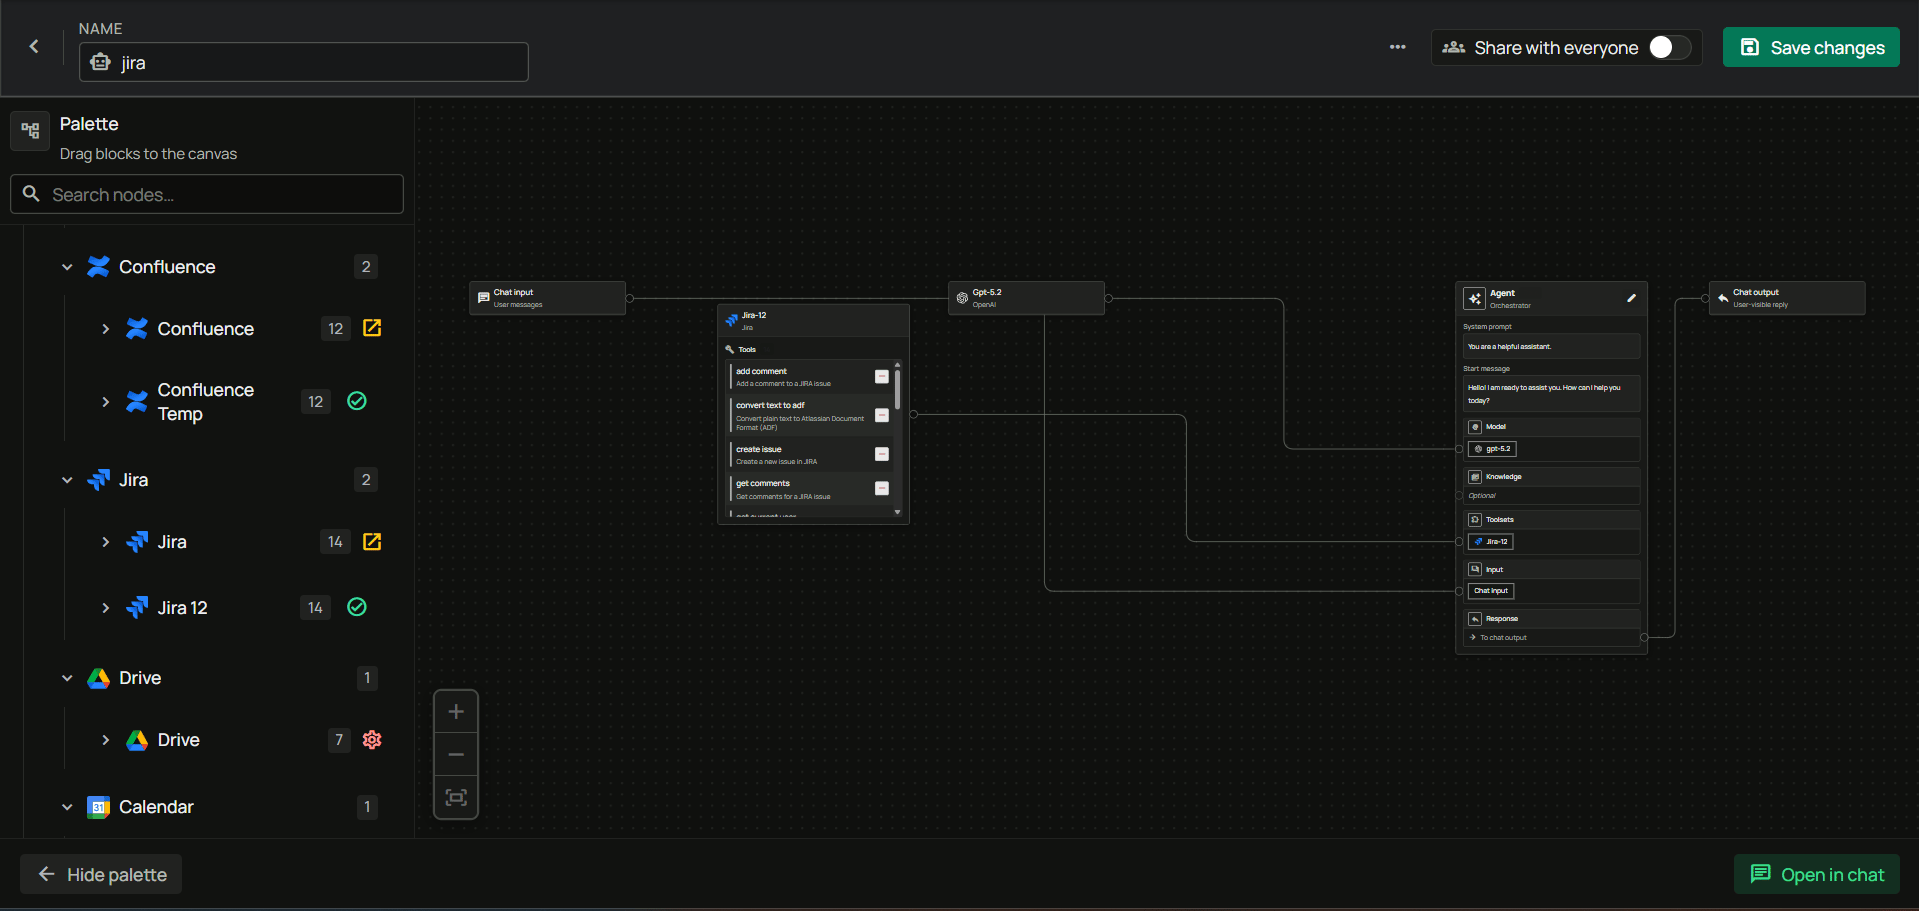
#### Step 9: Add Jira to an agent
1. Go to the **Home** page.
2. Next to **Agents**, click **+** to create a new agent.
3. Give the agent a name, drag the **Jira** toolset onto the canvas, connect it to the **Agent Core** node with your model and chat input/output, then create the agent.
The API Token method has a clear org/user split:
* **Admin** configures only the **Atlassian Site URL** under **Actions** (org-level field).
* **Each user** then opens **Your actions** and enters their own **Email** + **API Token** to authenticate the toolset for themselves.
This is different from the connector — here every user that wants to use the toolset needs their own API token, since each agent action runs under that user's identity.
#### Step 1: Each user generates an API token in Atlassian
Each user that will use the toolset must generate their own API token.
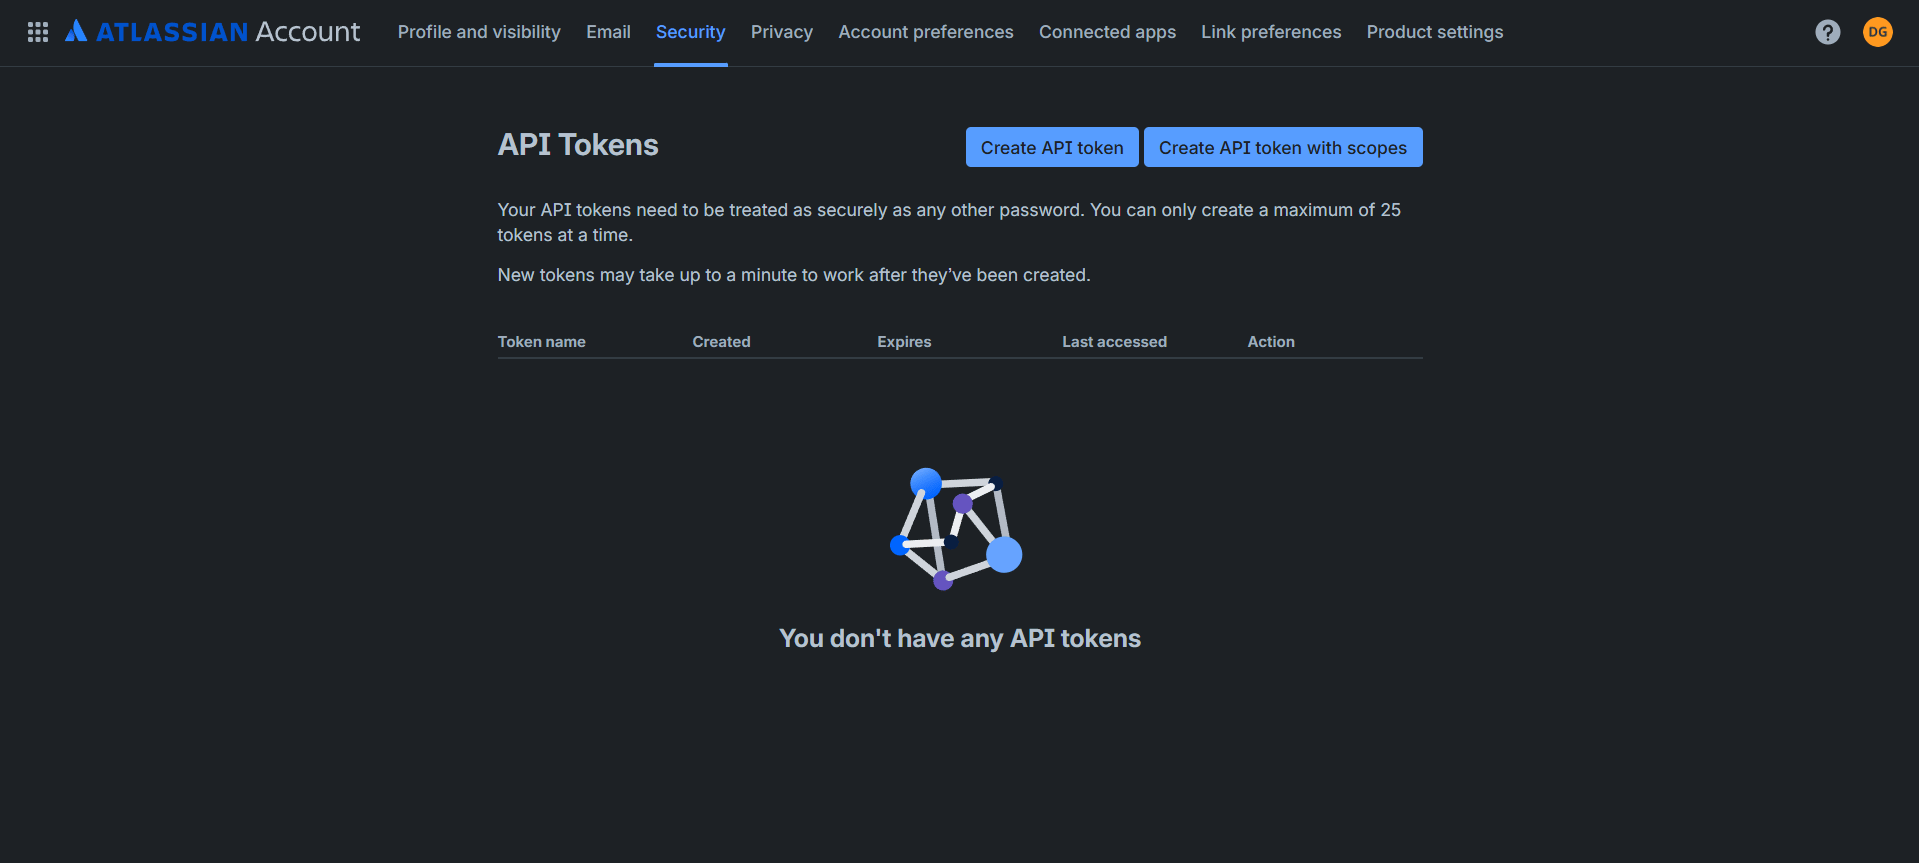
1. Sign in to [id.atlassian.com/manage-profile/security/api-tokens](https://id.atlassian.com/manage-profile/security/api-tokens).
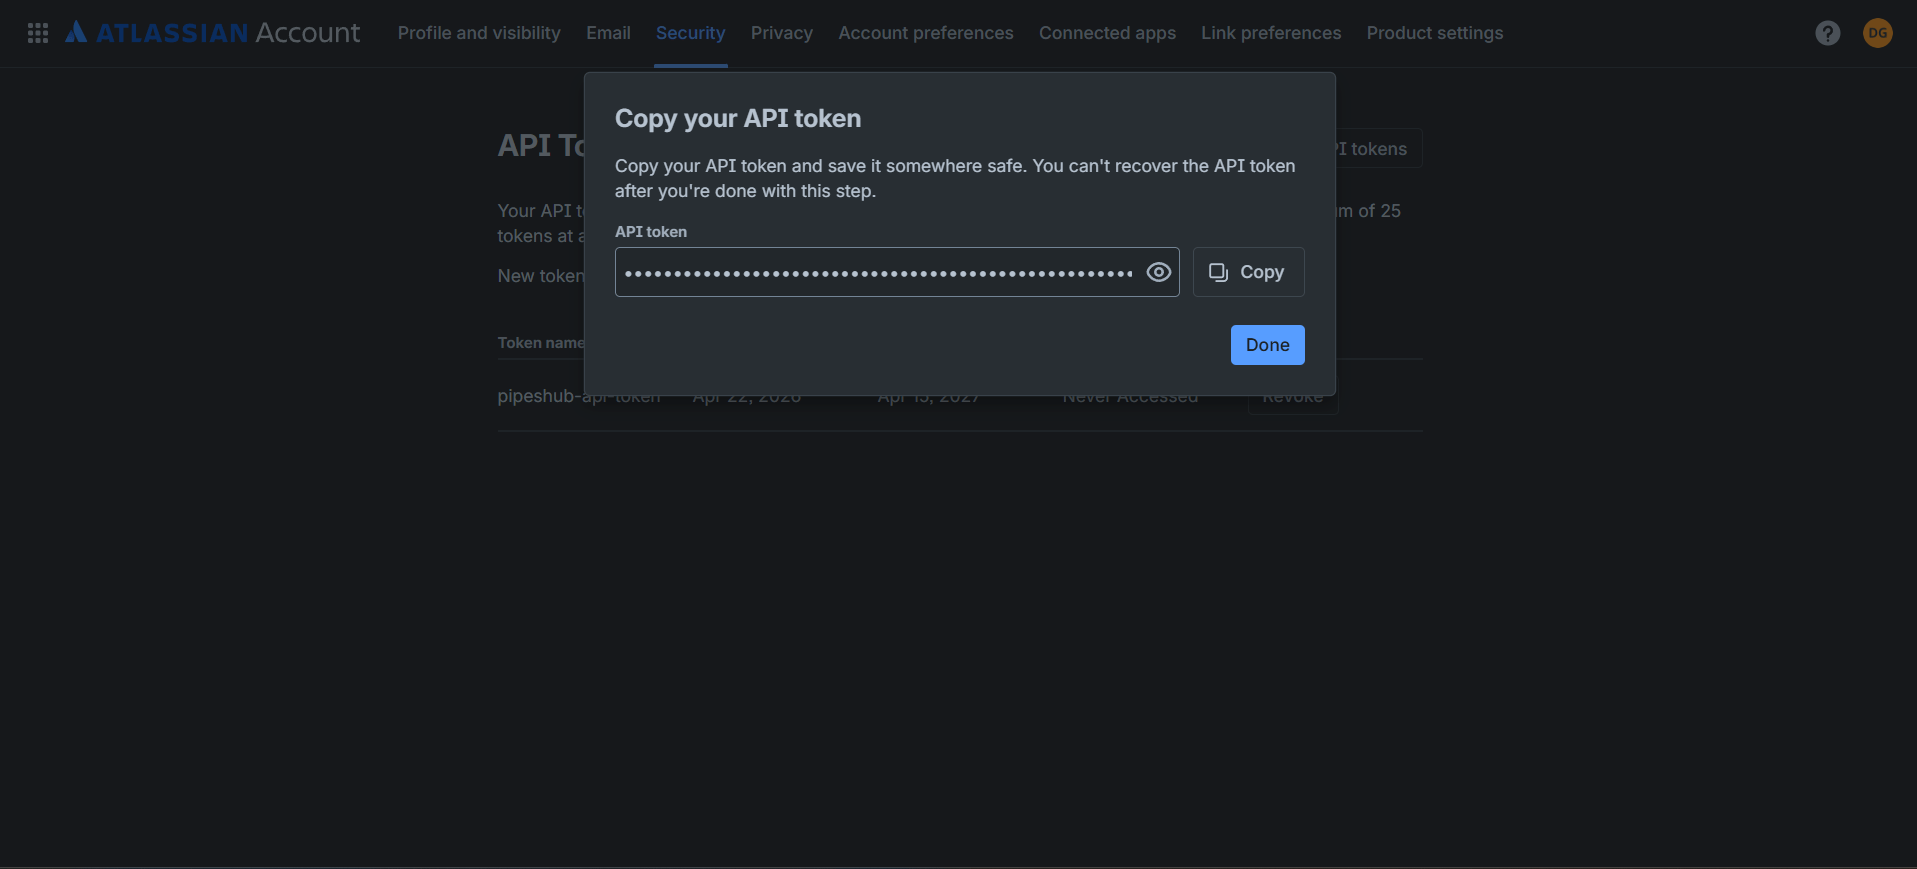
2. Click **Create API token**, set a meaningful label (e.g., `PipesHub Jira Toolset`) and an expiry if you want, then click **Create**.
3. Atlassian shows the token **once** — click **Copy** and store it securely.
The API token is shown only once. If you close the dialog without copying it, create a new token.
#### Step 2: Admin — configure the toolset instance in Actions
The admin sets up only the **org-level** field (the Atlassian Site URL). No credentials are entered here — those come from each user in the next step.
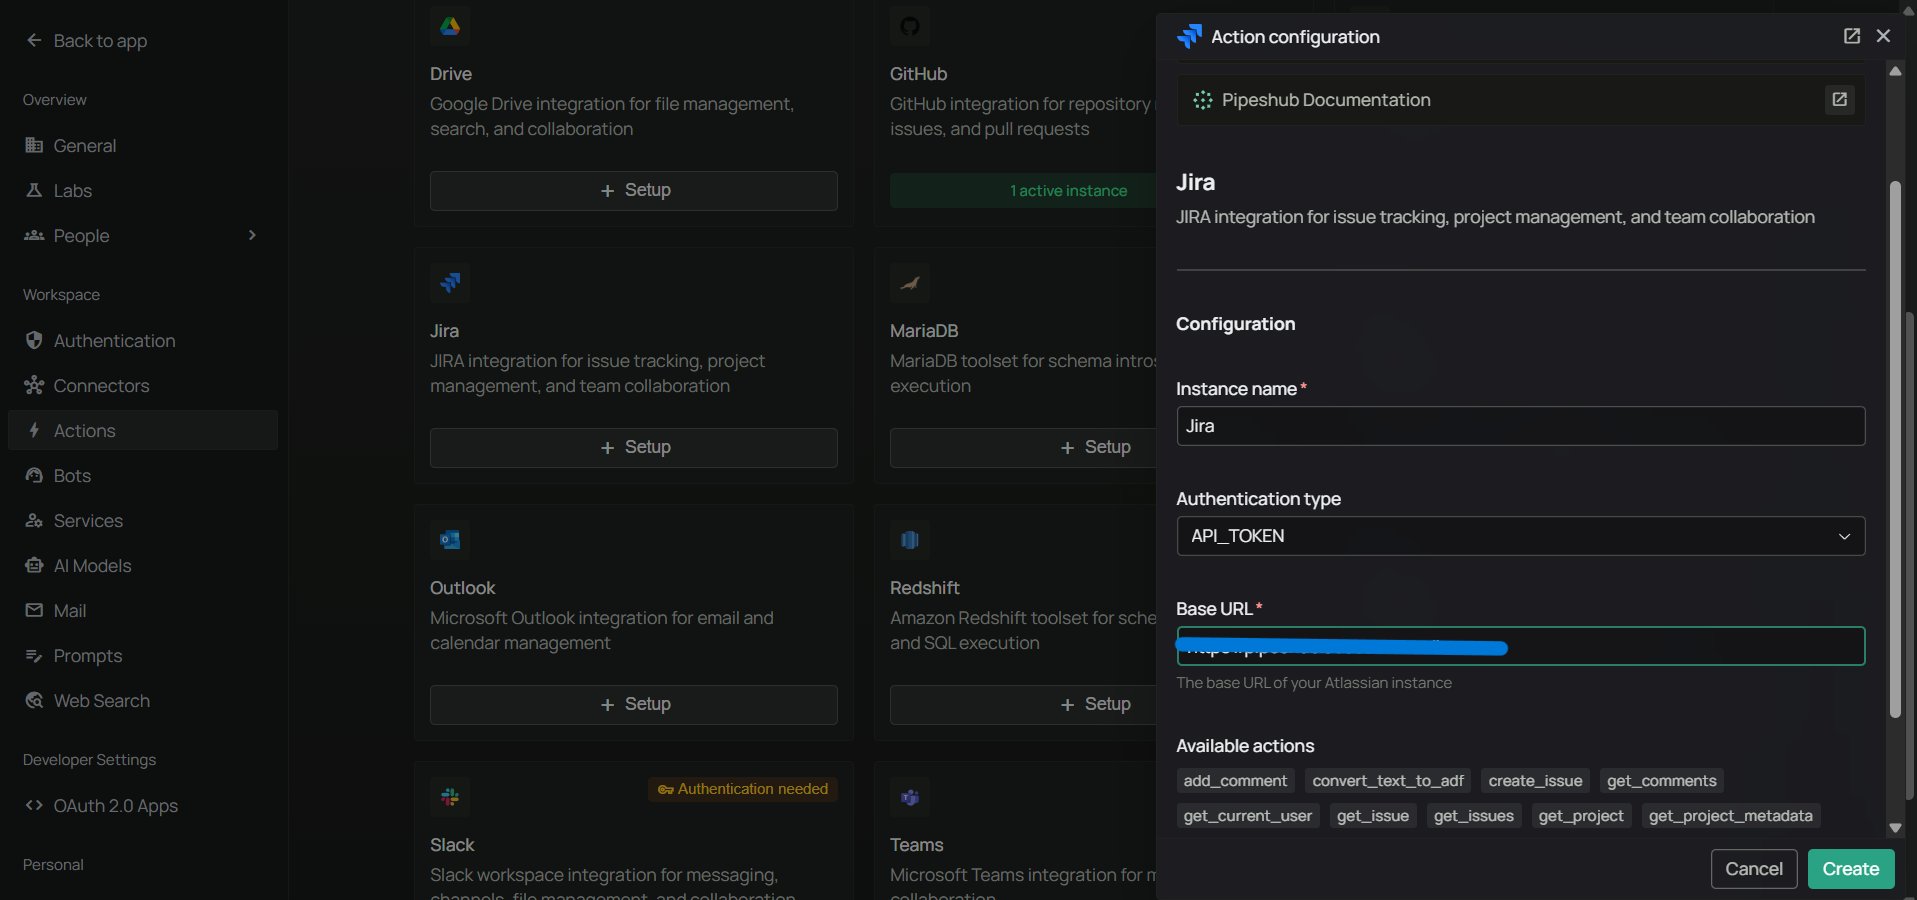
1. In PipesHub, go to **Workspace Settings** → **Actions**.
2. Find **Jira** and click **+ Setup** for a new instance.
3. In the dialog, choose **API Token** as the authentication method, then enter only:
* **Instance Name** (e.g., `Jira Production`)
* **Atlassian Site URL** — your Jira site URL (e.g., `https://your-domain.atlassian.net`; no trailing slash)
4. Click **Create**.
Clicking the instance settings later reopens this drawer where you can change **Instance Name** and **Atlassian Site URL**. A button below opens **Your actions** so each user can add their own credentials.
#### Step 3: Each user — add Email + API Token in Your actions
Each user that wants to use the toolset must complete this step with their own credentials.
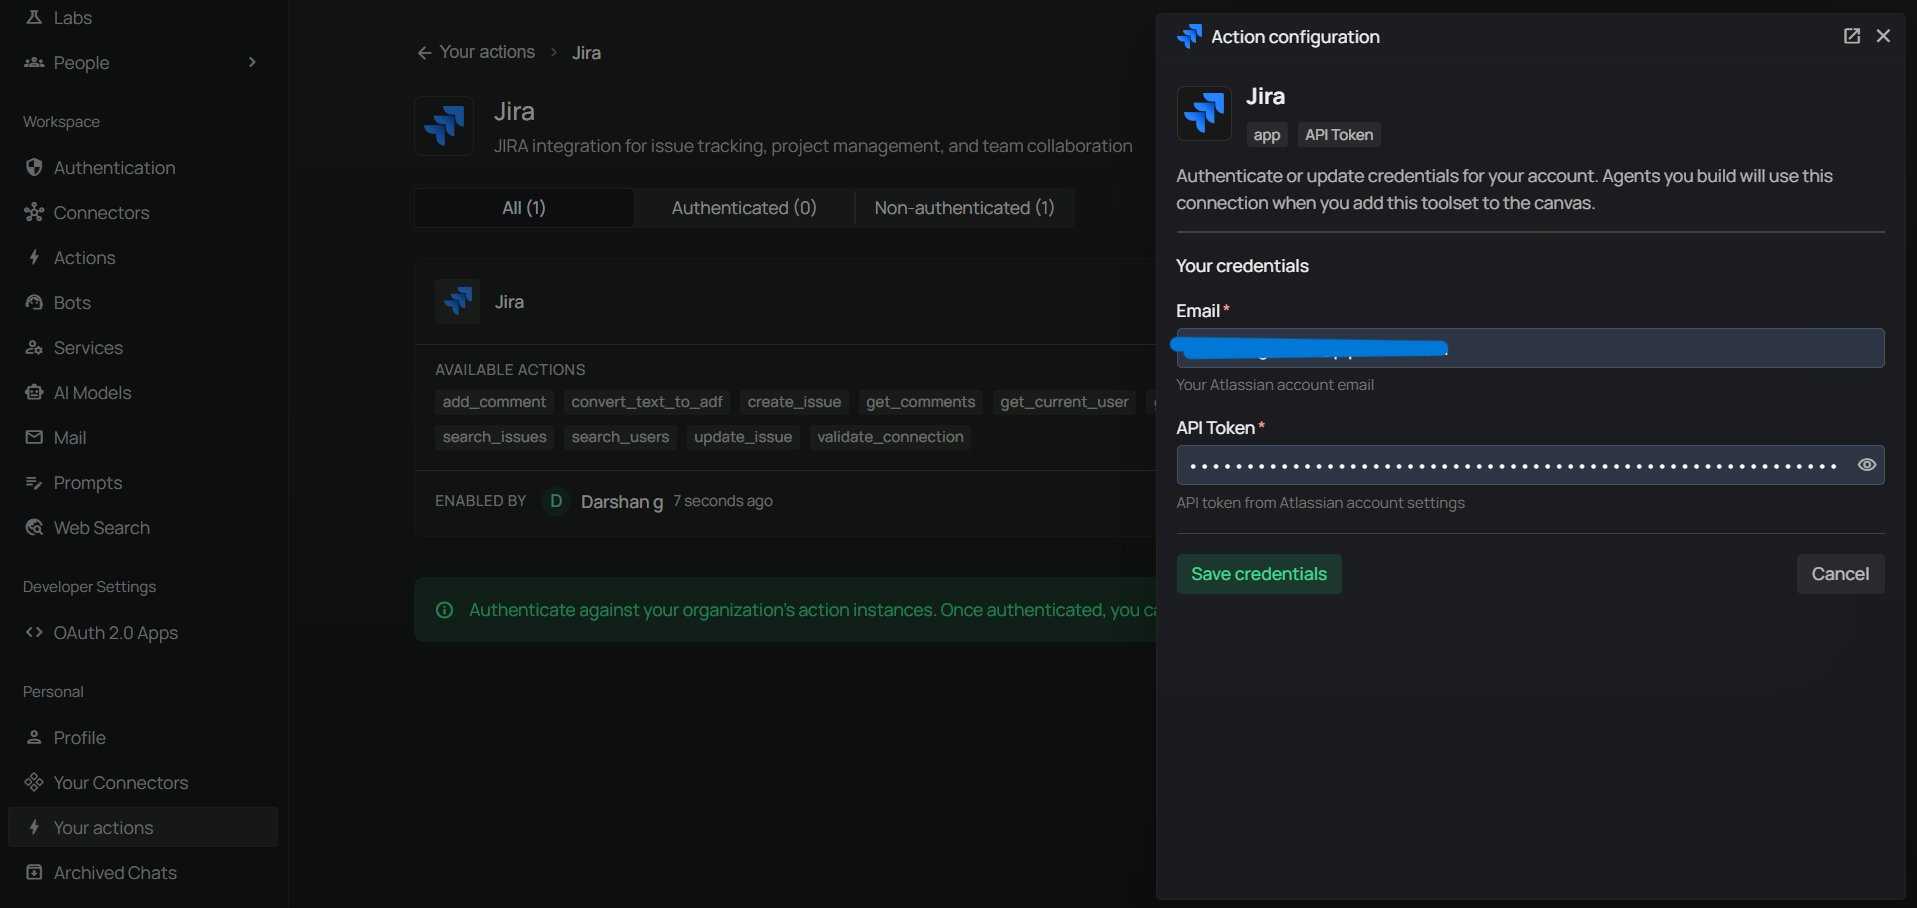
1. In PipesHub, open **Your actions** (in the **Personal** section of the sidebar).
2. Find the Jira instance and open it.
3. Enter:
* **Email** — your Atlassian account email (the account that created the API token in Step 1)
* **API Token** — the token you copied in Step 1
4. Click **Save credentials**.
The Jira tile in **Your actions** now shows **Authenticated**. The toolset is connected for this user only — every other user must repeat Step 3 with their own email + token.
The **Email** must match the Atlassian account that owns the API token. Using a different email causes authentication to fail.
#### Step 4: Add Jira to an agent
1. Go to the **Home** page.
2. Next to **Agents**, click **+** to create a new agent.
3. Give the agent a name, drag the **Jira** toolset onto the canvas, connect it to the **Agent Core** node with your model and chat input/output, then create the agent.
***
## FAQ
| | OAuth 2.0 | API Token |
| ------------------- | -------------------------------------------- | --------------------------------------------- |
| **Best for** | Multi-user / org-wide rollouts | Cases where OAuth app registration is blocked |
| **Org-level setup** | Client ID, Client Secret, Atlassian Site URL | Atlassian Site URL only |
| **Per-user setup** | OAuth popup (one click) | Each user pastes Email + API Token |
| **Prerequisites** | Atlassian Developer Console admin access | Any Atlassian account |
Choose **OAuth** for the simplest per-user experience. Choose **API Token** when you cannot register an Atlassian OAuth app or when each user wants to manage their own token (for example, to set tighter scopes or expiry).
| Aspect | Jira Connector | Jira Toolset |
| --------------- | --------------------------------------- | ------------------------------------------- |
| **Purpose** | Sync and index Jira data for search | Enable agents to perform actions in Jira |
| **Data Flow** | One-way (import data into PipesHub) | Two-way (read and write via API) |
| **When to Use** | Query/search issues, projects, comments | Create issues, update tickets, add comments |
**Example:** Use **Jira Connector** to search and retrieve existing ticket information. Use **Jira Toolset** to let agents create new issues or update ticket status.
***
When searching issues, always include a time range (e.g., "from the last 30 days" or "updated this week") to get accurate results.
***
## Usage Tips
**How do I create an issue?**\
Simply ask your agent to "create a Jira ticket" and provide the project key, title, and issue type (Task, Bug, or Story). You can also specify assignee, priority, and labels.
**How do I search for issues?**\
Ask to "find Jira issues" with specific criteria. The agent will use JQL syntax automatically. For example: "show me all in-progress issues in project PA from the last week"
**How do I assign issues?**\
You can assign by name (e.g., "assign to John Smith") or by email. The agent will look up the correct account ID automatically.
**How do I update issue status?**\
Ask to "move issue PA-123 to In Progress" or "mark PA-456 as Done". Common statuses include "To Do", "In Progress", and "Done".