> ## Documentation Index
> Fetch the complete documentation index at: https://docs.pipeshub.com/llms.txt
> Use this file to discover all available pages before exploring further.
# Toolsets Overview
> Connect your AI agents to external applications with toolsets
🔧
PipesHub Toolsets
Give your AI agents the ability to interact with external applications
## What are Toolsets?
Toolsets are collections of tools that enable AI agents to **perform actions** in external applications. Each toolset provides a set of actions (tools) that agents can use to read data, create content, and perform operations in connected services.
**Use Toolsets when you want agents to take action on data** — sending emails, creating tickets, updating documents, or modifying content in external services.
**Key characteristics:**
* **Two-way API access** - Read and write data in real-time
* **Action-oriented** - Send emails, create tickets, update documents
* **OAuth callback URL required** - Secure authorization flow
* **Instant execution** - Actions happen immediately when agents invoke tools
Unlike **Connectors** (which index data for querying and search), **Toolsets** provide real-time API access for performing actions.
Need to search or query through documents or emails? You need [**Connectors**](/connectors/overview) instead. Connectors index data for knowledge retrieval, while Toolsets enable actions.
**When you want to use both Connector and Toolset:** In the Agent Builder add nodes from **Knowledge** (Collections, API Apps) for document search and context retrieval, and add nodes from **Tools** for performing actions. Connect both to your Agent Core so the agent can search context and take action in the same conversation.
| Feature | Connectors | Toolsets |
| ------------- | ------------------------------ | ----------------------- |
| **Purpose** | Sync and index data for search | Perform actions via API |
| **Data Flow** | One-way (import) | Two-way (read/write) |
| **Use Case** | Query/search data | Actions on data |
| **Real-time** | Periodic sync | Instant API calls |
## Available Toolsets
### Google Workspace
| Toolset | Description | Auth Type |
| ----------------------------------------------- | ----------------------- | --------- |
| [Gmail](/toolsets/google-workspace/gmail) | Send and manage emails | OAuth 2.0 |
| [Calendar](/toolsets/google-workspace/calendar) | Manage calendar events | OAuth 2.0 |
| [Drive](/toolsets/google-workspace/drive) | Access and manage files | OAuth 2.0 |
### Atlassian
| Toolset | Description | Auth Type |
| --------------------------------------------- | ------------------------------------- | --------- |
| [Jira](/toolsets/jira/jira) | Issue tracking and project management | OAuth 2.0 |
| [Confluence](/toolsets/confluence/confluence) | Wiki and documentation | OAuth 2.0 |
### Microsoft 365
| Toolset | Description | Auth Type |
| ------------------------------------------- | ----------------------------------------------------------------- | --------- |
| [Microsoft Teams](/toolsets/ms-teams/teams) | Teams channels, chats, meetings, and calendar via Microsoft Graph | OAuth 2.0 |
### Slack
| Toolset | Description | Auth Type |
| ------------------------------ | -------------------------------- | --------- |
| [Slack](/toolsets/slack/slack) | Team messaging and collaboration | OAuth 2.0 |
### Database
| Toolset | Description | Auth Type |
| ------------------------------------ | -------------------------------------- | ---------- |
| [MariaDB](/toolsets/mariadb/mariadb) | Schema introspection and SQL execution | Basic Auth |
***
## Configuring Toolsets
### Step 1: Navigate to Toolsets Settings
1. Click on your **Connector Settings** in the navigation
2. Go to **Settings** in the sidebar
3. Click **Toolsets**
### Step 2: Browse Available Toolsets
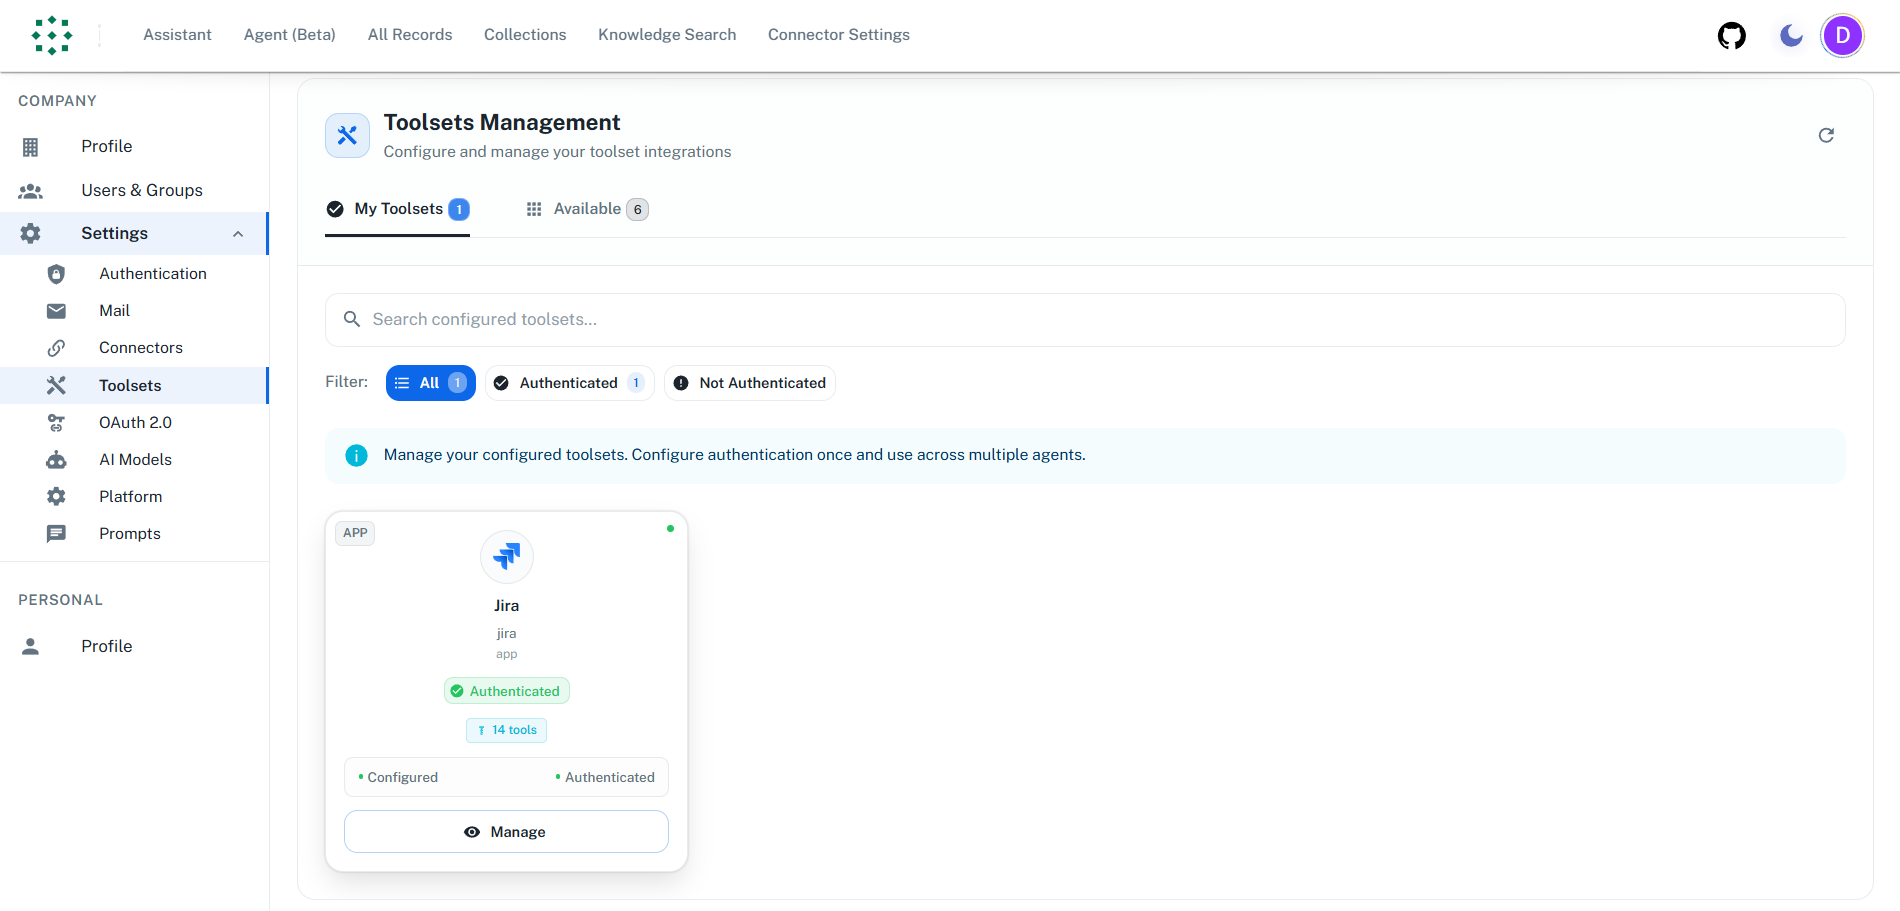
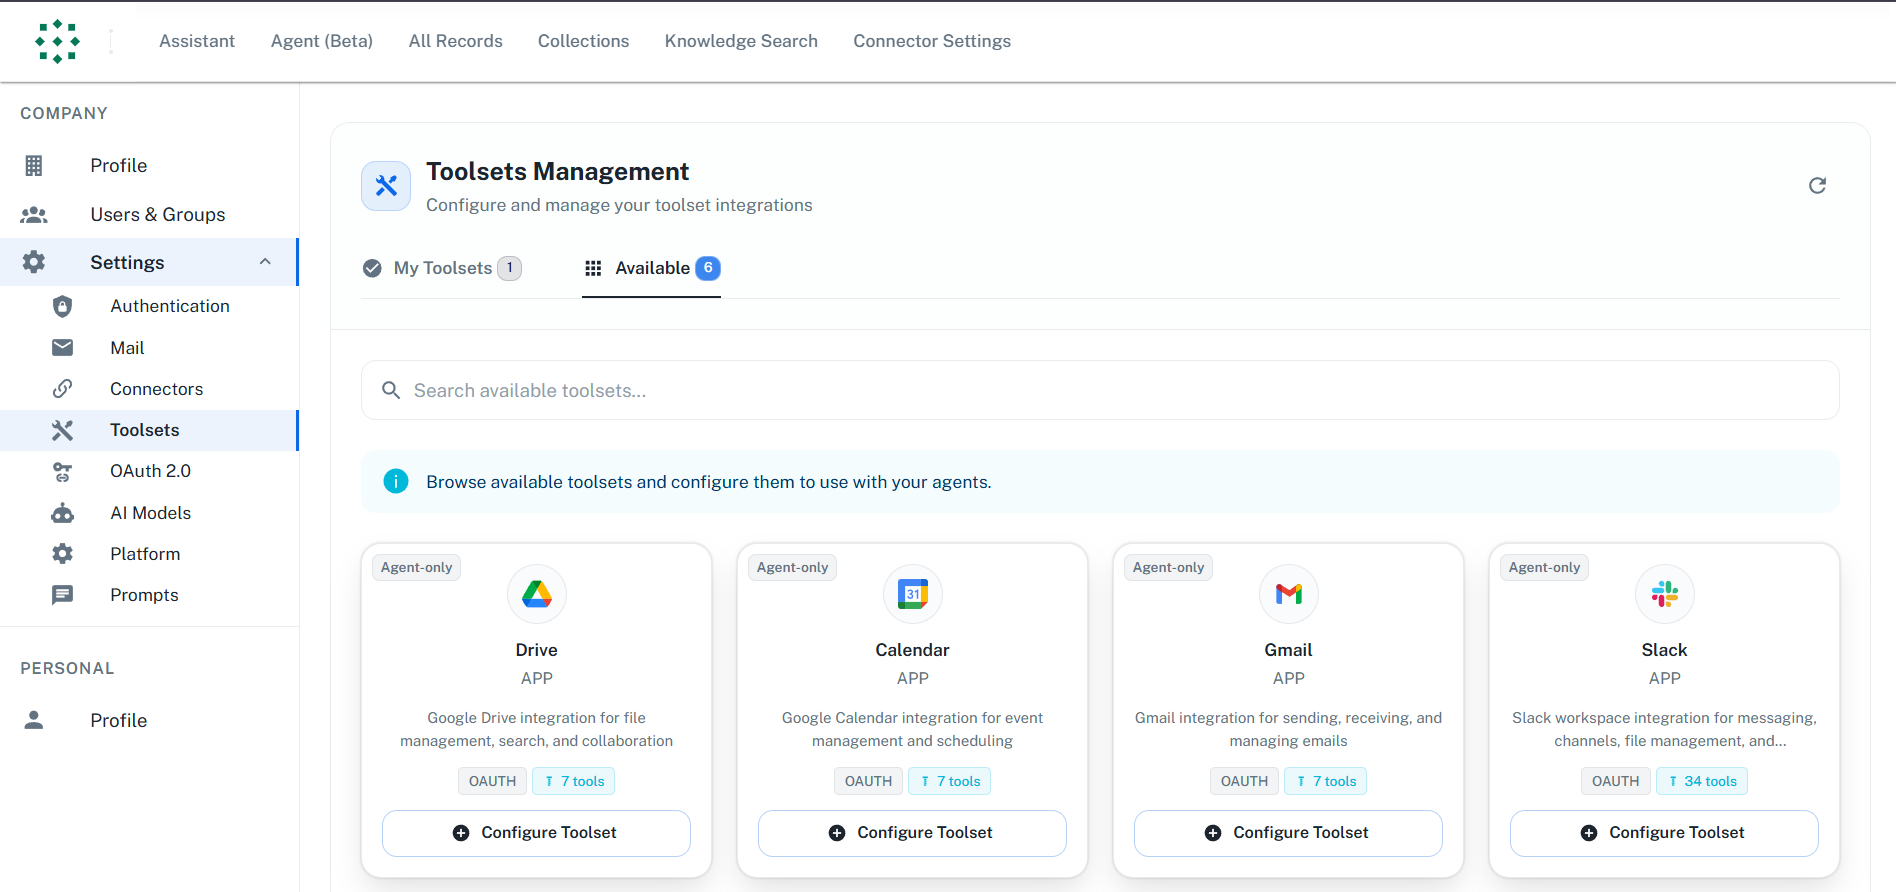
The Toolsets page has two tabs:
* **My Toolsets** - Toolsets you've already configured
* **Available** - All available toolsets ready to configure
### Step 3: Configure a Toolset
1. Find the toolset you want to configure in the **Available** tab
2. Click the **"Configure"** button on the toolset card
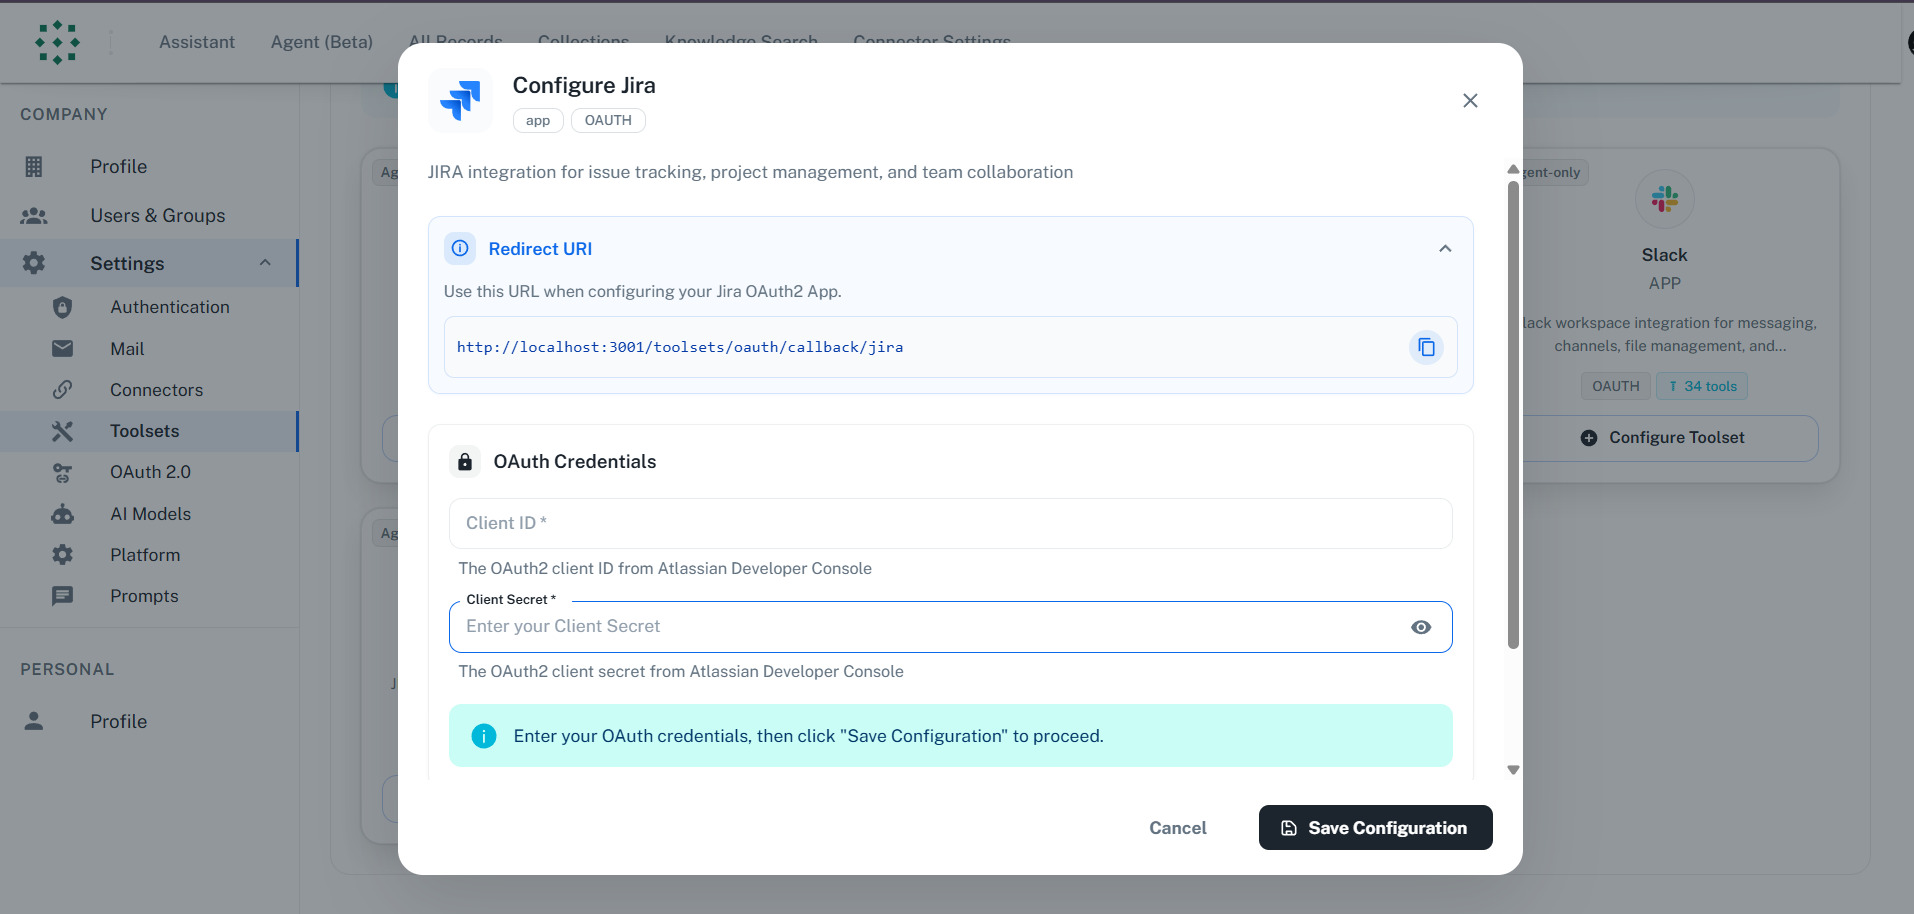
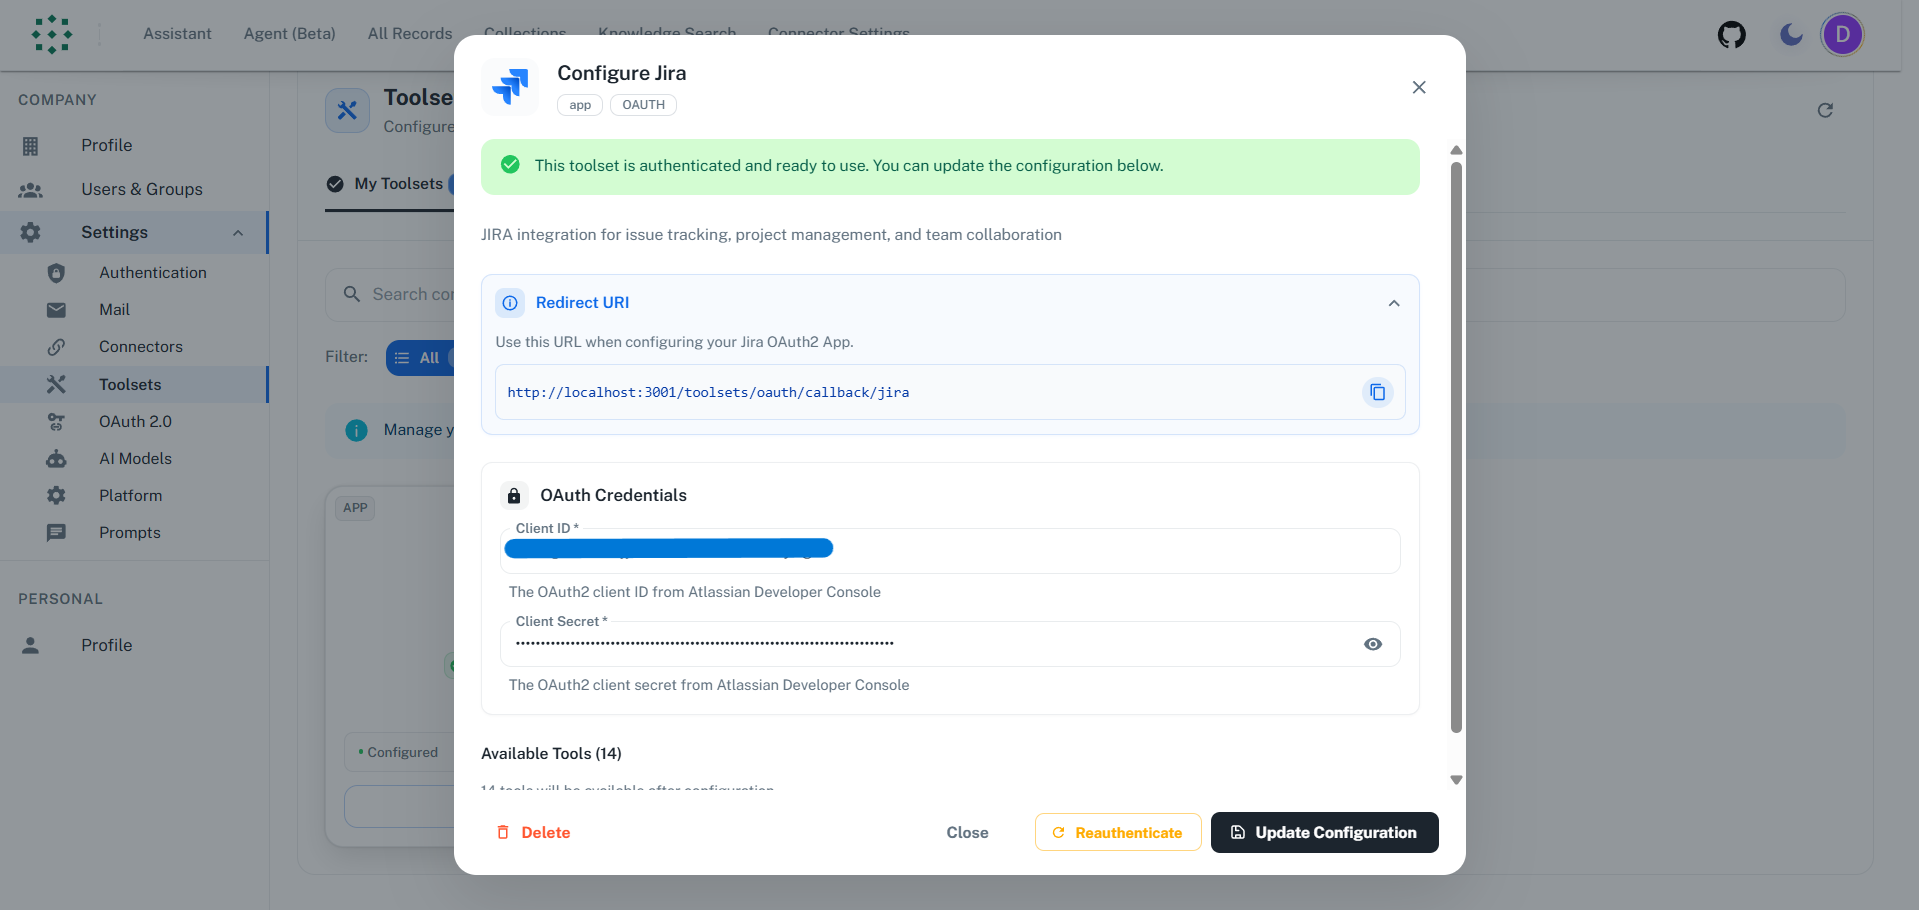
3. The **Configuration Dialog** will open
### Step 4: Authenticate
Follow the authentication flow for the toolset:
1. Enter the required credentials in the configuration dialog (e.g., Client ID and Client Secret, or Username and Password)
2. Click **"Authenticate"**
3. For OAuth toolsets, a popup window opens for authorization
4. Grant the requested permissions (OAuth flow)
5. You'll be redirected back to PipesHub with authentication confirmed
Each toolset may have different authentication requirements. See individual toolset documentation for specific setup steps and credentials needed.
### Step 5: Verify Configuration
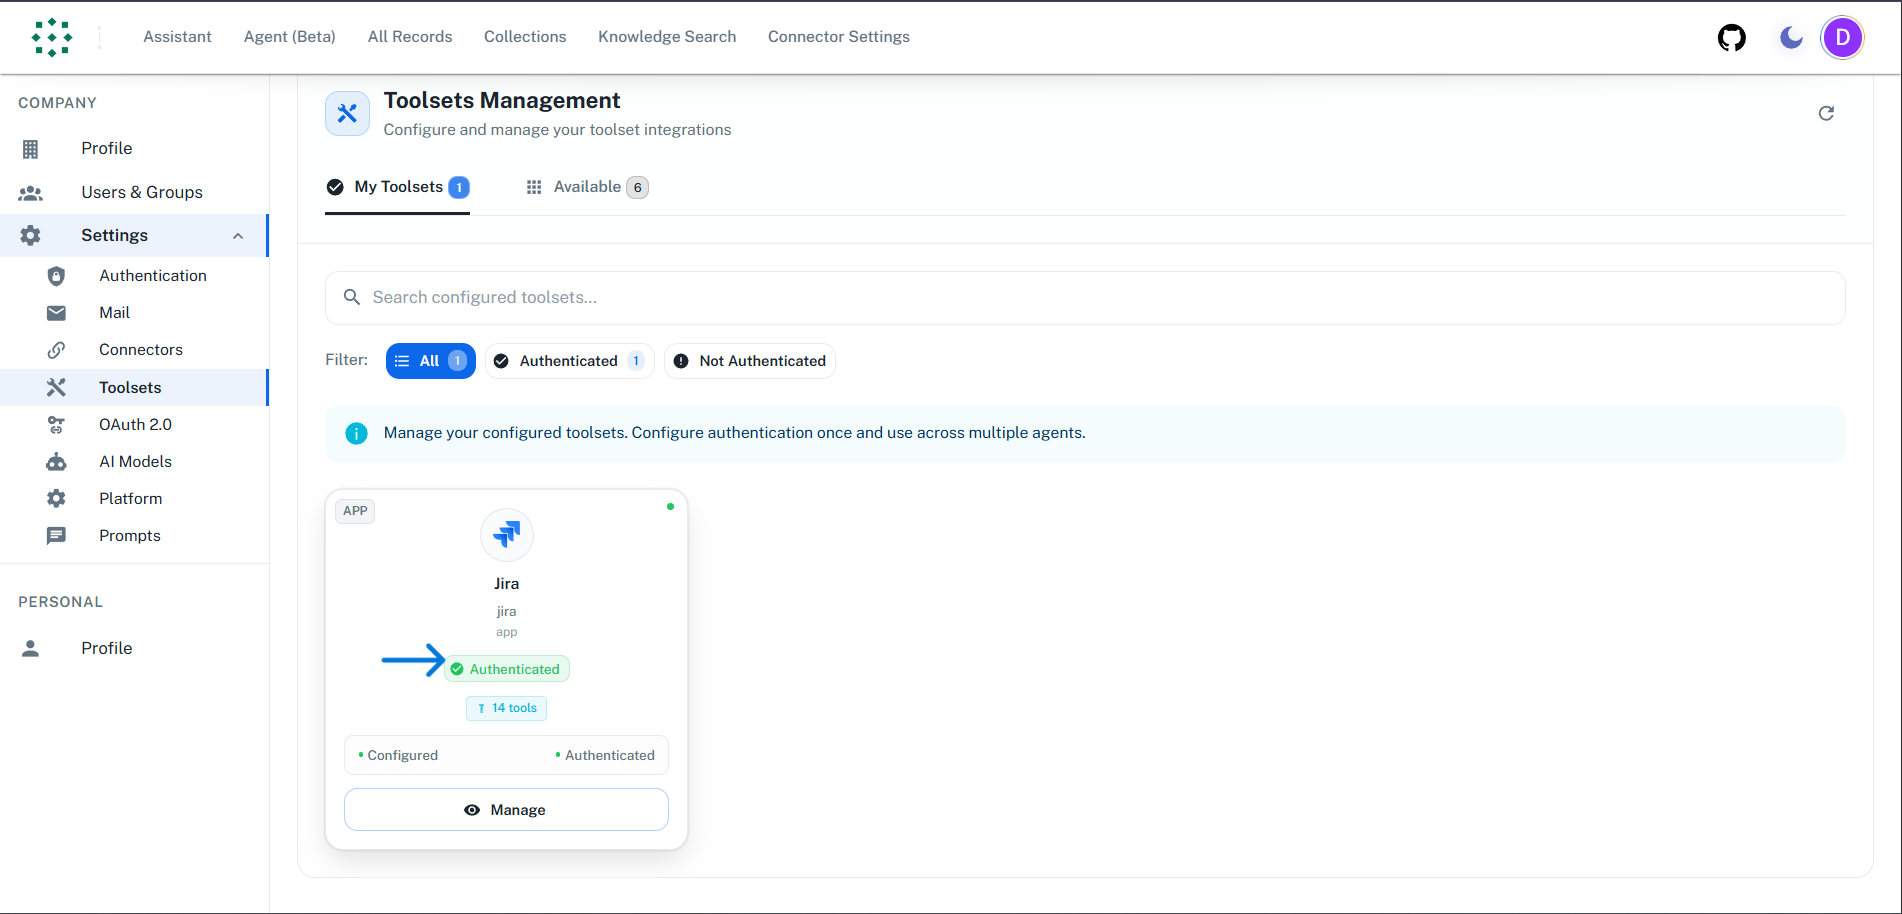
Once configured, the toolset will appear in your **My Toolsets** tab with an "Authenticated" status.
### Managing Toolset Configuration
You can manage your toolset by clicking on it in the **My Toolsets** tab to open the configuration dialog. Available actions:
* **Update Configuration** - Modify credentials or settings
* **Reauthenticate** - Refresh authentication if it expires or encounters issues
* **Delete** - Remove the toolset configuration entirely
***
## Using Toolsets in Agents
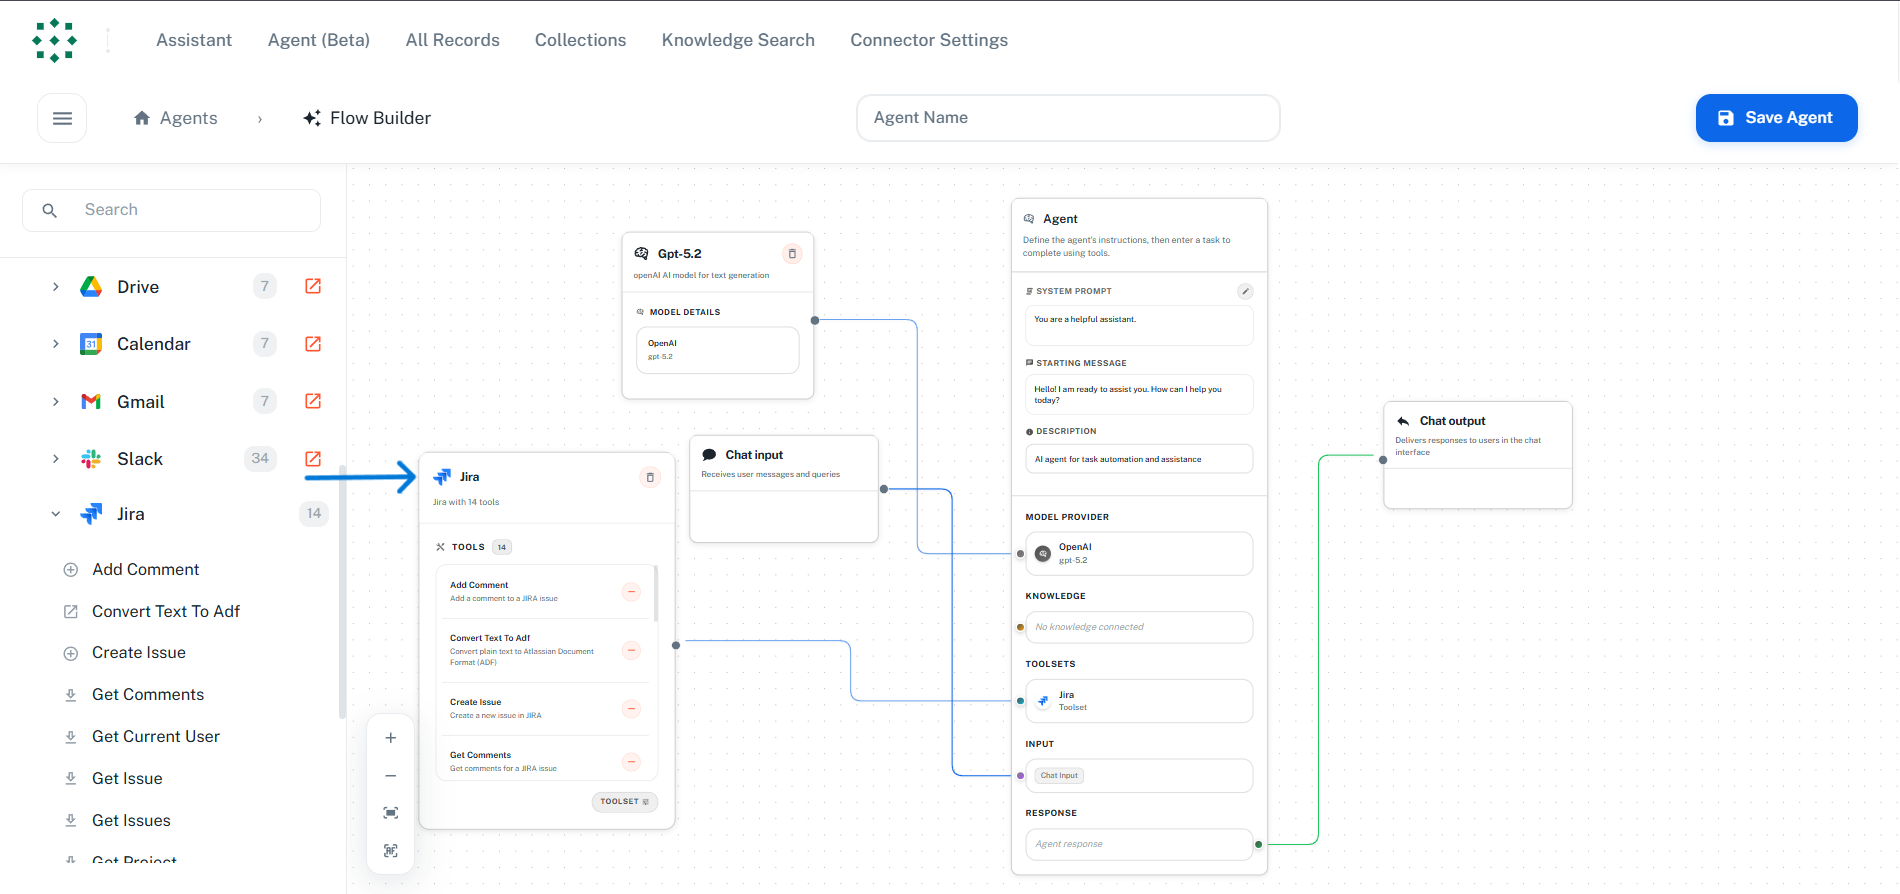
Once a toolset is configured, it becomes available in the Agent Builder:
1. Open the **Agent Builder** (create new or edit existing agent)
2. In the left sidebar, expand the **"Tools"** section
3. Find your configured toolset and drag it onto the canvas
4. Connect it to your agent flow
Only authenticated toolsets appear in the Agent Builder. If a toolset is missing, check its configuration status in **Settings > Toolsets**.
***
## Authentication Types
### OAuth 2.0
OAuth 2.0 is the recommended authentication method for most toolsets. It provides:
* **Secure token-based access** - No passwords stored
* **Automatic token refresh** - Tokens are refreshed automatically
* **Granular permissions** - Only request necessary scopes
* **User authorization** - Users explicitly grant access
**Requirements:**
* Create an OAuth application in the service's developer console
* Configure redirect URI (provided by PipesHub)
* Obtain Client ID and Client Secret
### Basic Auth
Basic Auth is used by toolsets like MariaDB. It works as follows:
* **Per-user credentials** - Each user enters their own username and password
* **Secure credential handling** - Credentials are stored securely and scoped to the authenticated user
* **Admin and user separation** - Admin creates the shared toolset instance; users authenticate their own accounts
* **No credential sharing** - One user's credentials are not visible to other users
**Requirements:**
* Admin creates the toolset instance (host, port, database)
* Each user provides valid username and password for that data source
***
## Frequently Asked Questions
| Aspect | Connectors | Toolsets |
| --------------- | ----------------------------------- | -------------------------------- |
| **Purpose** | Sync and index data for search | Enable agents to perform actions |
| **Data Flow** | One-way (import data into PipesHub) | Two-way (read and write via API) |
| **When to Use** | Query/search data | Perform actions on data |
**Example:** Use a **Gmail Connector** to index and search your email history. Use a **Gmail Toolset** to send new emails through an agent.
**Connector** — Use when you need document context search: connectors sync and index your documents, emails, and pages so your assistant can find and use that context, and they do not perform actions.
**Toolset** — When you need **actions**: create or update content, send messages, or run analytical queries (e.g. JQL, CQL, reports).
**Quick takeaway:** Search & context → **Connector**. Actions → **Toolset**.
The callback URL is displayed in PipesHub when configuring a toolset:
1. Go to **Settings > Toolsets**
2. Click **"Configure"** on the toolset you want to set up
3. Copy the **Redirect URI** shown in the dialog
4. Add it to your OAuth app's allowed redirect URIs in the service's developer console
The callback URL must match exactly between PipesHub and the OAuth app for authentication to succeed.
Toolsets need **read, write and delete permissions** to perform actions on your behalf:
* **Read permissions** - Access existing data (messages, tickets, files)
* **Write permissions** - Create and update content (send emails, create tickets)
* **Delete permissions** - Remove items (delete messages, delete comment)
The required scopes depend on what actions your agents will perform. Check each toolset's documentation page for the complete list of required scopes based on your use case.
Toolsets appear in the Agent Builder but can only be used after authentication:
1. Check **Settings > Toolsets** for the authentication status
2. If not "Authenticated", click **"Configure"** and complete the OAuth flow
3. If expired, click **"Reauthenticate"**
4. Return to Agent Builder and the toolset will be available to drag and connect
Unauthenticated toolsets are visible but cannot be added to agents.
***
## Next Steps