Azure OpenAI Configuration
Required Fields
Endpoint *
The Endpoint URL is required to connect to your Azure OpenAI service instance. How to obtain your Endpoint:- Log in to the Azure Portal
- Navigate to your Azure OpenAI resource
- Go to the “Keys and Endpoint” section in the left navigation
- Copy the Endpoint URL (it will look like:
https://your-resource-name.openai.azure.com/)
Deployment Name *
The Deployment Name refers to the specific model deployment you’ve created in your Azure OpenAI service. How to find your Deployment Name:- In the Azure Portal, navigate to your Azure OpenAI resource
- Select “Model deployments” from the left navigation
- Find the deployment you want to use and copy the “Deployment name”
- This is the name you assigned when you deployed the model (not the model name itself)
API Key *
The API Key authenticates your requests to your Azure OpenAI service. How to obtain your API Key:- In the Azure Portal, navigate to your Azure OpenAI resource
- Go to the “Keys and Endpoint” section in the left navigation
- Copy either Key 1 or Key 2 (both will work)
Model Name *
The Model Name field defines which Azure OpenAI model you want to use with PipesHub. Popular Azure OpenAI models include:gpt-5- OpenAI’s latest flagship model, best for complex tasks and reasoning.gpt-5-mini- Powerful model balancing cost and capability.gpt-5-nano- Fastest, most cost-effective option.
- For complex reasoning and advanced features, select
gpt-5 - For balanced performance, select
gpt-5-mini - For routine tasks and lower latency, select
gpt-5-nano - Check the Azure OpenAI model documentation for the most up-to-date options
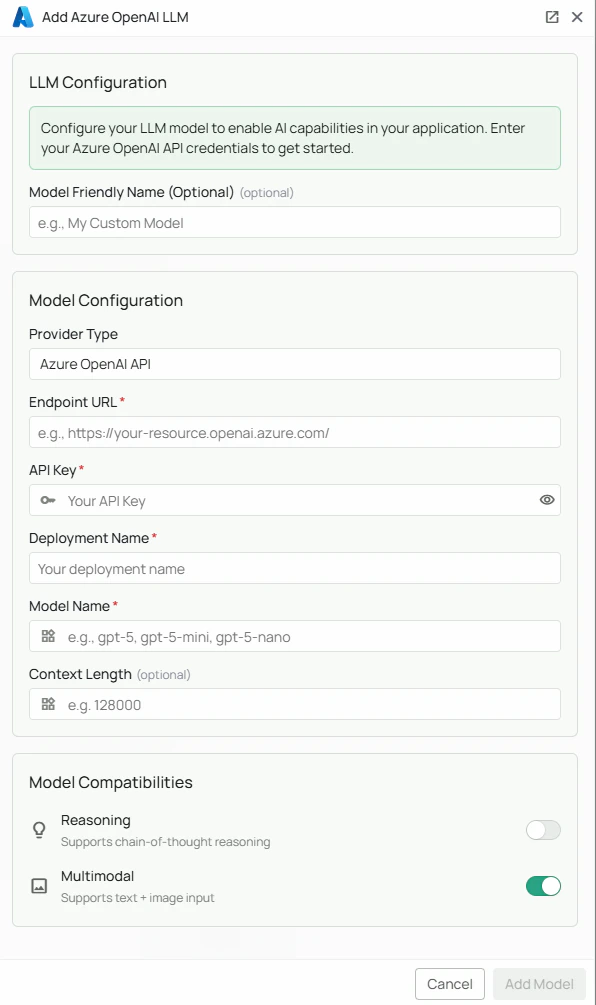
Configuration Steps
As shown in the image above:- Click Configure on the Azure OpenAI provider card
- Enter your Endpoint URL in the designated field (marked with *)
- Specify your Deployment Name from your Azure OpenAI service (marked with *)
- Enter your Azure OpenAI API Key (marked with *)
- Specify your Model Name (marked with *)
- Click Add Model to save and validate your credentials
All fields (Endpoint, Deployment Name, API Key, and Model Name) are required to successfully configure Azure OpenAI integration. You must complete these fields to proceed with the setup.
Usage Considerations
- API usage will count against your Azure OpenAI resource’s quota and billing
- Different models have different pricing - check Azure’s pricing page for details
- Model capabilities vary - more powerful models may provide better results but at higher cost
- Azure OpenAI provides additional enterprise features like:
- Virtual Network support
- Role-based access control
- Content filtering
- Regional data residency
Troubleshooting
- If you encounter authentication errors, verify your API key and endpoint are correct
- Ensure your Azure subscription is active and has sufficient quota for the selected model
- Verify that the deployment name exists in your Azure OpenAI resource
- Check that the model name matches one of the models available in your Azure OpenAI service
- Ensure your IP address is allowed if you’ve configured network access restrictions