Overview
Confluence is Atlassian’s team workspace and documentation platform, widely used for knowledge bases, product docs, meeting notes, and collaborative content. The Confluence connector syncs spaces, pages, blog posts, comments, attachments, and user information, enabling comprehensive knowledge-base search across your Confluence content.What Gets Synced
| Entity | Description |
|---|---|
| Spaces | Top-level containers (e.g., Engineering, Marketing) |
| Pages | Full page content with formatting preserved |
| Blog Posts | All blog post content and metadata |
| Comments | Comments on pages and blog posts |
| Attachments | Files attached to pages and blog posts |
| Users & Groups | User profiles, group memberships |
| Permissions | Space permissions and content restrictions |
Configuration Guide
The Confluence connector supports two authentication methods. Both sync the same data — pick whichever fits your rollout.Prerequisite: Email Visibility
This prerequisite applies to both authentication methods (OAuth and API Token). Why email visibility matters. PipesHub uses email addresses to match Confluence users with their permissions. If a user’s email is hidden:- PipesHub cannot match the user’s Confluence account to their PipesHub account
- Permissions cannot be synced correctly for that user
- The user will not see any Confluence content in PipesHub
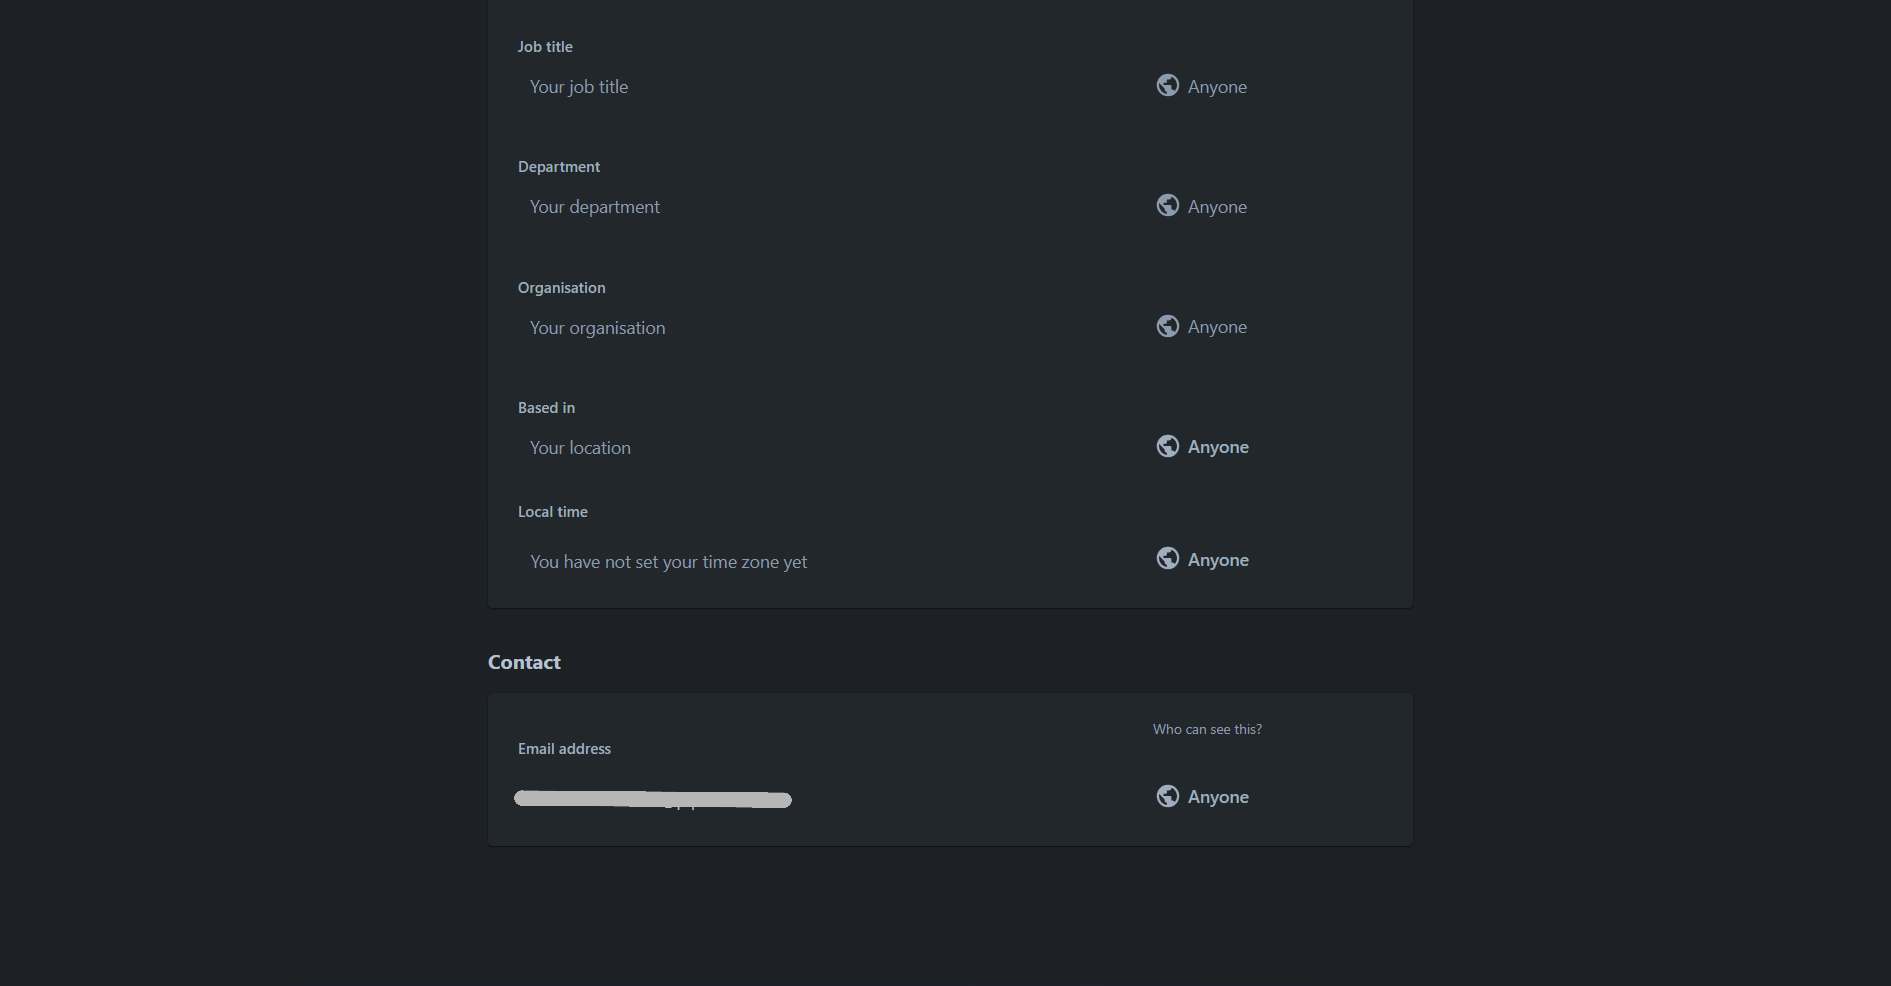
- Click your profile picture in the top right → select Account Settings.
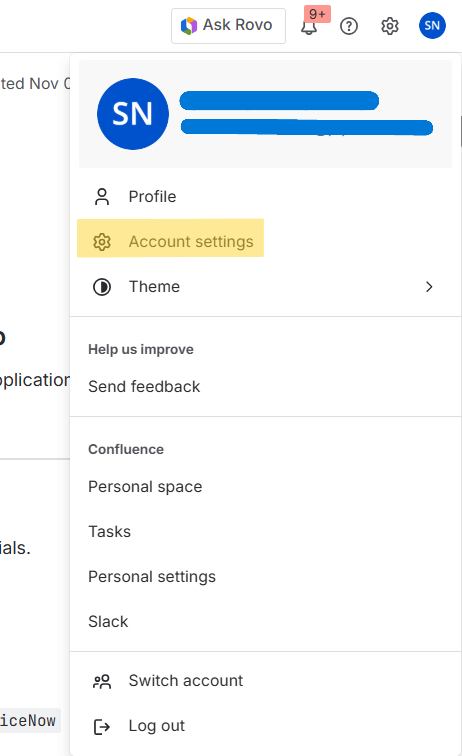
- Select the Profile and visibility tab.
- Scroll down to the Contact section.
- In the Who can see this? dropdown for your email address, select either Anyone (recommended) or Your organization.
This is a per-user setting that must be configured by each individual user. Administrators cannot change this setting for other users. We recommend communicating this requirement to your team during the Confluence connector rollout.
Choose an authentication method
| Method | Best for |
|---|---|
| OAuth 2.0 (3LO) | Multi-user / org-wide rollouts, production — per-user refresh tokens, per-user consent, audit trail. Requires Atlassian Developer Console access. |
| API Token | Single-account setups, quick POCs, or environments where you cannot register an OAuth app. Fastest path to sync. |
- OAuth 2.0
- API Token
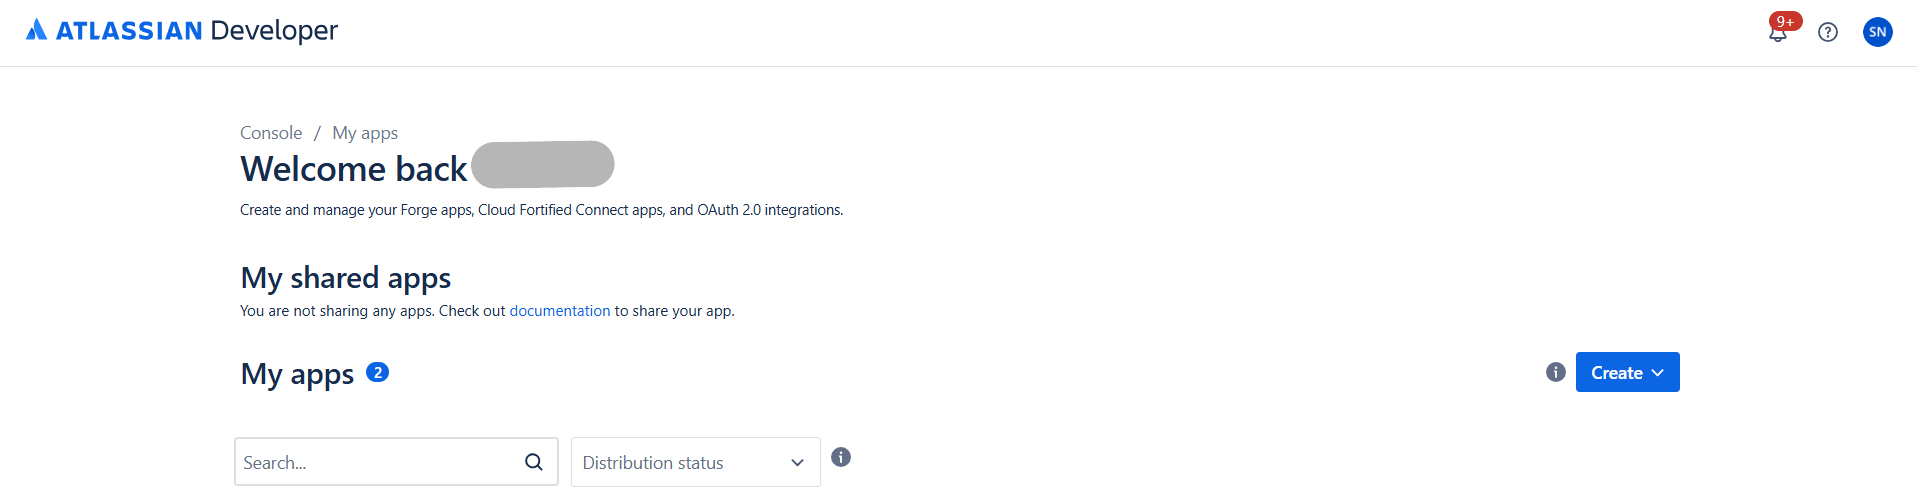
Step 1: Access the Atlassian Developer Console
- Go to developer.atlassian.com/console/myapps/ and sign in with your Atlassian account (must have admin access to your Confluence workspace).
- You’ll see the My apps page where you create and manage OAuth 2.0 integrations.
Step 2: Create a new OAuth 2.0 integration
- Click Create in the top-right corner.
- Select OAuth 2.0 integration from the dropdown.
- Fill in the application details:
- Name: Enter a meaningful name (e.g.,
PipesHub Confluence Connector). - Check the box to agree to Atlassian’s developer terms.
- Name: Enter a meaningful name (e.g.,
- Click Create.
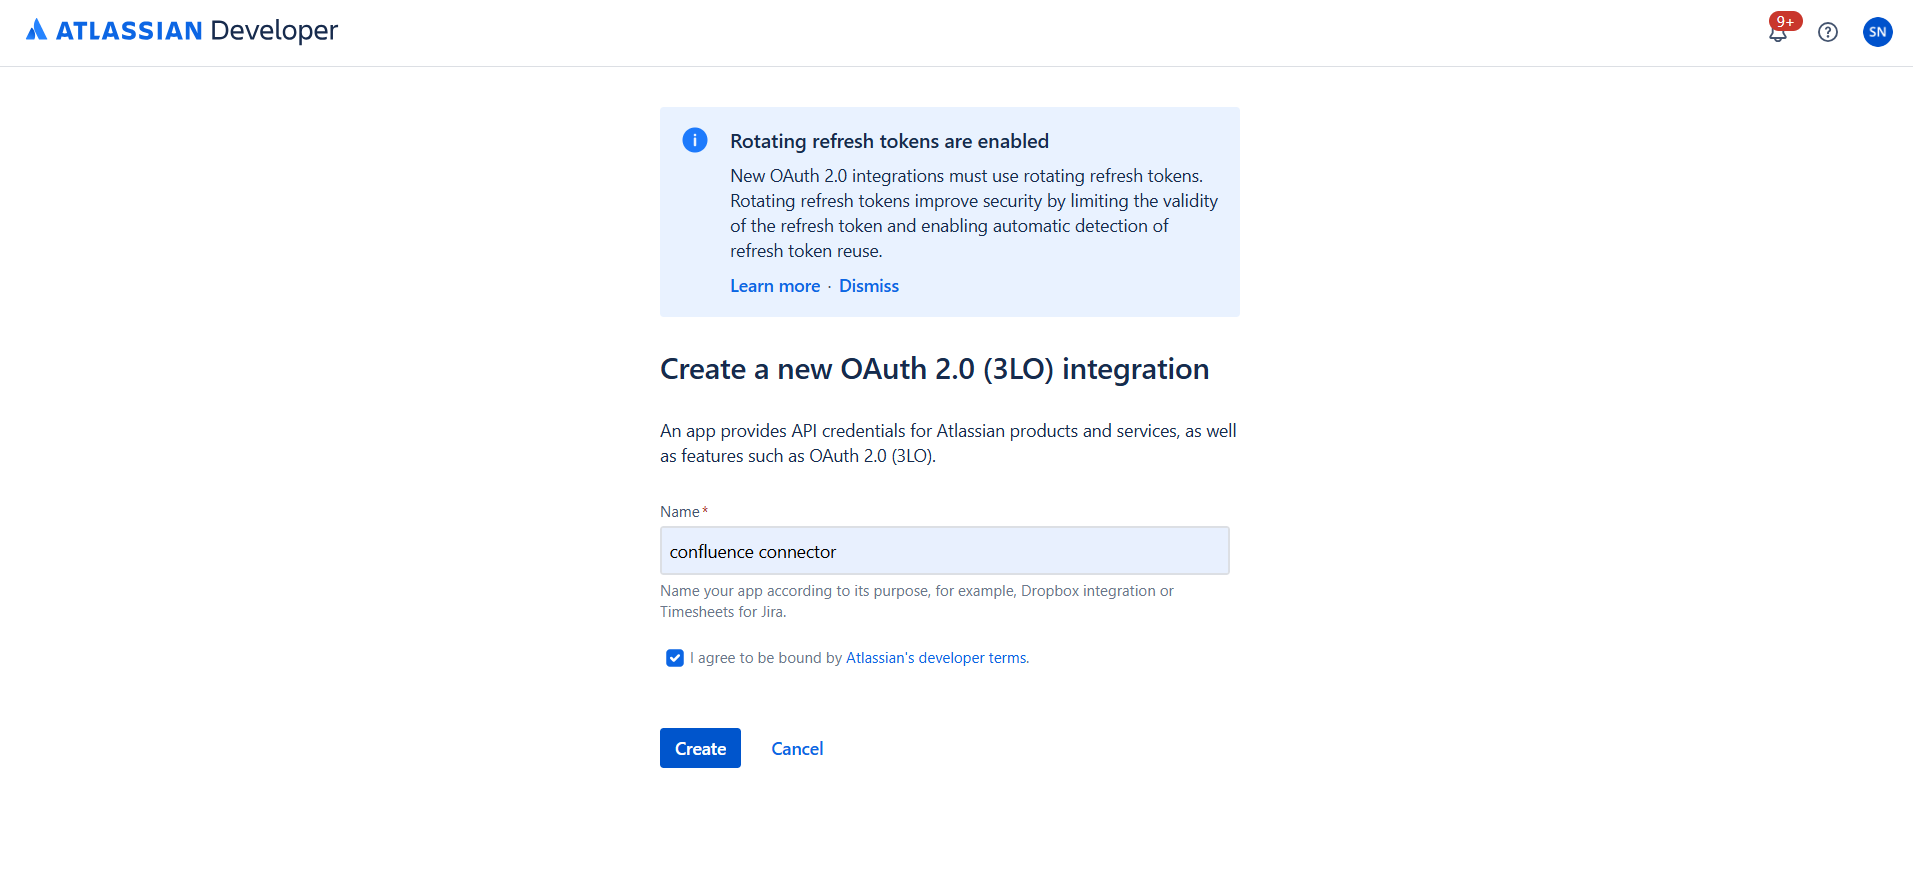
OAuth 2.0 (3LO) integrations use rotating refresh tokens by default, which improves security by limiting token validity and enabling automatic detection of refresh-token reuse.
Step 3: Review the application overview
After creation, you’ll land on the app overview page. It shows:- App ID — your application’s unique identifier
- Distribution status — whether the app is shared publicly
- Permissions — API scopes configured for the app
- Authorization — OAuth 2.0 (3LO) authorization settings

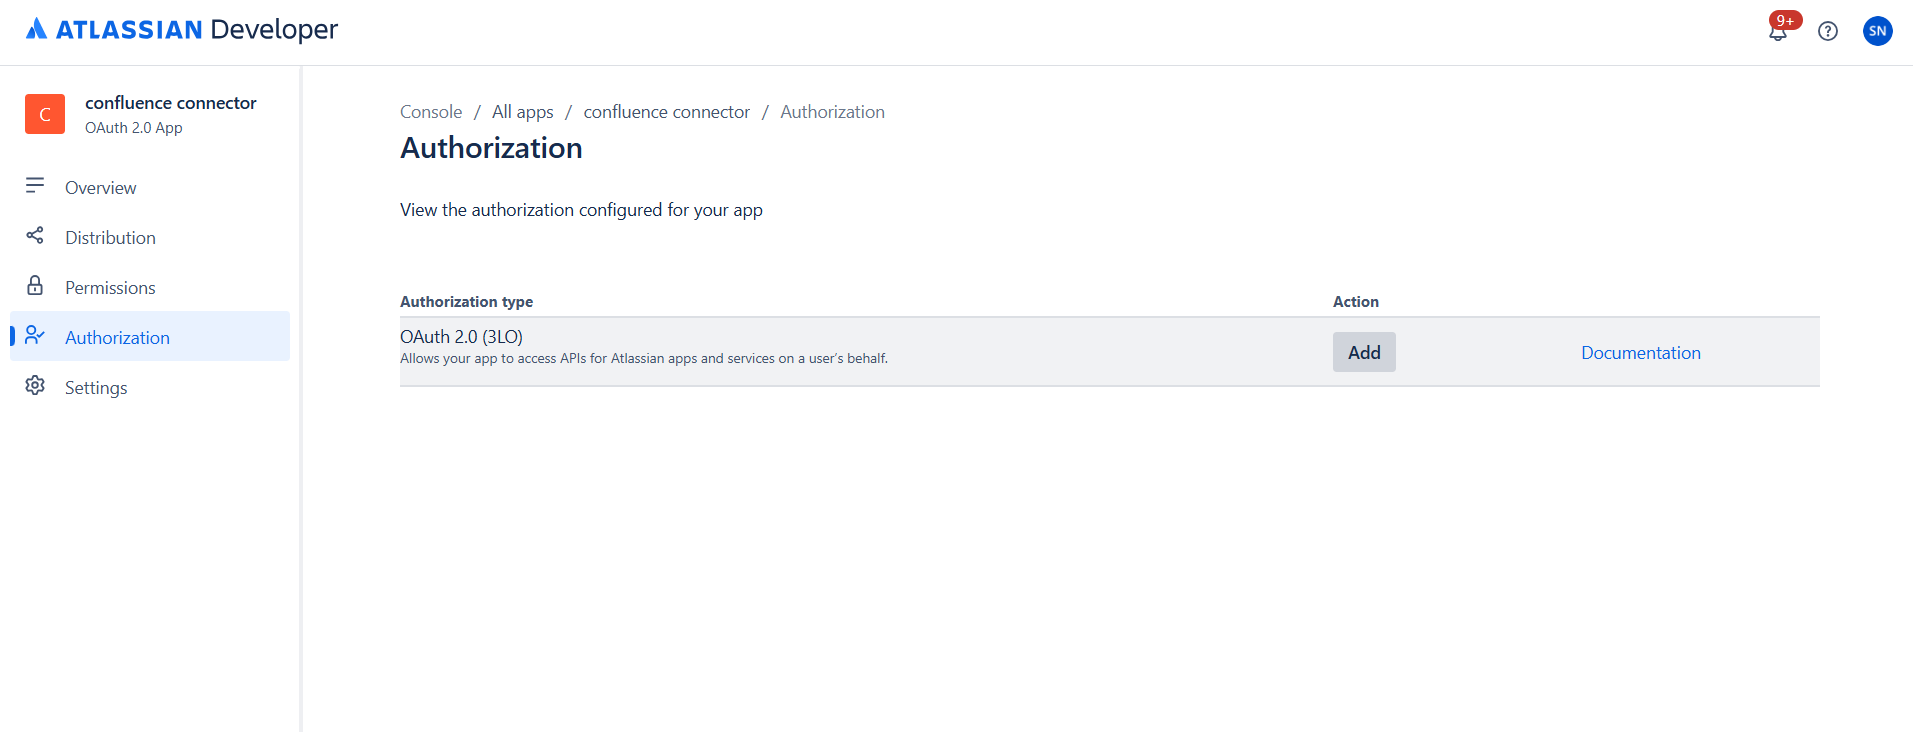
Step 4: Configure OAuth 2.0 authorization
- In the left sidebar, click Authorization.
- Find OAuth 2.0 (3LO) in the authorization types list.
- Click Add to enable OAuth 2.0 authorization for your app.
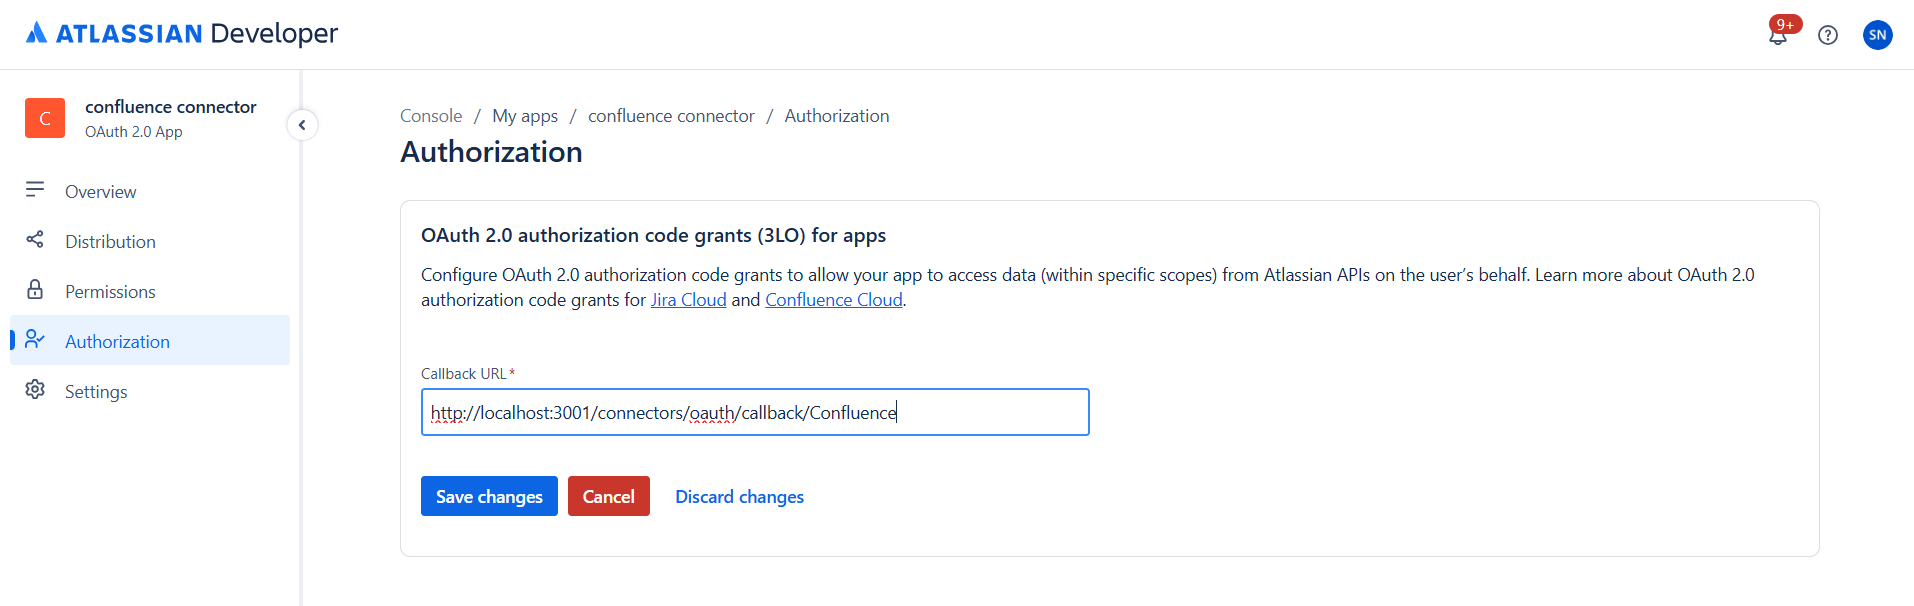
- Get the Redirect URL from PipesHub:
- In PipesHub, go to Workspace Settings → Connectors, find Confluence, and click + Setup for a new instance.
- The connector panel opens as a right-side drawer. On the Authenticate Instance tab, copy the Redirect URL.
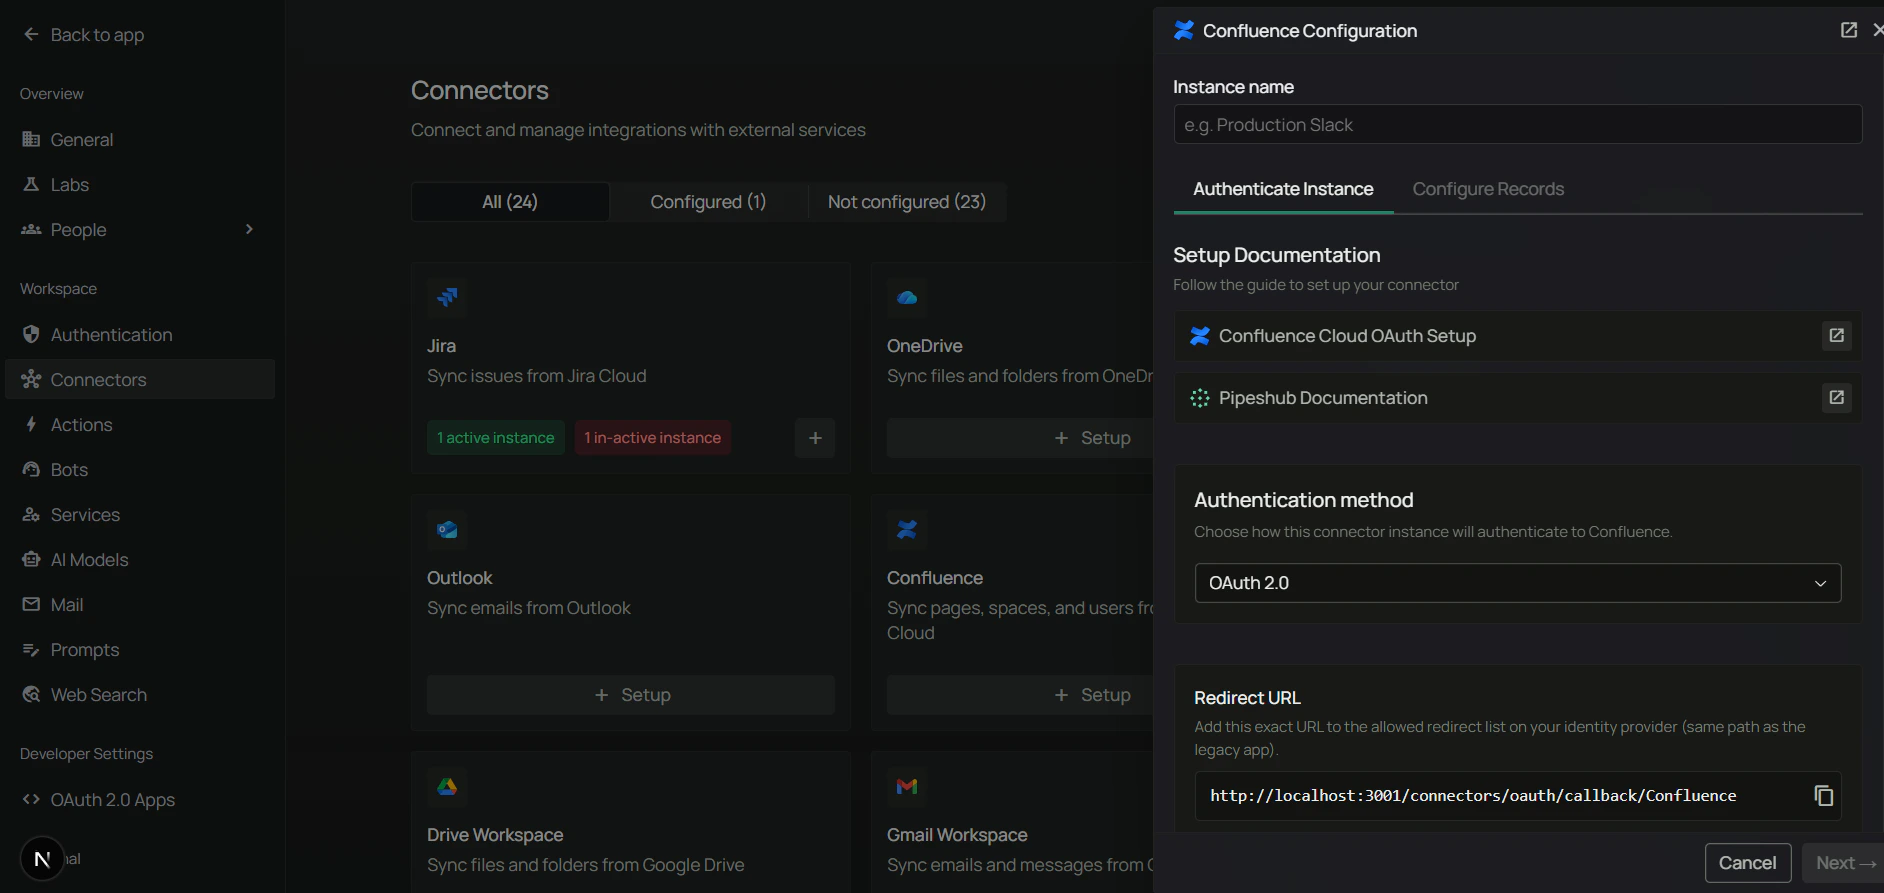
- Paste the copied URL into the Callback URL field in Atlassian Developer Console.
- Click Save changes.
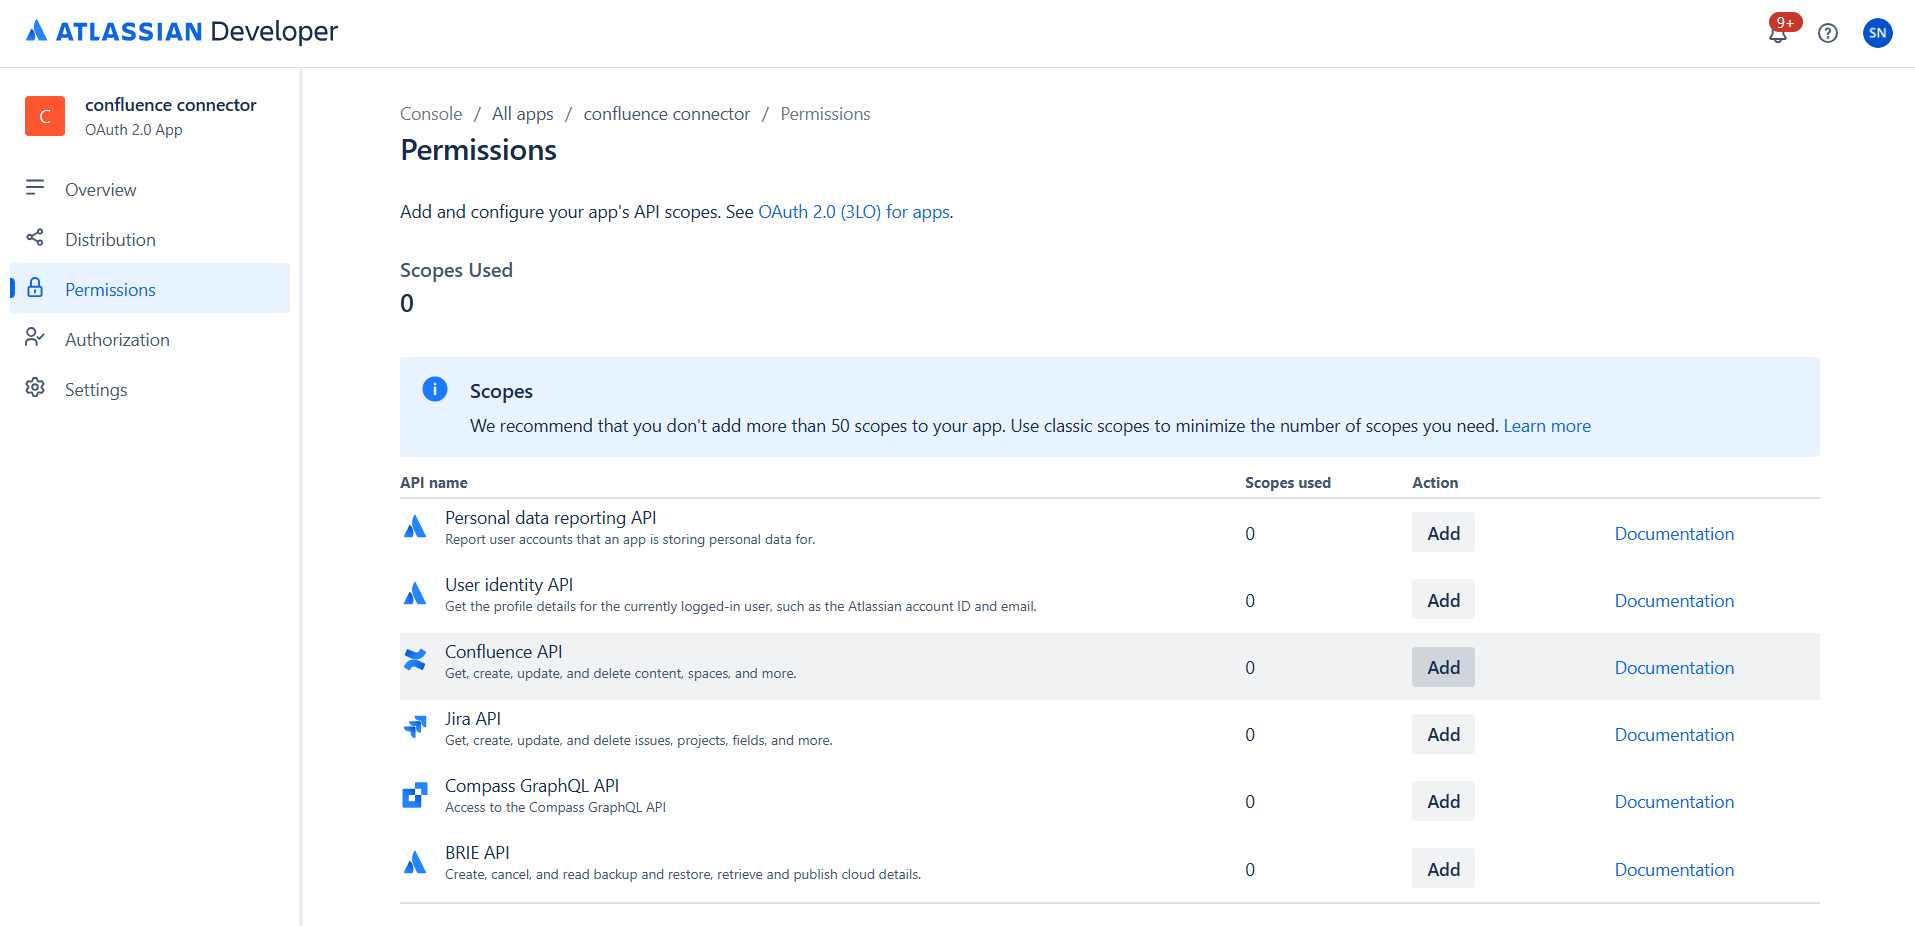
Step 5: Add API permissions
- In the left sidebar, click Permissions.
- You’ll see a list of available Atlassian APIs.
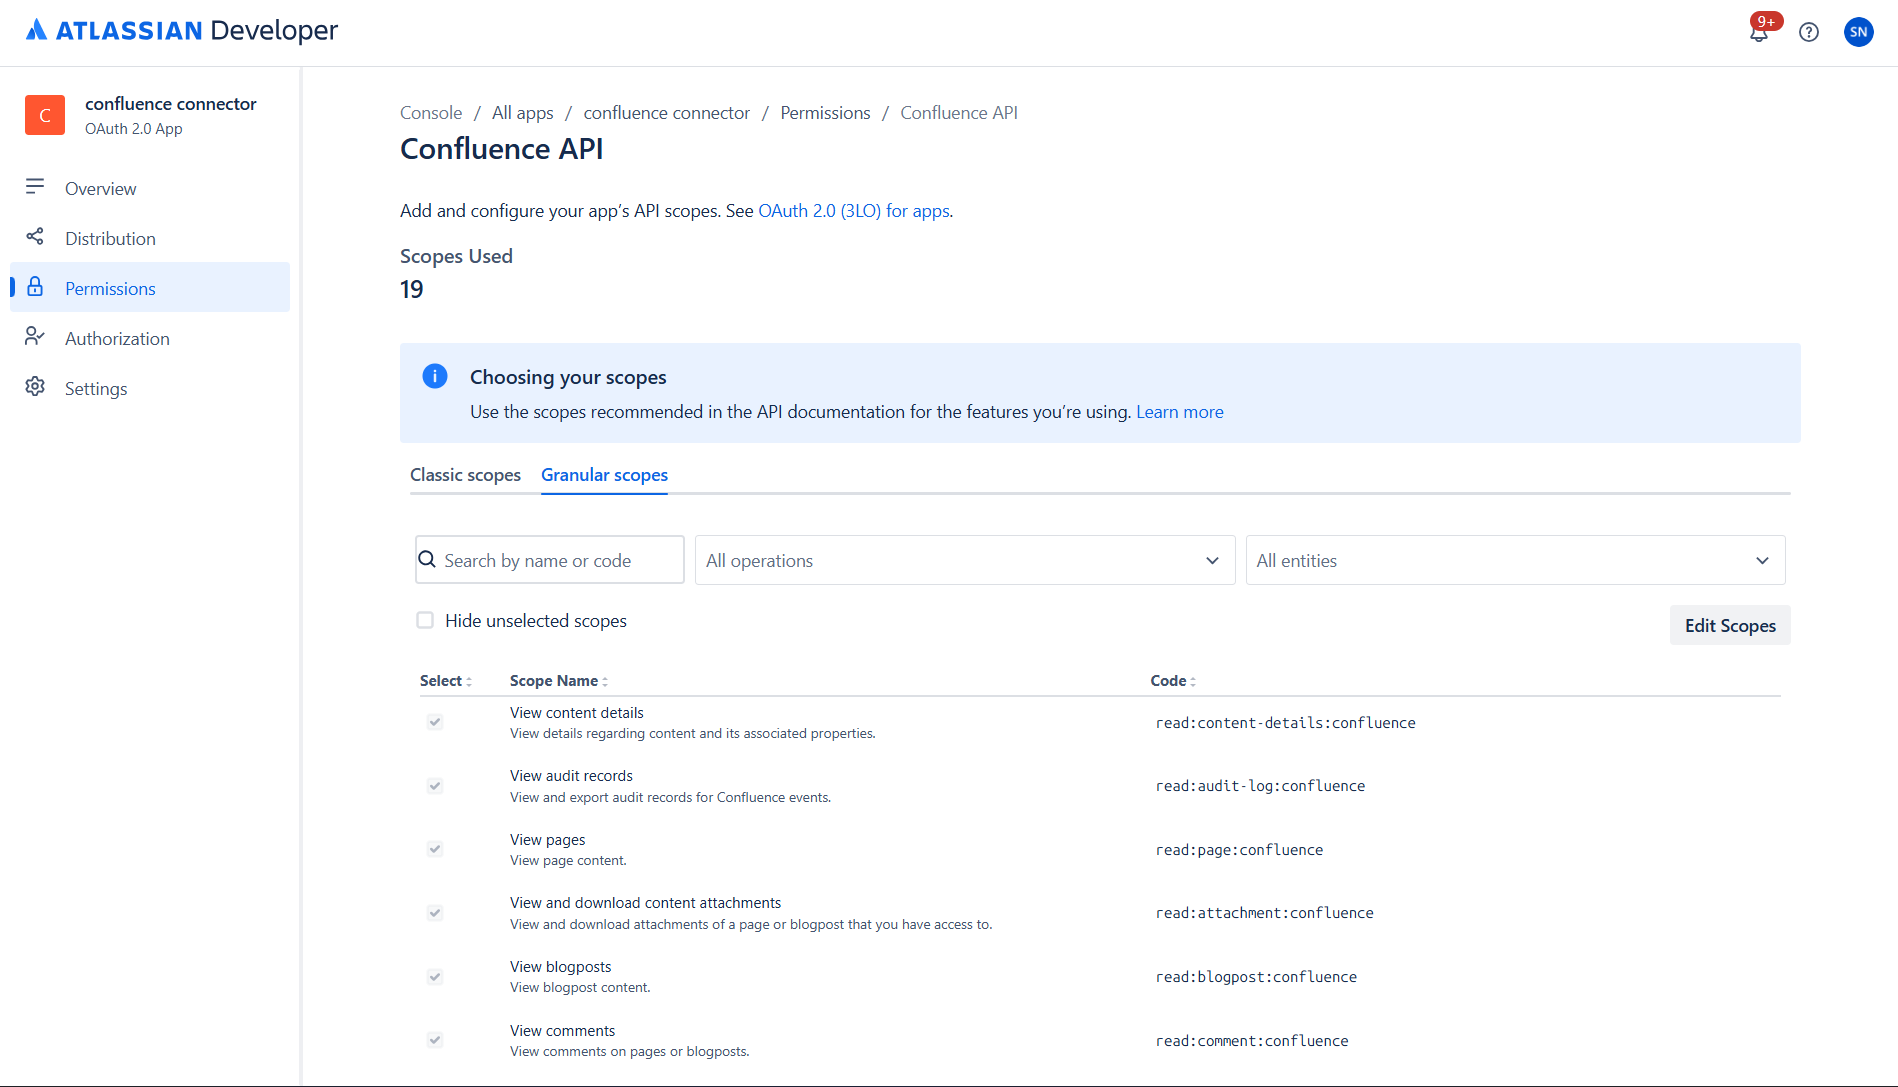
- Add scopes for both User identity API and Confluence API.
| Scope | Description |
|---|---|
read:account | View user profiles (required for user identification) |
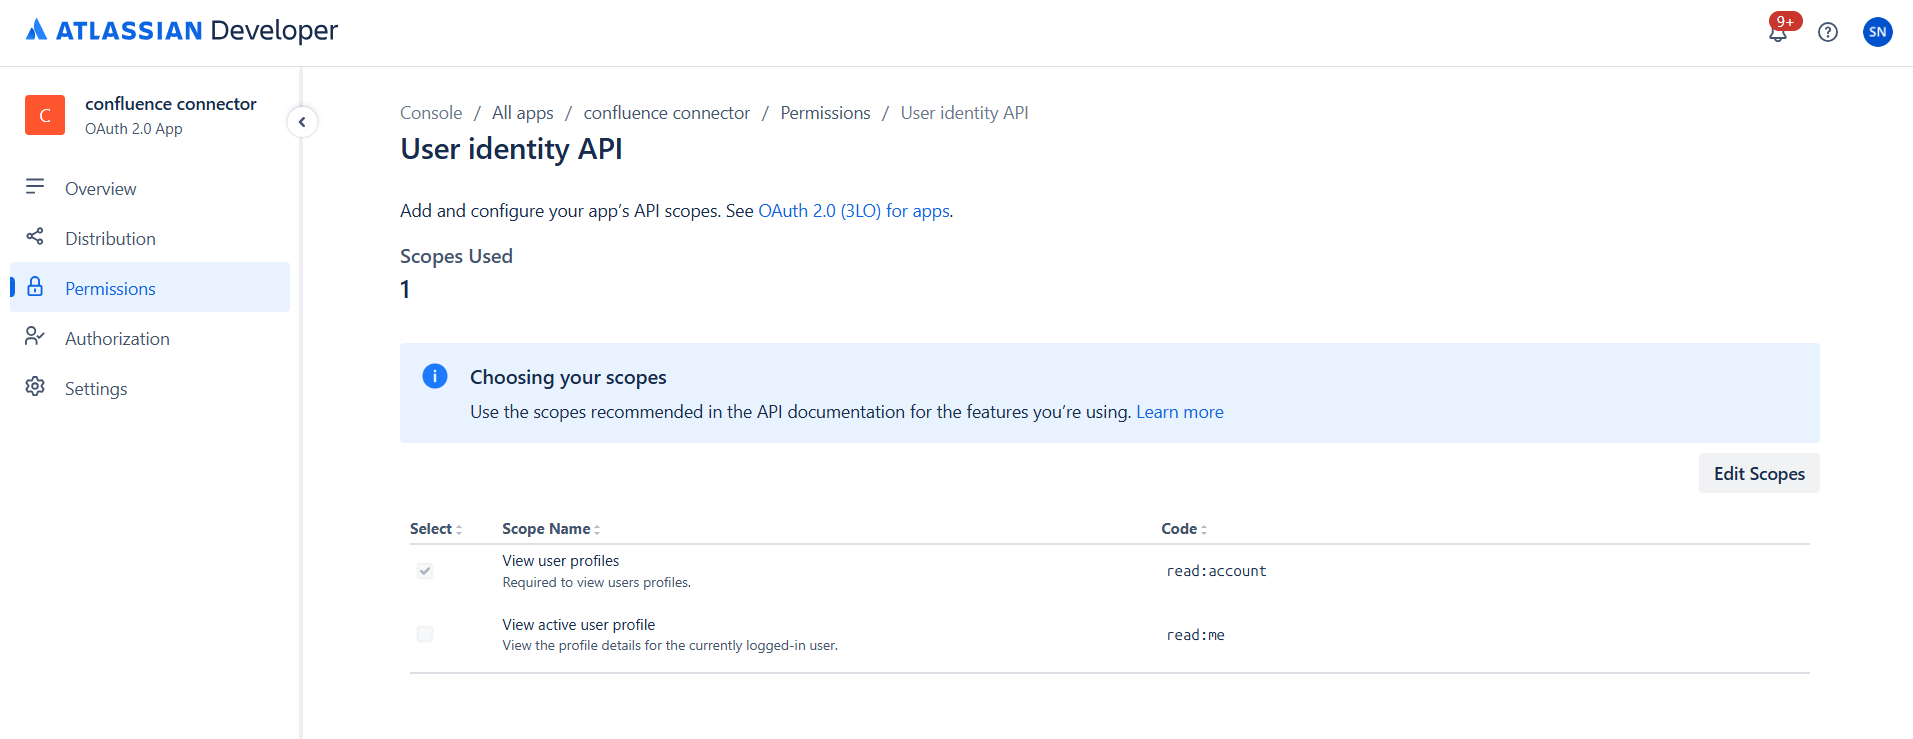
The
offline_access scope is automatically included when you configure OAuth 2.0 (3LO). It enables refresh tokens so scheduled synchronization continues when users are not actively logged in.| Scope | Description |
|---|---|
read:confluence-content.all | Read all Confluence content |
read:confluence-content.summary | Read Confluence content summaries |
read:confluence-props | Read Confluence content properties |
read:confluence-space.summary | Read Confluence space summaries |
read:confluence-user | Read Confluence user information |
read:confluence-groups | Read Confluence group information |
search:confluence | Search Confluence content |
Classic scopes provide broader access patterns required for certain API endpoints. Some features may not work correctly without them.
| Scope | Description |
|---|---|
read:content-details:confluence | View content details and properties |
read:page:confluence | View page content |
read:blogpost:confluence | View blog post content |
read:attachment:confluence | View and download attachments |
read:comment:confluence | View comments on pages and blog posts |
read:space:confluence | View space details |
read:user:confluence | View user details |
read:group:confluence | View groups and memberships |
read:permission:confluence | View content restrictions and permissions |
read:audit-log:confluence | View audit records |
read:folder:confluence | View folder data |
read:email-address:confluence | View user email addresses |
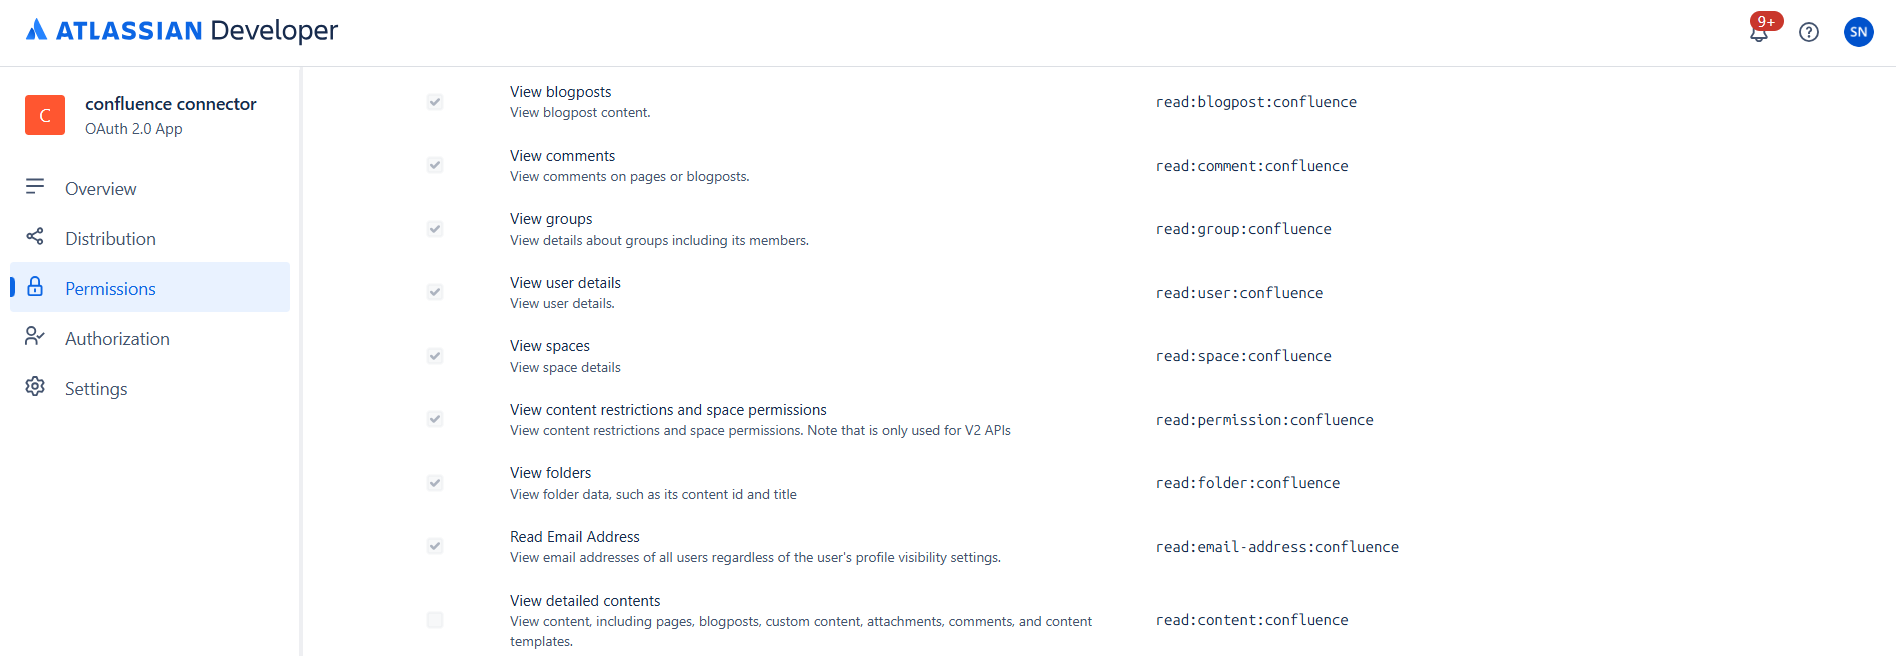
Atlassian recommends not adding more than 50 scopes to your app. Both Classic and Granular scopes are required for full connector functionality.
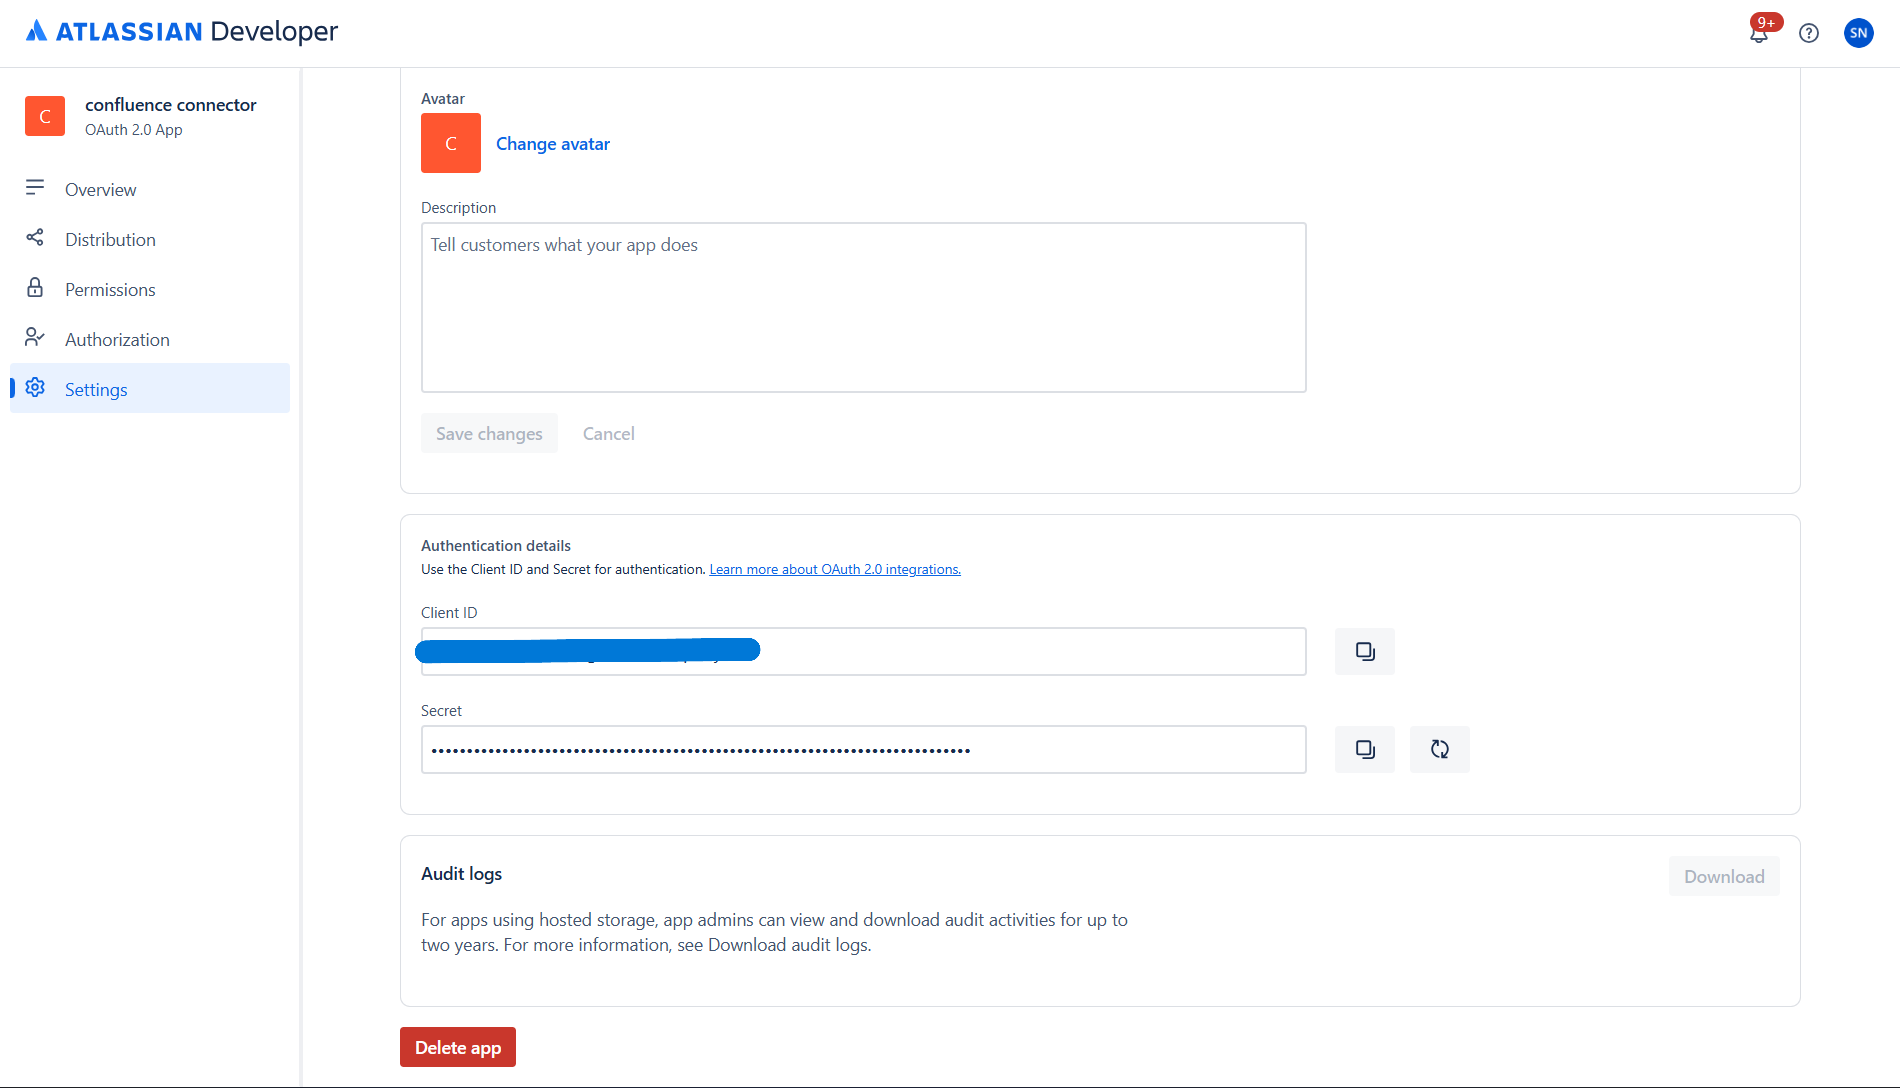
Step 6: Copy Client ID and Client Secret
- In the left sidebar, click Settings.
- Scroll to the Authentication details section.
- Copy:
- Client ID — used as Client ID in PipesHub.
- Secret — used as Client Secret in PipesHub. Copy it immediately.
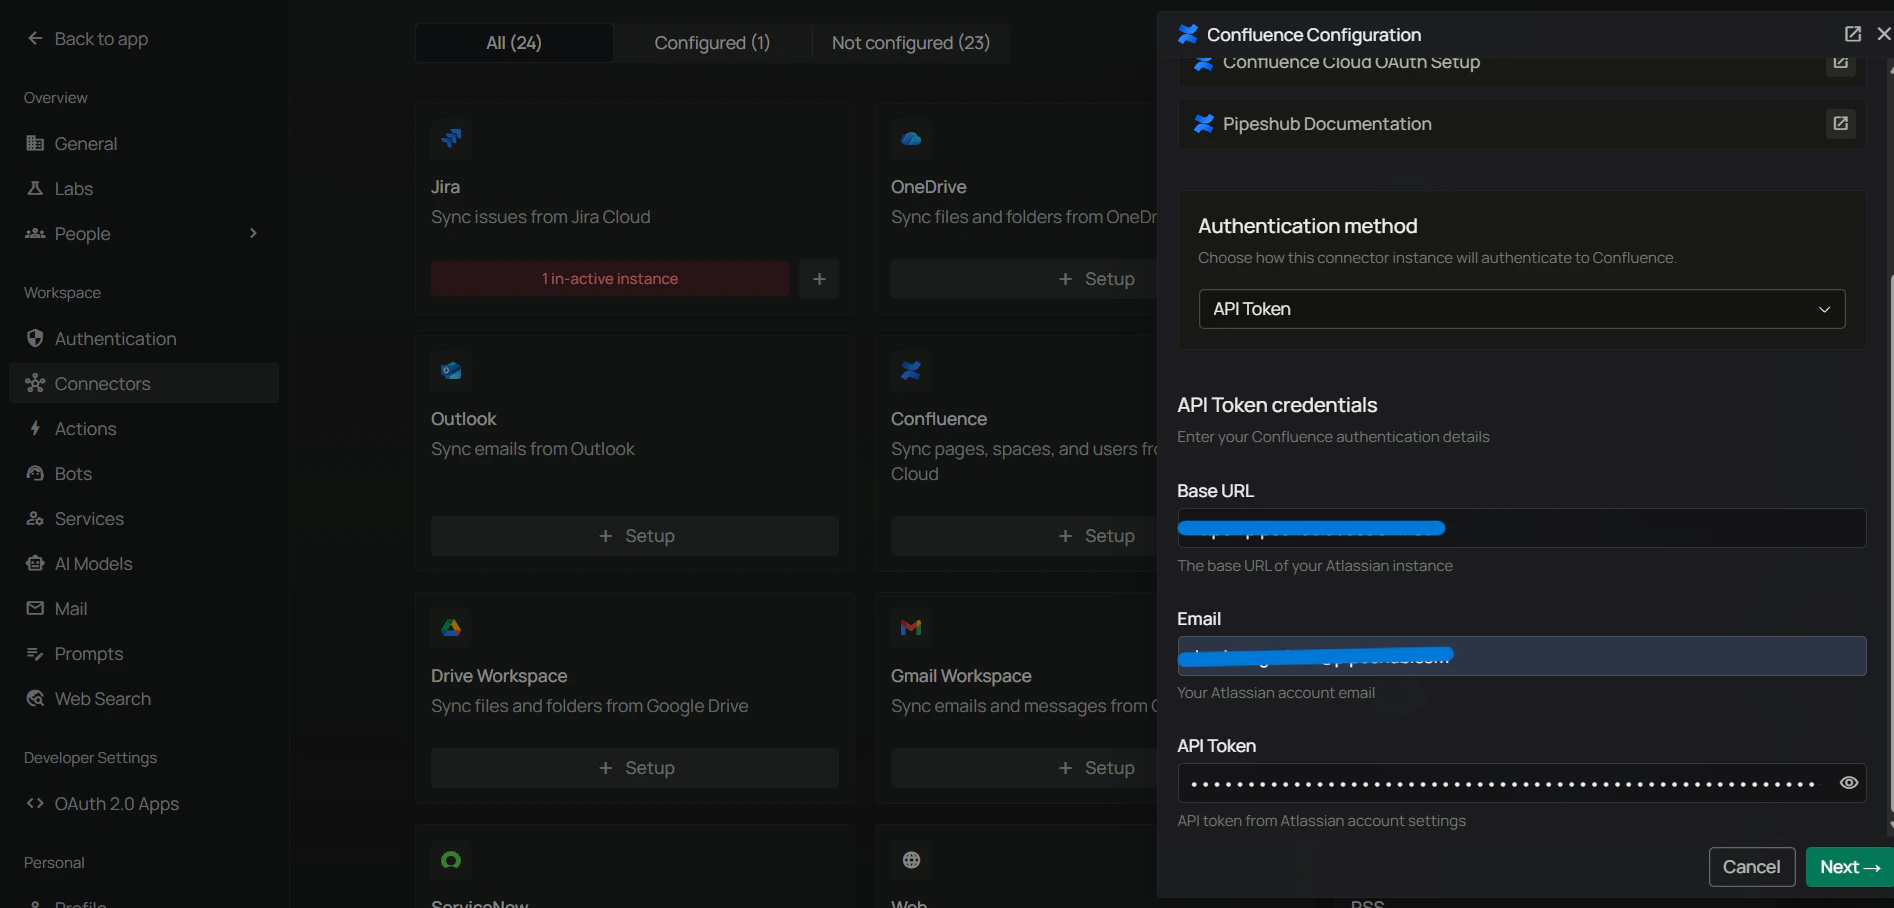
Step 7: Authenticate Instance tab — enter credentials
The connector drawer in PipesHub has three tabs: Authenticate Instance, Authorize, and Configure Records. Start on the Authenticate Instance tab.- Confirm the Redirect URL matches the Callback URL you saved in Atlassian in Step 4.
- If your admin has pre-registered an OAuth app, pick it from the OAuth app dropdown. Otherwise leave it blank and enter credentials manually.
- Enter:
- Client ID — from Step 6
- Client Secret — from Step 6
- Atlassian Site URL — your Confluence site URL (e.g.,
https://your-domain.atlassian.net; no trailing slash)
- Click Next to move to the Authorize tab.

The Atlassian Site URL targets the specific Confluence Cloud site this connector instance will sync. Use the full site URL including
https:// (e.g., https://acme.atlassian.net).Step 8: Authorize tab — complete the OAuth flow
On the Authorize tab, all the OAuth authorization work happens. The tab shows an Authenticate button to kick off the OAuth handshake.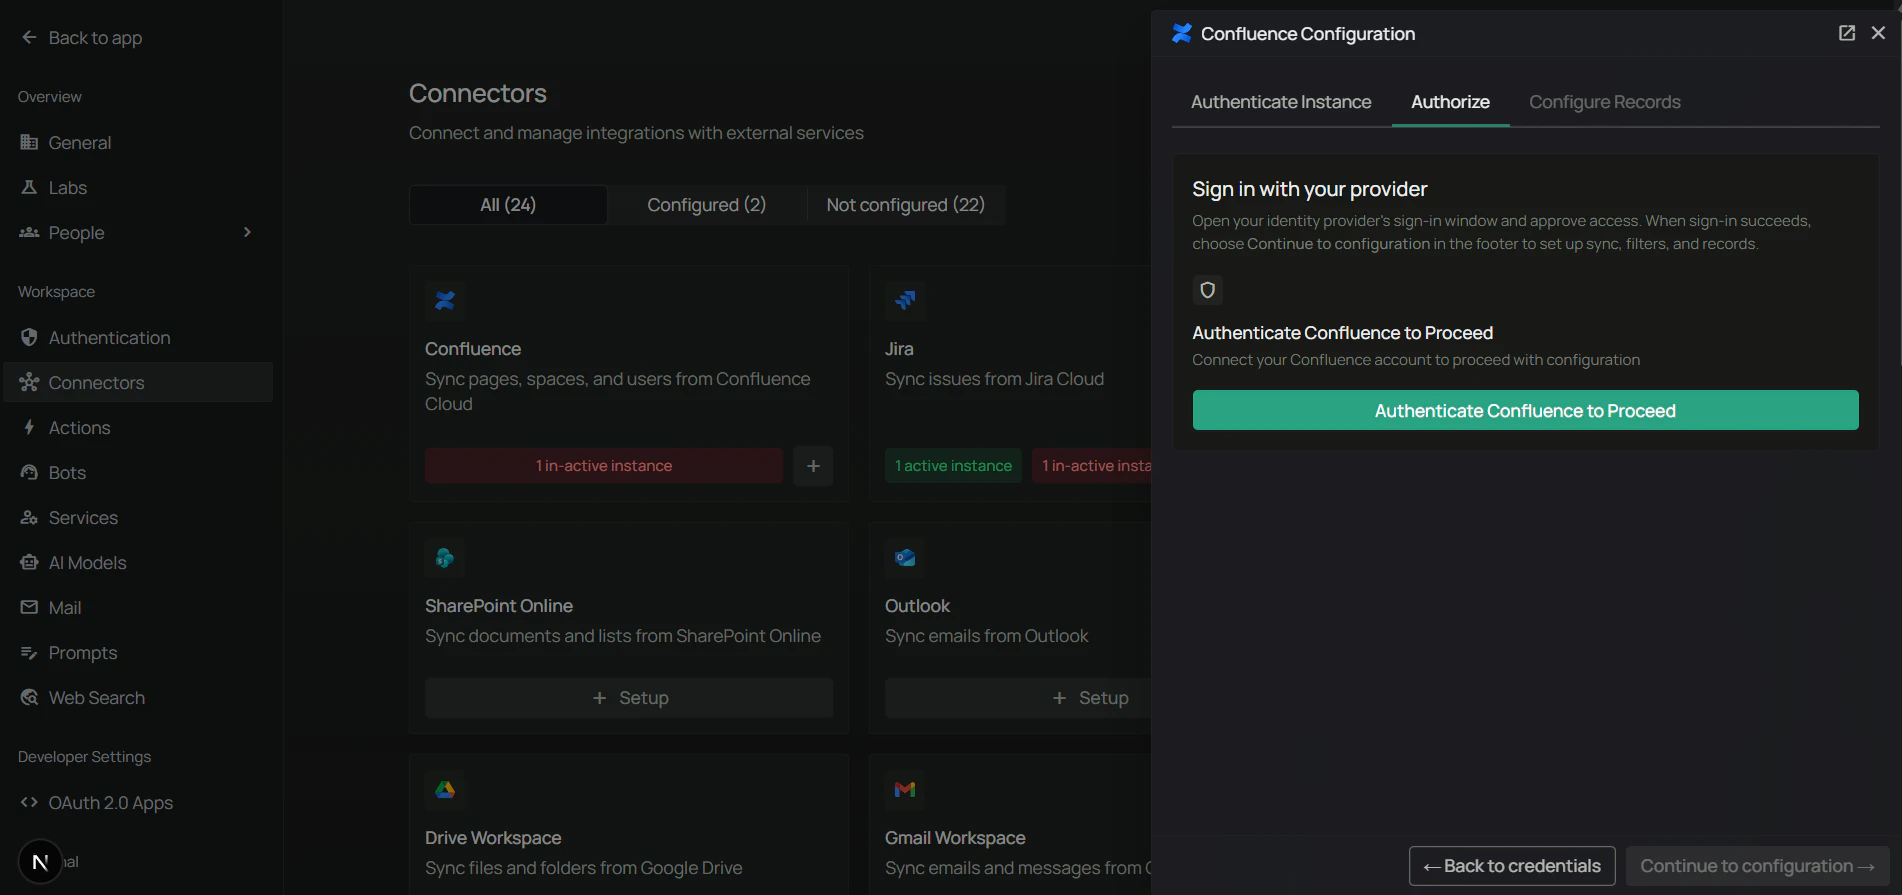
- Click Authenticate to start the OAuth flow. A popup opens to Atlassian’s authorization page.
- Select your Confluence site from the dropdown.
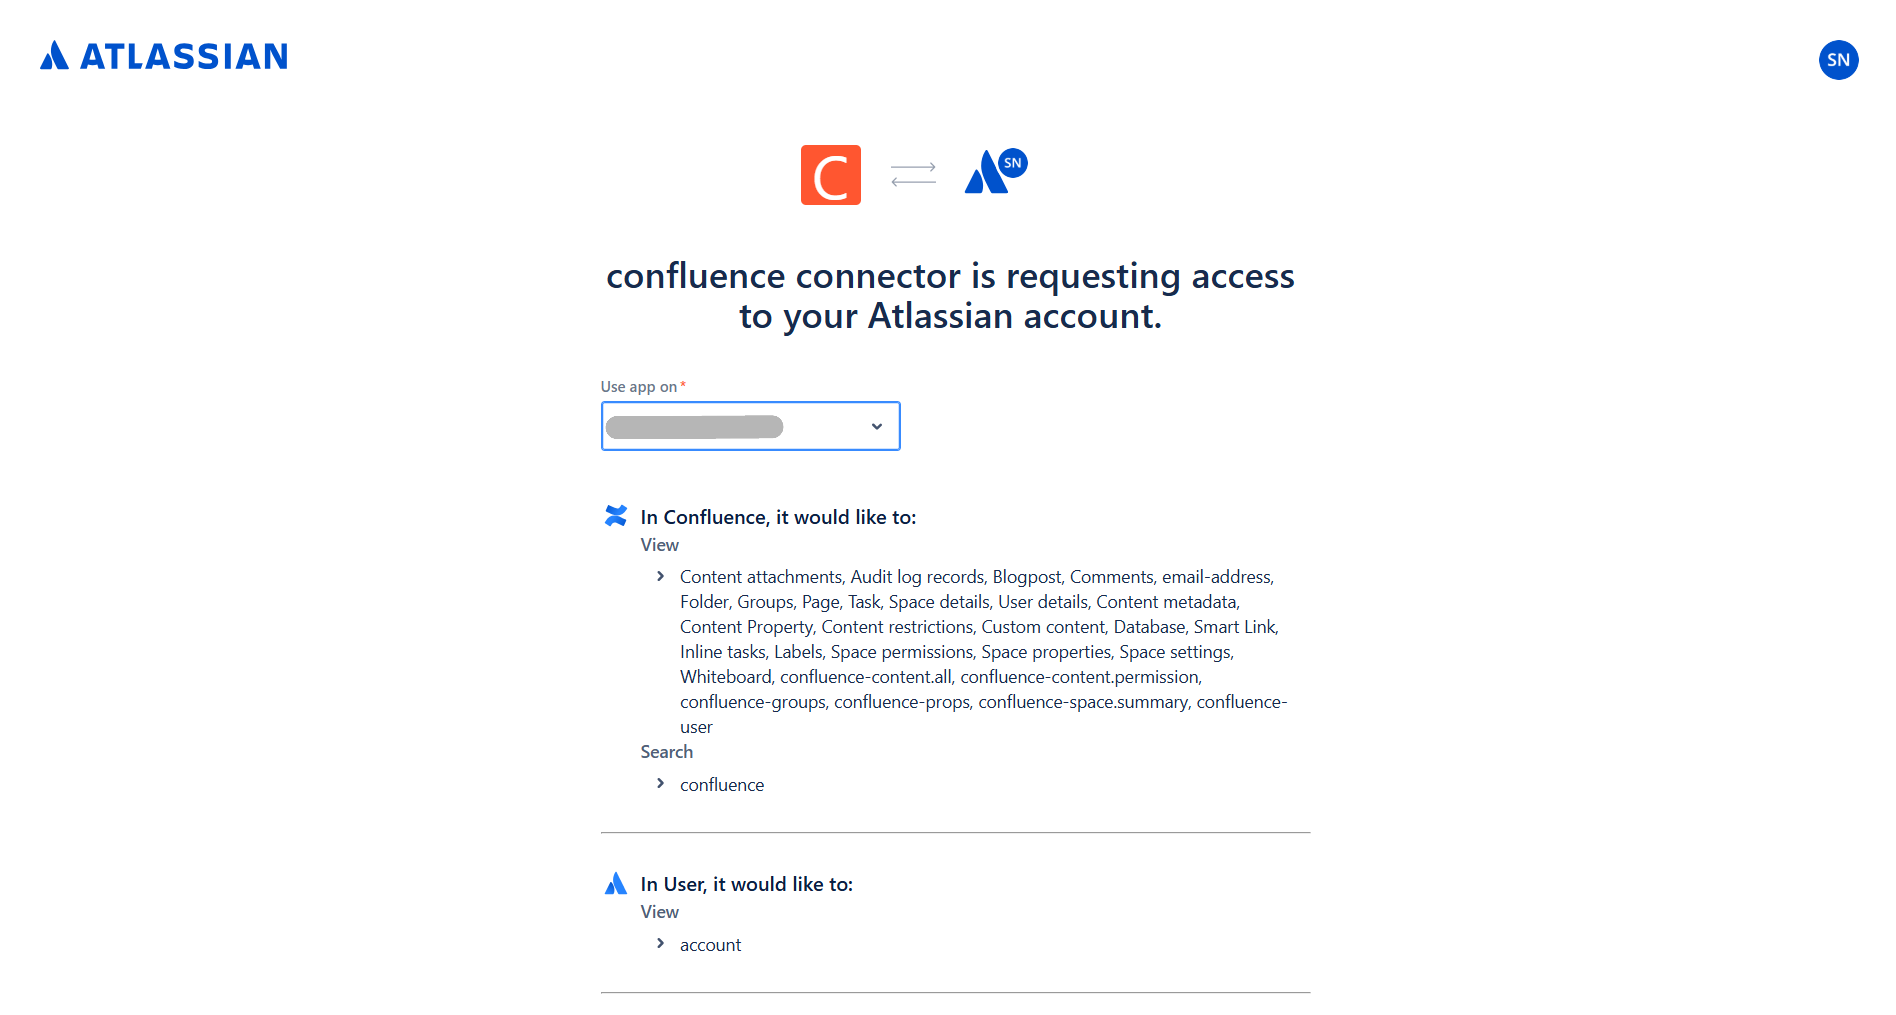
- Review the permissions requested by the connector and click Accept.
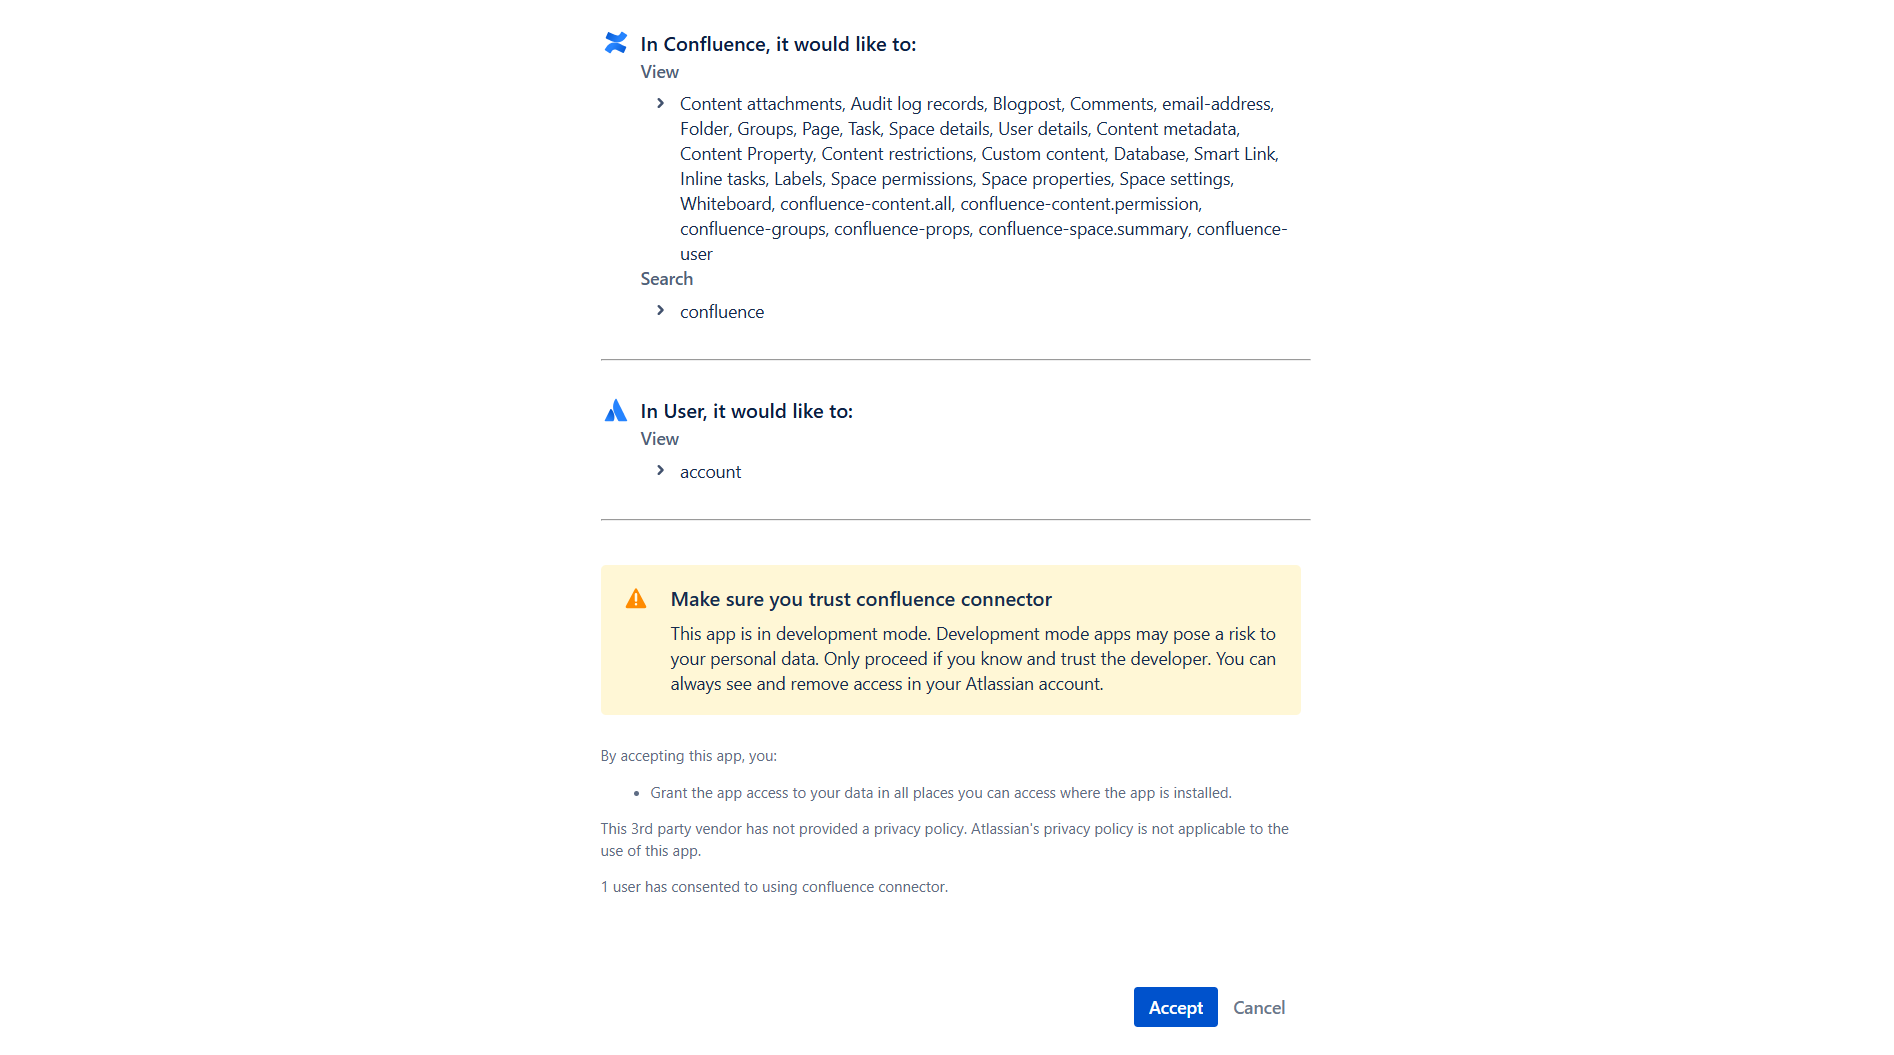
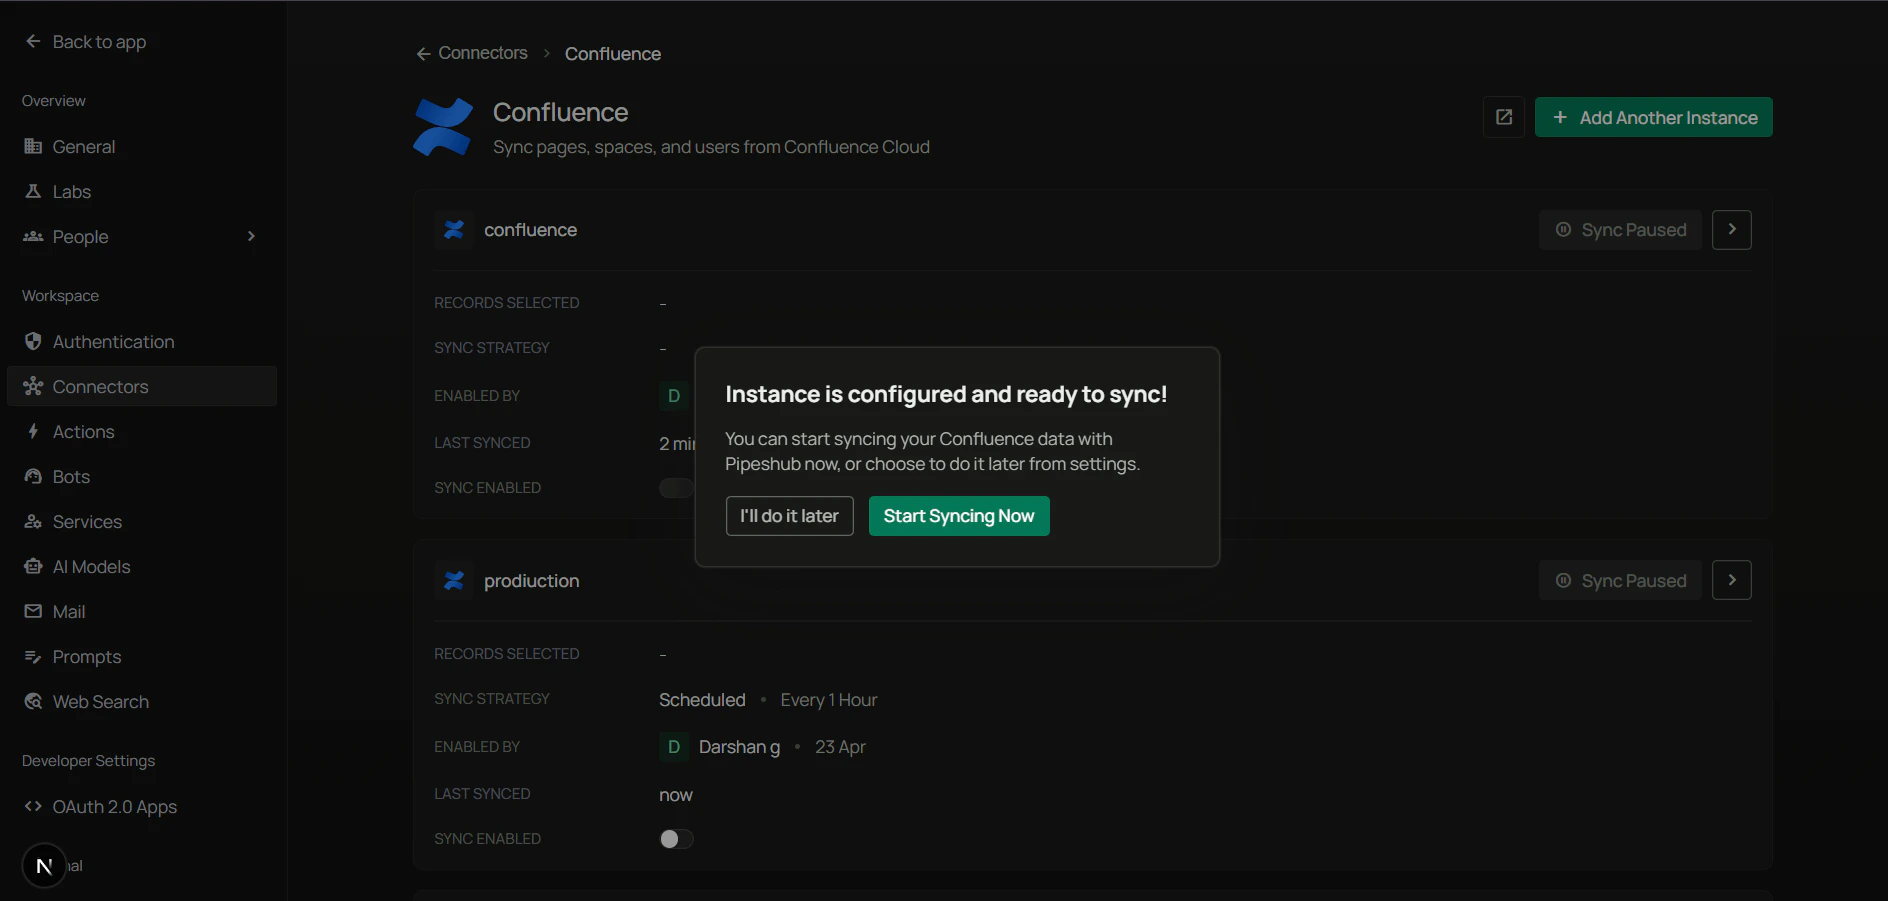
- The popup closes and returns you to PipesHub. The connector tile shows an Authenticated badge with a Reauthenticate option.
- Click Next to move to the Configure Records tab.
Step 9: Configure Records tab — sync settings, filters, and indexing
On the Configure Records tab, control how the connector syncs and what gets synced.Sync settings — configure your synchronization preferences first:- Sync Strategy —
ScheduledorManual. - Sync Interval — how often to sync (default: 60 minutes).
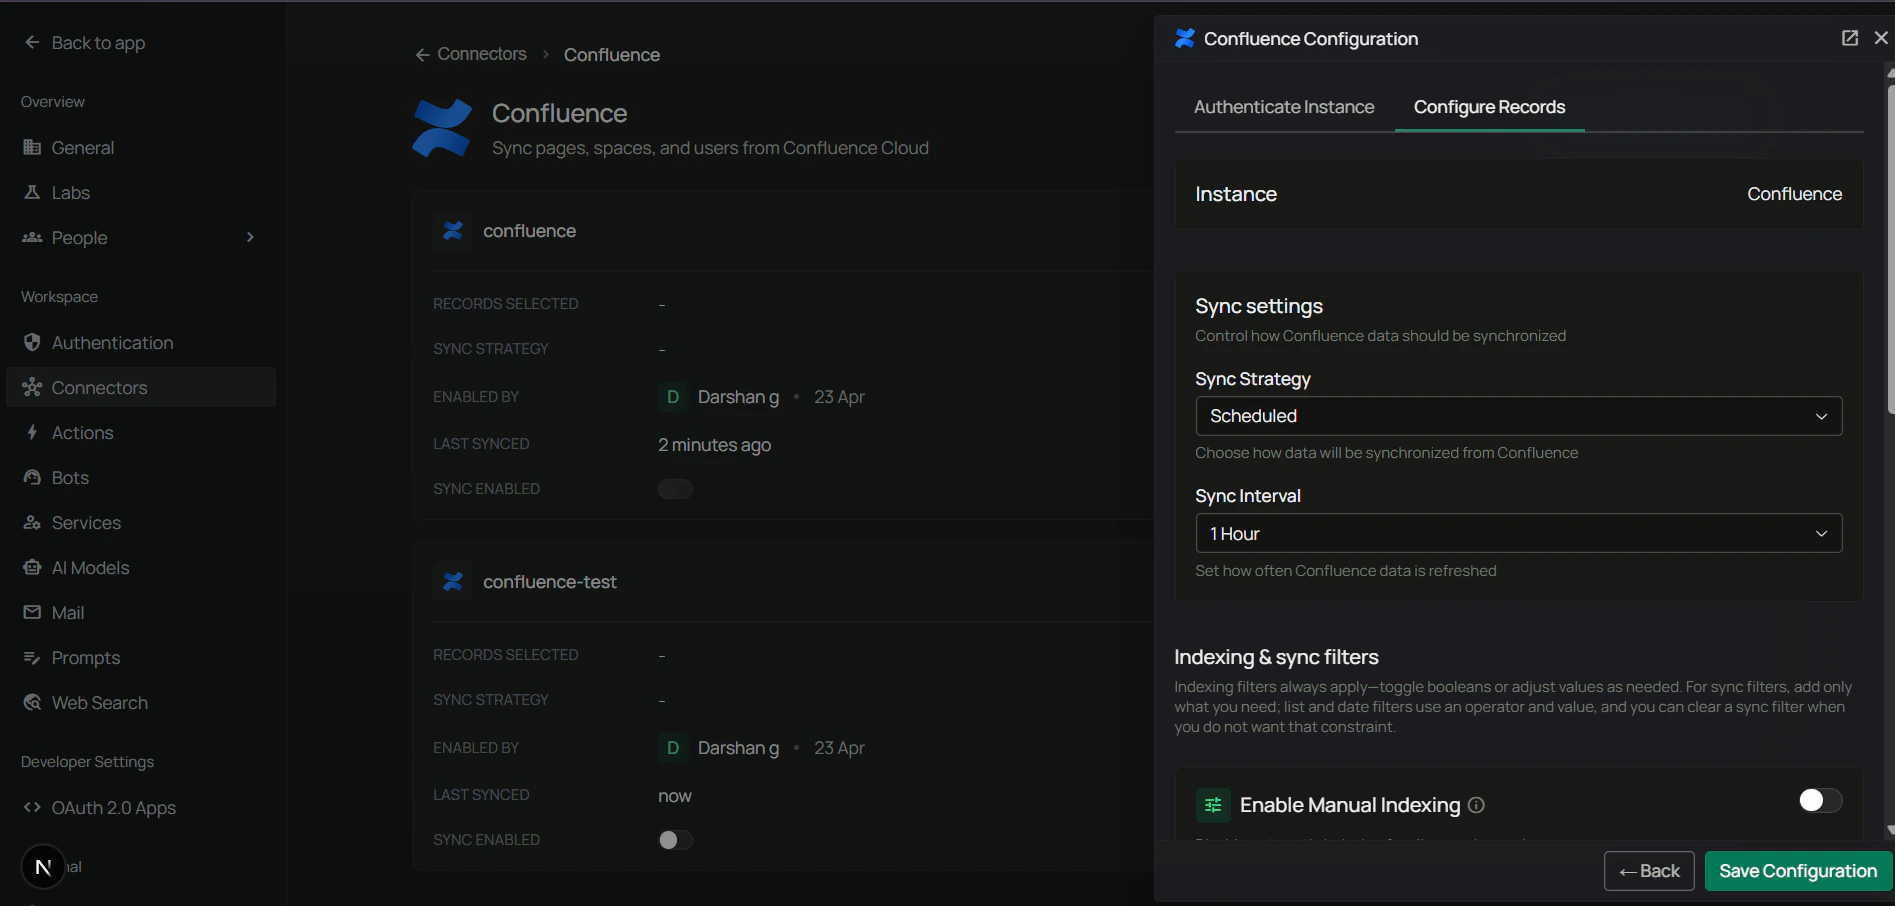
Scheduled sync runs automatically at the specified intervals. Manual sync requires you to trigger synchronization on-demand.

-
Space Keys — filter by Confluence spaces.
- Operator:
In(include only) orNot In(exclude) - Value: one or more space keys (e.g.,
ENG,MKT,PROD). Space keys are case-sensitive. - Finding space keys: check your space URL —
https://yourinstance.atlassian.net/wiki/spaces/SPACEKEY/overview— theSPACEKEYis what you need.
- Operator:
-
Page IDs — filter specific pages (includes all child pages automatically).
- Operator:
InorNot In - Value: one or more page IDs (e.g.,
88375321,90341377) - Finding page IDs: check your page URL — the number after
/pages/is the page ID.
- Operator:
-
Blogpost IDs — filter specific blog posts.
- Operator:
InorNot In - Finding blogpost IDs: the number after
/blog/YYYY/MM/DD/in the URL.
- Operator:
-
Modified Date — filter by last modification date. Operators:
Is After,Is Before,Is Between. - Created Date — filter by creation date. Same operators.
- Pages: Index Pages / Index Page Attachments / Index Page Comments (all default: enabled)
- Blog posts: Index Blogposts / Index Blogpost Attachments / Index Blogpost Comments (all default: enabled)
- Sync only Engineering space: Space Keys → Operator
In, ValueENG - Exclude archived spaces: Space Keys → Operator
Not In, ValueARCHIVE, OLD - Sync specific documentation tree: Page IDs → Operator
In, Value88375321 - Recent content only: Modified Date → Operator
Is After, Date2024-06-01 - Index pages but not attachments: disable the Index Page Attachments toggle

Supported Features
The Confluence connector syncs the following data from your Confluence Cloud workspace:- Spaces — all accessible spaces and their configurations
- Pages — full page content with formatting preserved
- Blog Posts — all blog post content and metadata
- Comments — comments on pages and blog posts
- Attachments — files attached to pages and blog posts
- Users — user profiles and account information
- Groups — user groups and memberships
- Permissions — content restrictions and space permissions
- Folders — folder structure and organization
- Audit Logs — activity records for compliance
This connector is designed for Confluence Cloud only. Confluence Data Center and Confluence Server (on-premise) deployments are not supported.
Useful Links
- Atlassian Developer Console: developer.atlassian.com/console/myapps/
- Atlassian API tokens: support.atlassian.com/atlassian-account/docs/manage-api-tokens-for-your-atlassian-account/
- OAuth 2.0 (3LO) documentation: developer.atlassian.com/cloud/confluence/oauth-2-3lo-apps/
- Confluence API scopes reference: developer.atlassian.com/cloud/confluence/scopes/
Troubleshooting
Troubleshooting
Troubleshooting
Common issues
Invalid client credentials error (OAuth):- Verify Client ID and Client Secret are correct — no extra spaces
- Check that the OAuth app is active in Atlassian Developer Console
- Regenerate the secret if necessary and update PipesHub
- Ensure the Redirect URL in PipesHub exactly matches the Callback URL in Atlassian
- Check for trailing slashes, protocol differences (
httpvshttps), or casing - Update both configurations to use the same URL
- Confirm the token was copied correctly — no leading/trailing whitespace
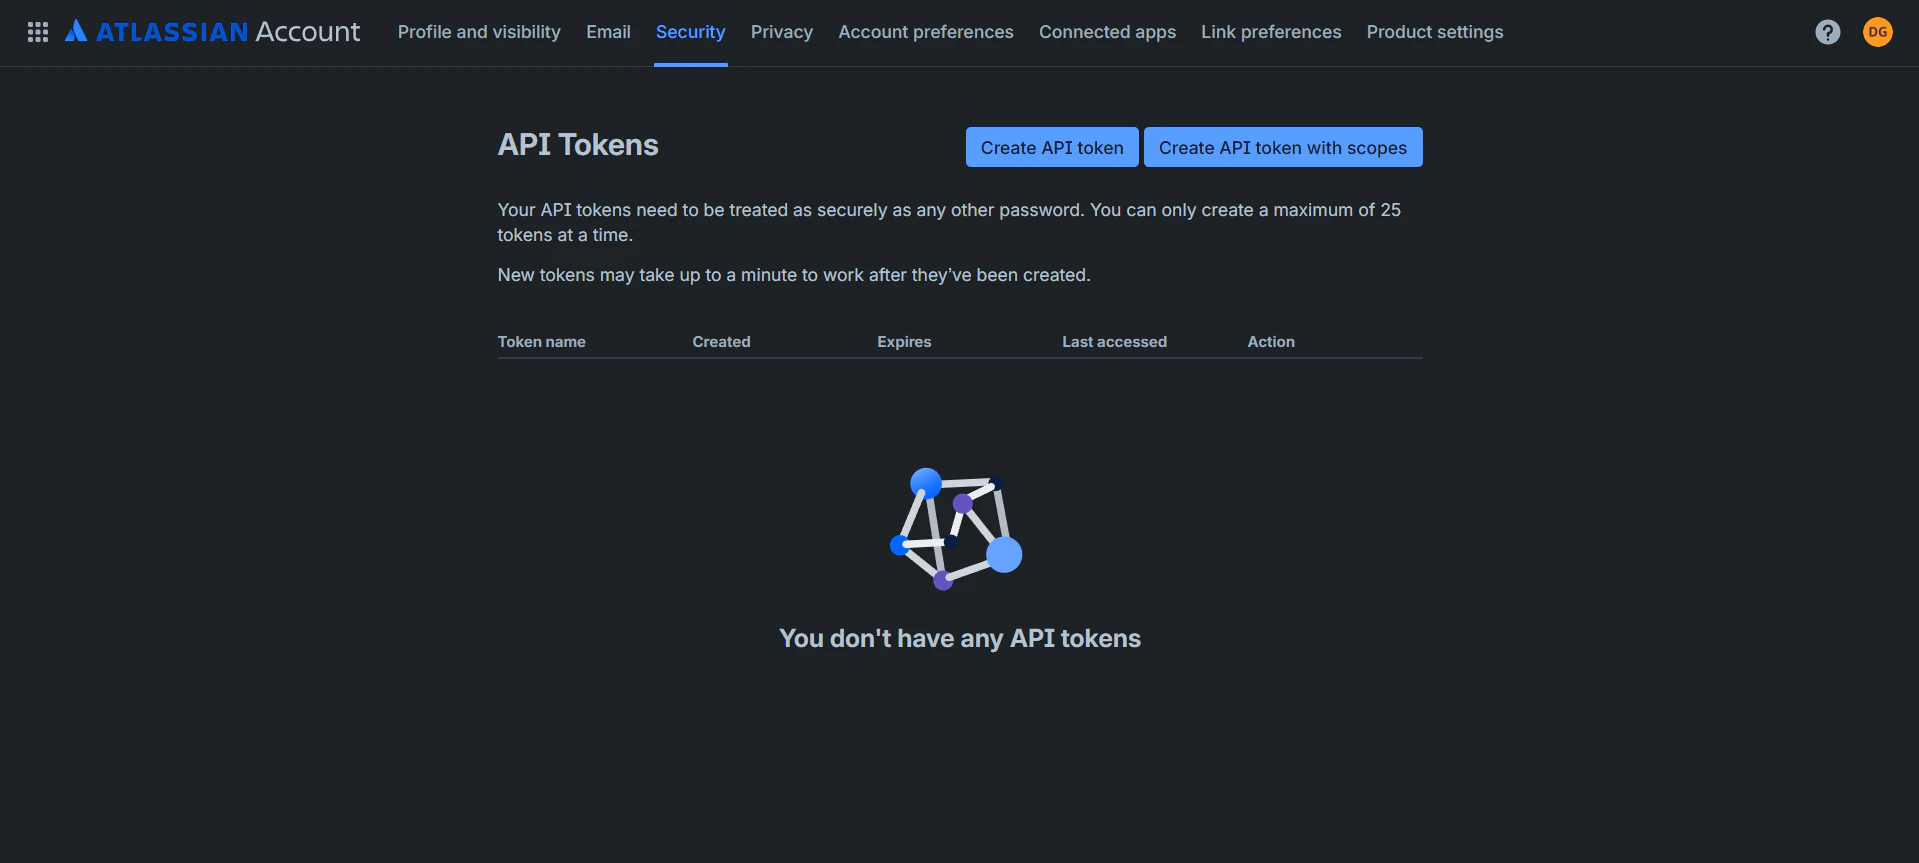
- The token may have been revoked or expired; create a new one at id.atlassian.com/manage-profile/security/api-tokens
- Verify the Email field matches the Atlassian account that created the token
- Verify the Base URL matches your Confluence site (must include
https://, no trailing slash, match*.atlassian.net)
- Must include the protocol:
https:// - Must not include a trailing slash — use
https://acme.atlassian.net, nothttps://acme.atlassian.net/ - Must match the actual Confluence Cloud site (usually
*.atlassian.net) - Do not include paths like
/wikior/spaces/...
- Verify you’re signing in with an account that has Confluence access
- Ensure your Confluence site is selected during authorization
- Check that all required API scopes are configured
- Verify the connector status shows Active
- Check that the authenticating user (OAuth) or token-owning user (API Token) has access to Confluence spaces
- Ensure spaces are not restricted or archived
- Review sync logs for specific error messages
- OAuth tokens may expire per Atlassian’s policies; disable and re-enable the connector to re-authenticate
- API tokens can be revoked from the Atlassian account page; generate a new one and update the Authenticate Instance tab
- Check if the OAuth app is still active in Developer Console
- Verify the authenticating user has read access to the content
- Check space permissions in Confluence
- Review page restrictions that may limit access
Data Sync Behavior
Synchronization Process
Synchronization Process
Initial sync
- Fetches all accessible content from connected Confluence spaces
- Indexes pages, blog posts, attachments, and comments
- Respects user permissions for content visibility
- Duration depends on the size of your Confluence workspace
Incremental sync
- Uses timestamp-based synchronization to detect changes
- Only syncs new or modified content since last sync
- Efficiently handles additions, updates, and deletions
- Reduces API calls and sync duration
Permission handling
- Syncs content based on the authenticating user’s permissions
- Each user sees only content they have access to in Confluence
- Respects space permissions and page restrictions
- Maintains Confluence’s access control model
FAQ
Which authentication method should I choose?
Which authentication method should I choose?
| OAuth 2.0 | API Token | |
|---|---|---|
| Best for | Multi-user / org-wide rollouts, production | Single-account setups, quick POCs |
| Credentials model | Per-user consent, rotating refresh tokens | Single token, long-lived until revoked |
| Prerequisites | Atlassian Developer Console admin access | Any Atlassian account |
What's the difference between Confluence Connector and Confluence Toolset?
What's the difference between Confluence Connector and Confluence Toolset?
| Aspect | Confluence Connector | Confluence Toolset |
|---|---|---|
| Purpose | Sync and index Confluence data for search | Enable agents to perform actions in Confluence |
| Data Flow | One-way (import data into PipesHub) | Two-way (read and write via API) |
| When to Use | Query/search pages, spaces, blog posts | Create pages, update content, manage spaces |
Queries not returning results. What could be wrong?
Queries not returning results. What could be wrong?
There are three common causes:
-
Email mismatch - The email used during connector authentication doesn’t match your PipesHub account email. This causes permission issues preventing you from accessing synced data.
- Fix: Reconfigure the connector and authenticate using the same email as your PipesHub account.
-
Records show in “All Records” but not in search - Documents display in the All Records section but don’t appear in search query results.
- Fix: Verify sync filters in the connector settings and ensure indexing has completed. Check that the data matches your search query criteria.
-
Data not yet indexed - The connector is still syncing or hasn’t completed the initial indexing process.
- Fix: Go to Settings > Connectors, check the sync status, and wait for indexing to complete.
Is it possible to index only specific Confluence spaces?
Is it possible to index only specific Confluence spaces?
Yes. When creating a Confluence connector, the admin has the option to apply filters and select specific Confluence spaces for indexing. This allows you to limit the scope of indexed content to only the spaces that are relevant to your organization’s needs.
Is it possible to index only specific pages within a Confluence space?
Is it possible to index only specific pages within a Confluence space?
Yes. You can achieve this by following these steps:
- Create a dedicated connector instance — Create a Confluence connector instance for the space that contains the pages you want to index.
- Select Manual Indexing — When configuring the connector, choose the Manual Indexing option. This gives you granular control over which content gets indexed.
- Select the Confluence space — Use the filters to select the specific Confluence space that contains the pages you want to index.
- Navigate to specific pages — Go to All Records in the navigation bar, then browse to the specific pages you want to index within the selected Confluence space.
Ready to Get Started?
Connect your Confluence workspace to PipesHub in just a few minutes. Follow the step-by-step guide above to enable organization-wide knowledge search and access across all your Confluence content.