


















Overview
Linear is a modern issue tracking and project management platform designed for high-performance software teams. It provides streamlined workflows, keyboard-first design, and powerful integrations to help teams build products faster.Linear Data Structure
The connector understands Linear’s hierarchical data model:- Teams
- Issues (with comments, attachments, documents, and embedded files)
- Projects (with milestones, updates, external links, and documents)
- Users (team members with profiles and emails)
What Gets Synced
The connector indexes the following content for AI-powered search:| Content Type | Details |
|---|---|
| Issues | Title, description, status, priority, labels, identifiers (e.g., ENG-123), assignee, creator, type, and parent issue (sub-issues) |
| Comments | Full comment threads organized by thread ID with author info and timestamps |
| Attachments | External links attached to issues |
| Documents | Linear documents linked to issues and projects |
| Files | Files from descriptions/comments (images as base64, others as FileRecord) |
| Projects | Description, content, milestones, updates, comments, external links, and documents |
| Users | Profiles with IDs, emails, and display names |
| Permissions | Team-level access controls (public vs. private teams) |
Configuration Guide
Setup
Setup
Getting Started
The Linear connector provides access to your organization’s Linear workspace through OAuth 2.0 authentication. It syncs teams, projects, issues, comments, attachments, documents, and user information, enabling comprehensive issue tracking search and access across your Linear content.Authentication Method
The Linear connector uses OAuth 2.0 for secure authentication. This allows users to authorize the connector to access Linear data on their behalf while maintaining control over permissions through Linear’s OAuth scopes.OAuth 2.0 is the recommended authentication method by Linear. It provides secure, token-based access with automatic refresh token support for continuous synchronization.
How to configure and enable the Linear Connector
Step 1: Access Linear API Settings
-
Navigate to Linear Settings:
Go to linear.app/settings/api and sign in with your Linear account that has administrator access to your workspace. - View Your Applications: You’ll see the “API” settings page where you can create and manage OAuth 2.0 applications.
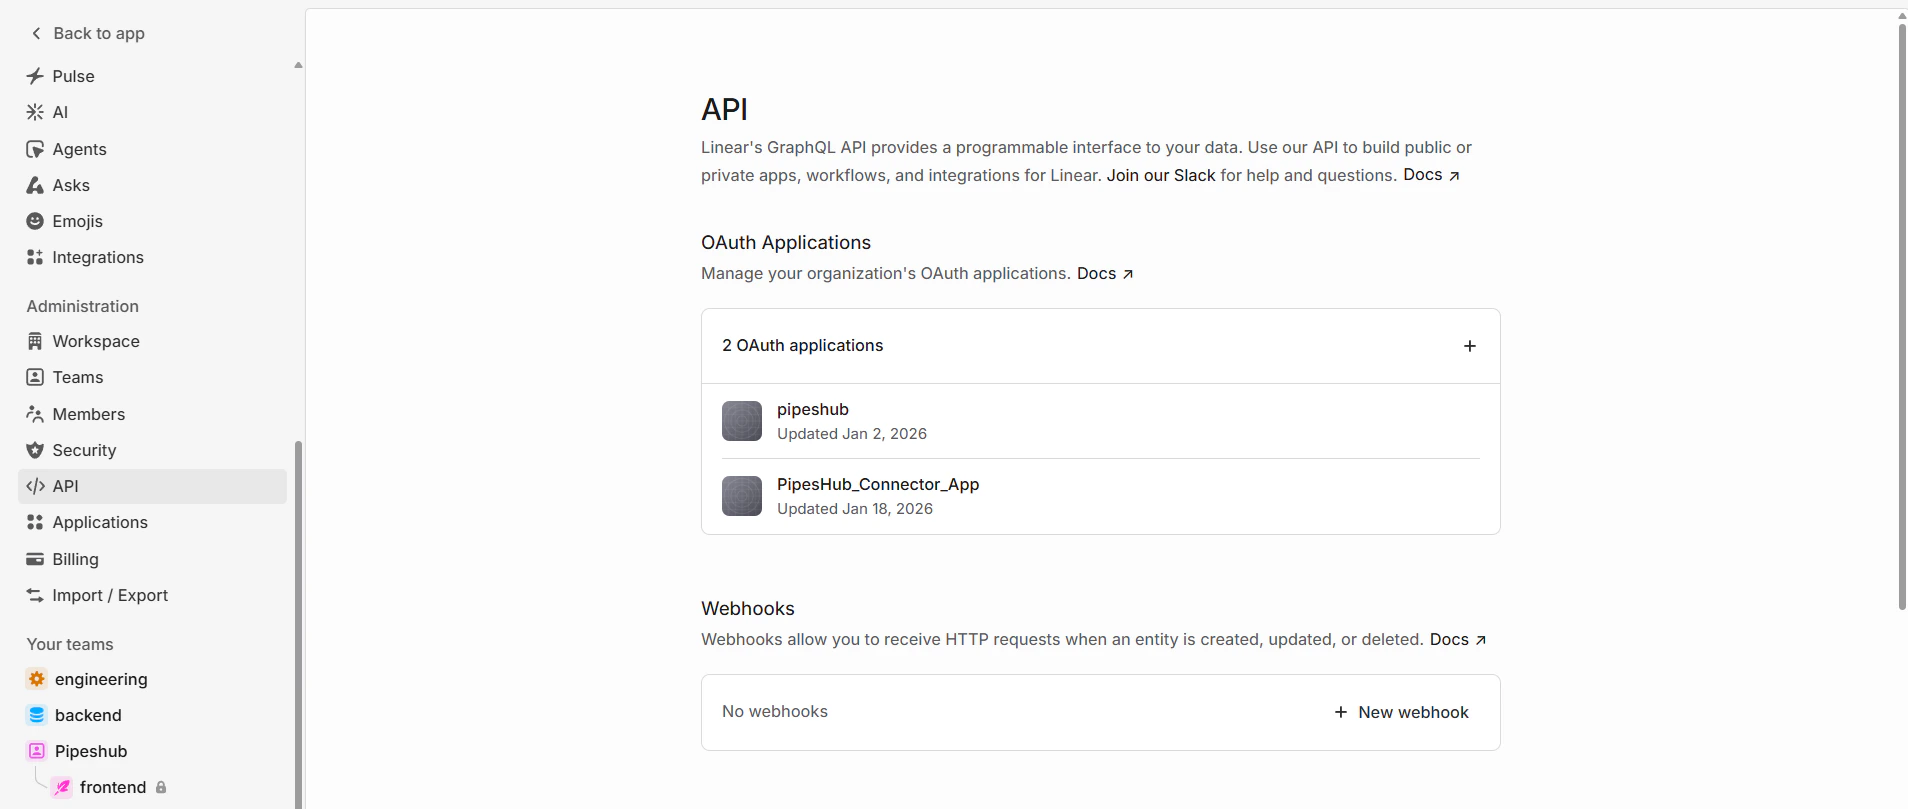
It is recommended to create a dedicated workspace for managing OAuth 2.0 applications, as each admin user will have access to the application credentials.
Step 2: Get Redirect URI from PipesHub
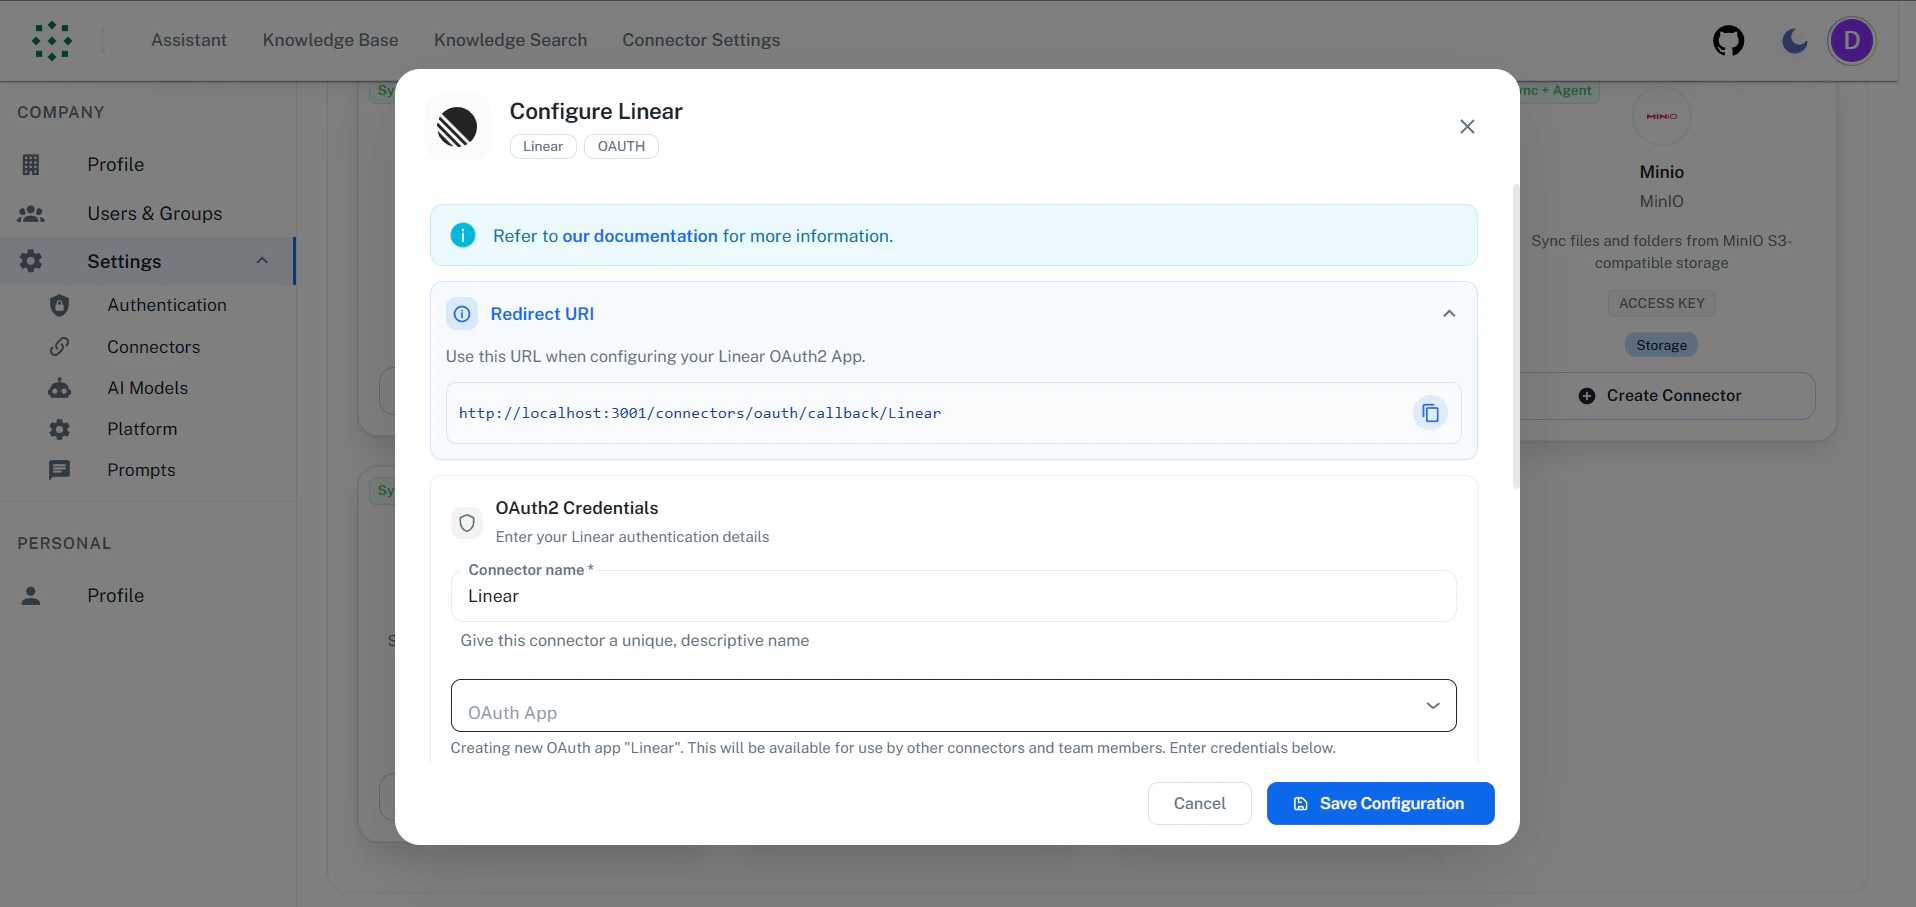
Before creating the OAuth application in Linear, you need to get the Redirect URI from PipesHub:- Open PipesHub in another tab
- Navigate to Connector Settings → Add New Connectors
- Find the Linear connector and click “Configure”
- Copy the Redirect URI shown in the configuration dialog
Step 3: Create a New OAuth 2.0 Application
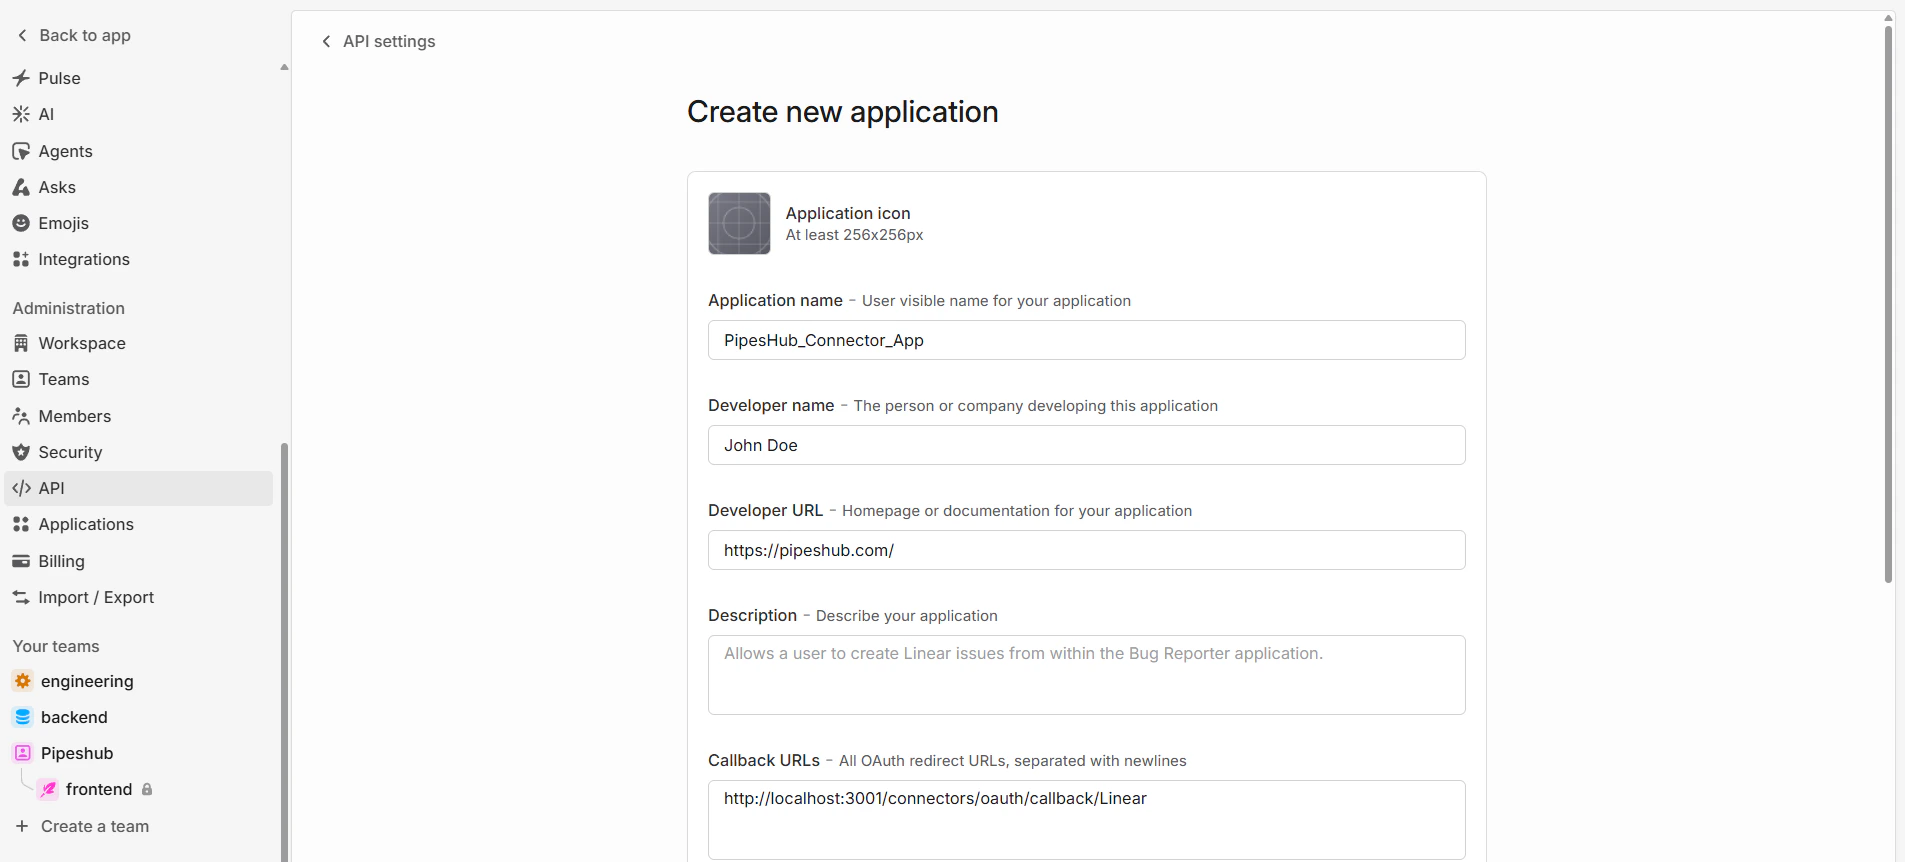
- On the Linear API page, find the “OAuth Applications” section
- Click the ”+” button to create a new application
- Fill in the application details:
- Application name: Enter a meaningful name (e.g., “PipesHub_Connector_App”)
- Developer name: Your name or organization name
- Developer URL: Your website URL (e.g., “https://pipeshub.com/”)
- Description: Optional description of the application
- Callback URLs: Paste the Redirect URI you copied from PipesHub (Step 2)
-
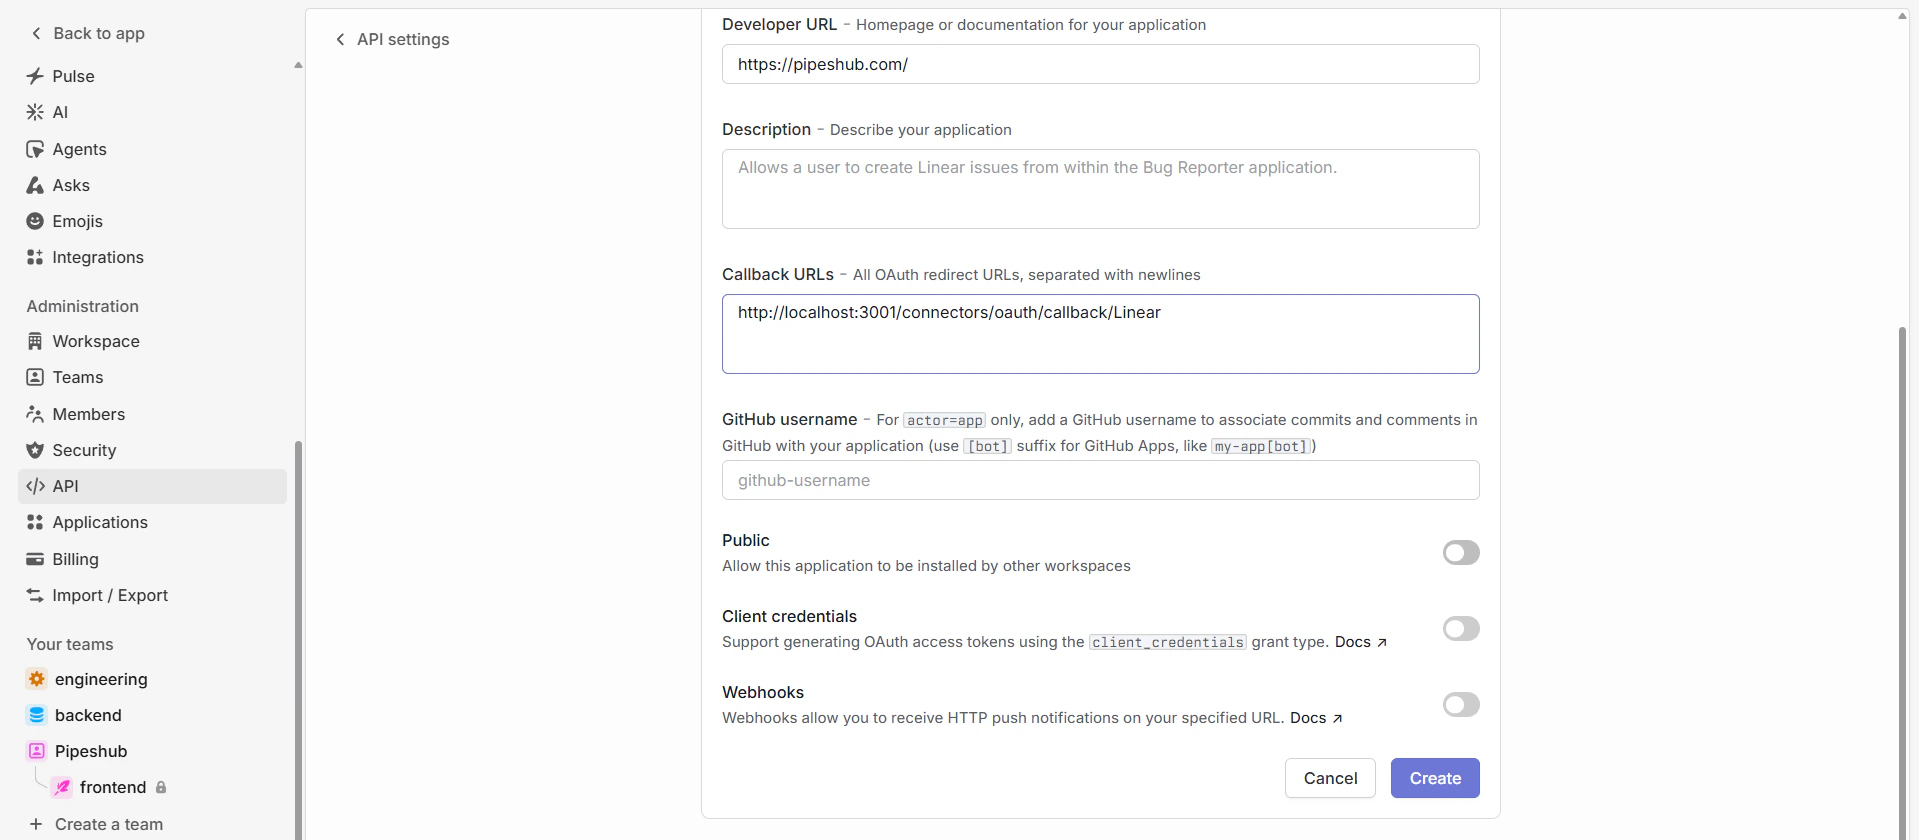
Configure the additional settings (leave all toggles OFF):
- Public: Keep OFF - the connector is only for your organization
- Client credentials: Keep OFF - not needed for standard OAuth flow
- Webhooks: Keep OFF - the connector uses scheduled polling, not webhooks
- Click “Create” to create the application
OAuth 2.0 applications created from October 1, 2025 onwards have refresh tokens enabled by default. Access tokens are valid for 24 hours and are automatically refreshed.
Step 4: Get OAuth 2.0 Credentials
- After creating the application, you’ll see the application settings page
- Copy the following credentials:
- Client ID: Your application’s unique identifier
- Client Secret: Your application’s secret key (click to reveal and copy)
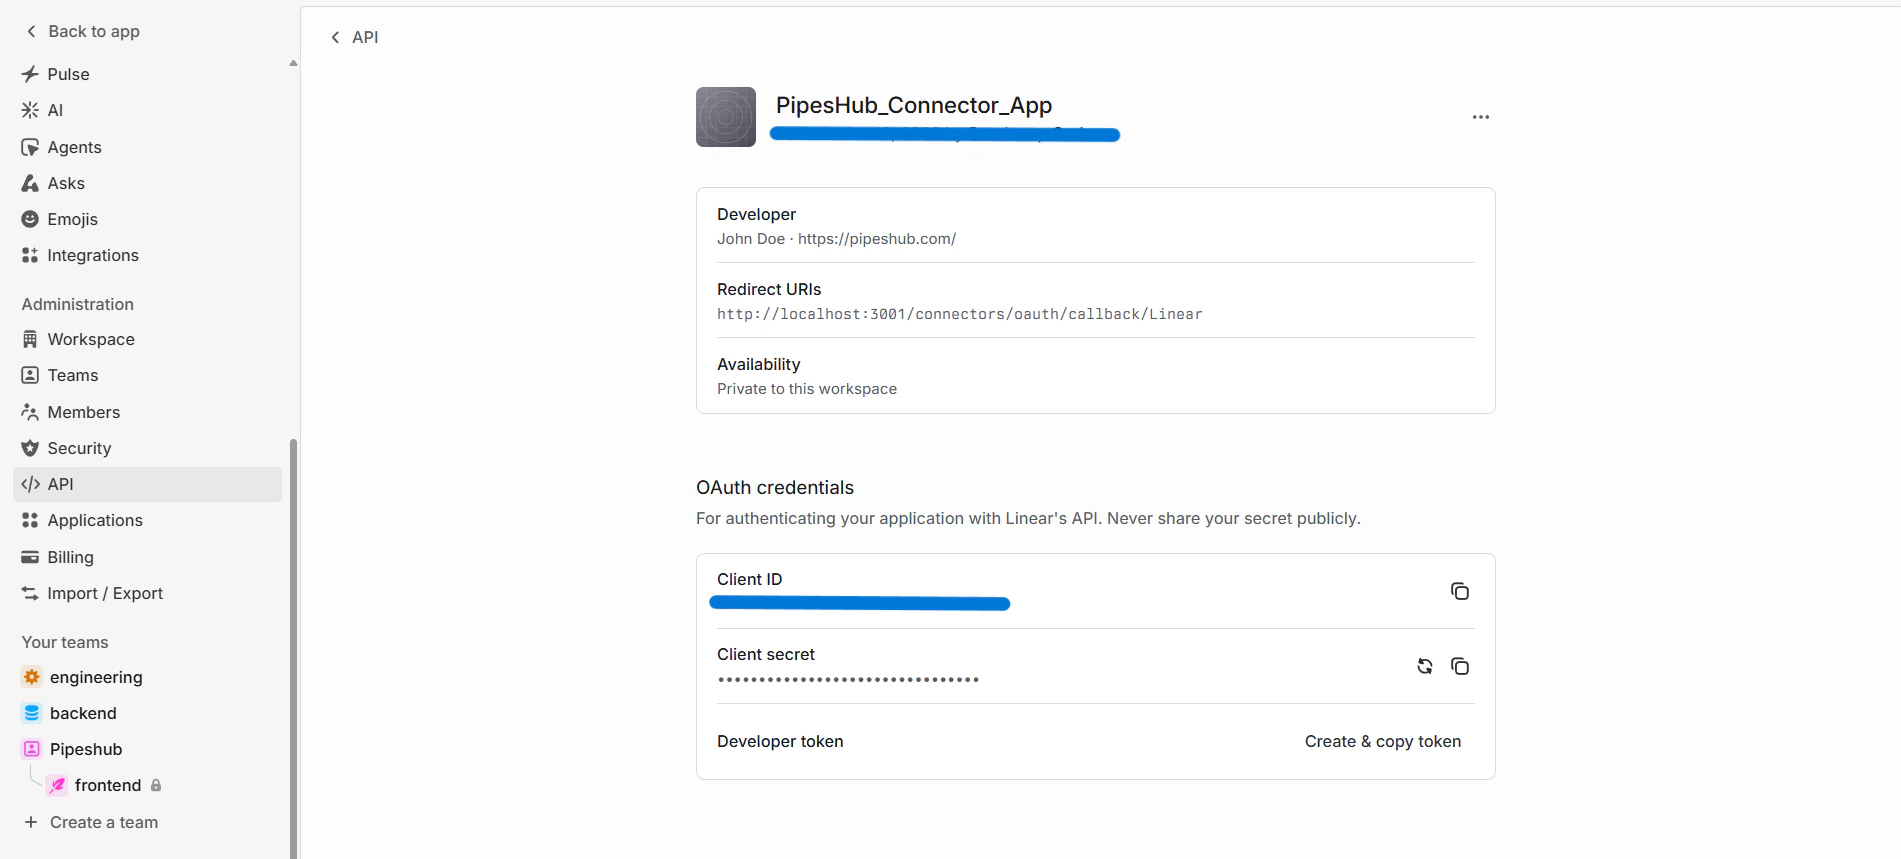
Step 5: Configure Connector in PipesHub
- Return to the PipesHub Linear configuration dialog (if you closed it, navigate to Settings → Connectors and click “Configure” on the Linear connector)
-
The configuration dialog has two steps:
- Step 1: Authentication - Enter OAuth credentials
- Step 2: Sync Settings - Configure synchronization
- Verify the Redirect URI displayed matches the callback URL you configured in Linear (Step 3)
-
Enter your OAuth 2.0 credentials:
- Client ID: From Step 4
- Client Secret: From Step 4
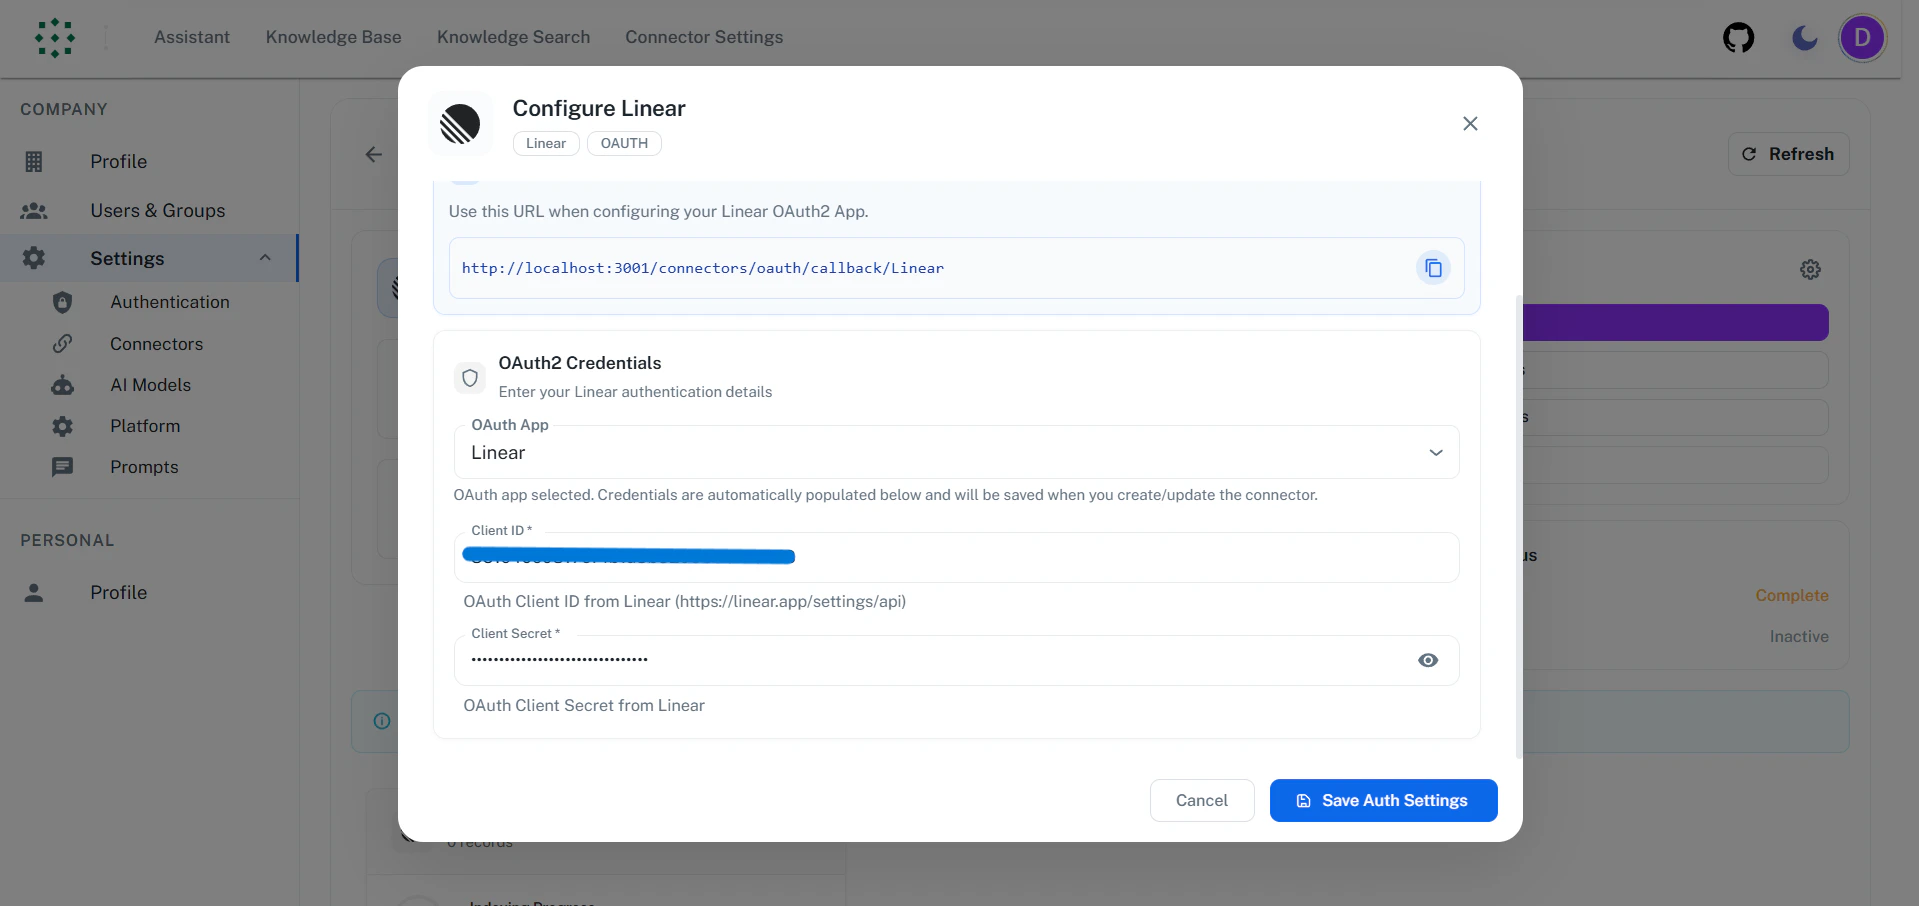
- Click “Save Auth Settings” to save authentication settings
Step 6: Authorize the Connection
- After saving the credentials, click “Authenticate” from the Quick Actions panel
- You’ll be redirected to Linear’s authorization page showing:
- Your application name (e.g., “PipesHub_Connector_App is requesting access”)
- The workspace it will authenticate with
- Permissions: “Read access to your workspace”
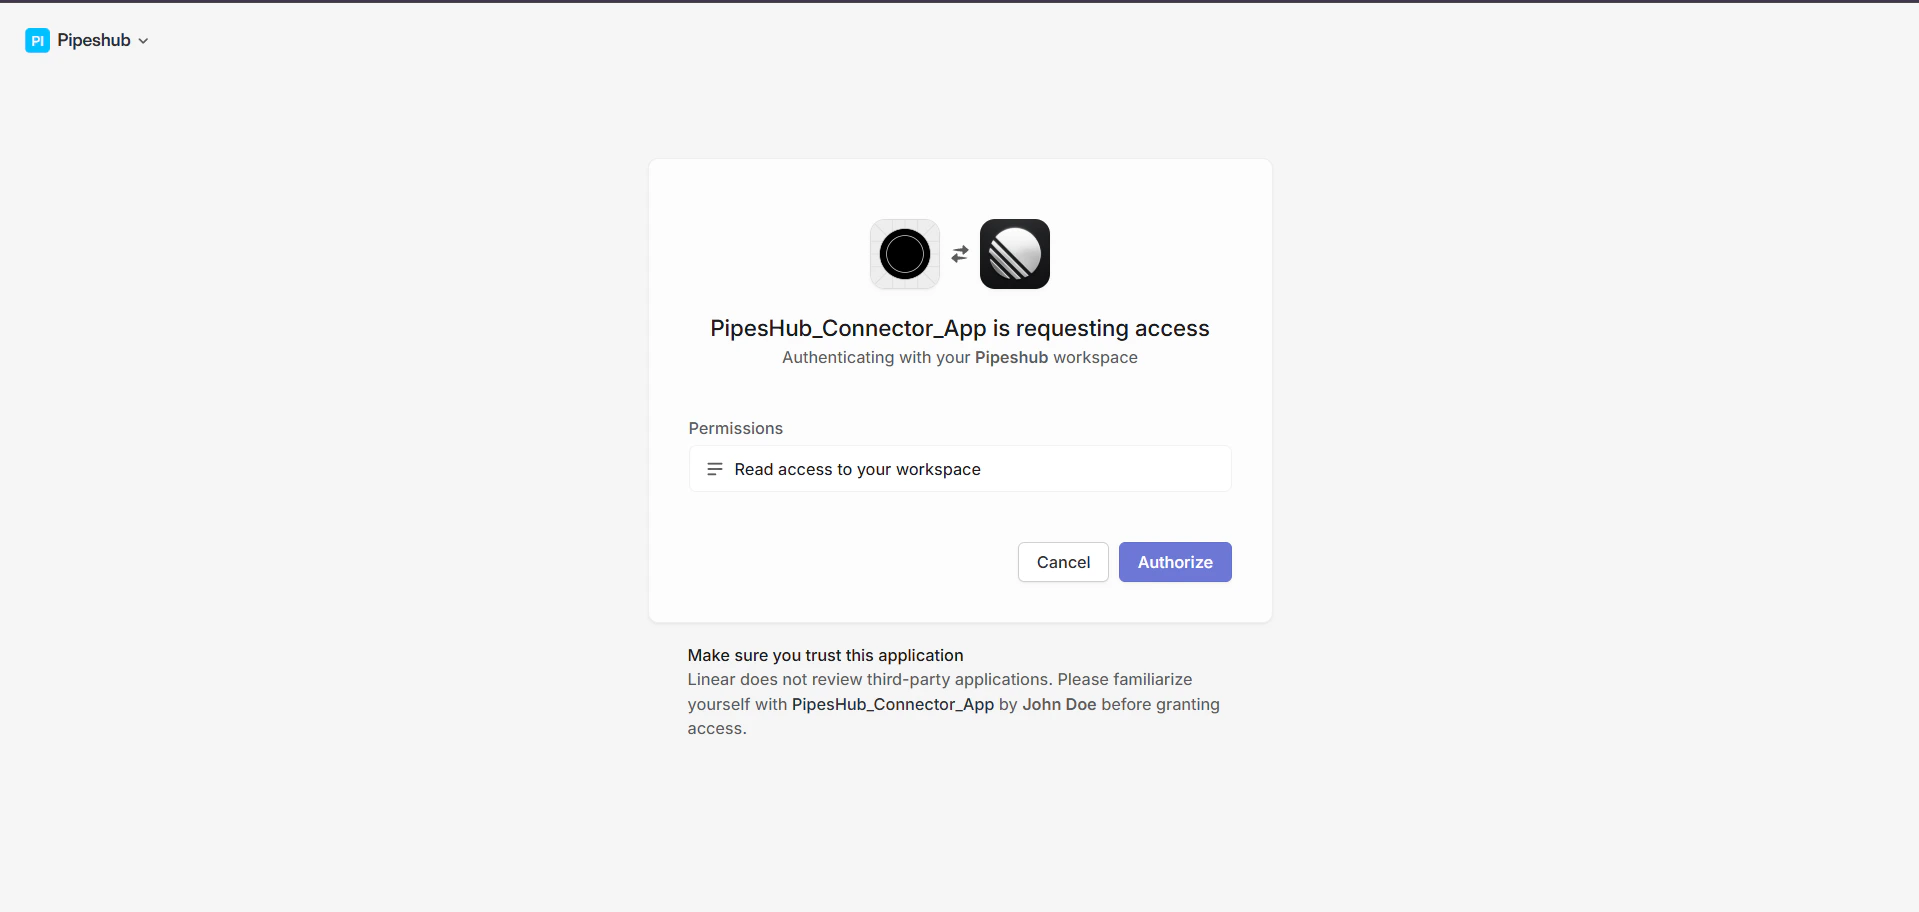
- Click “Authorize” to grant access
The connector requests only read access to your workspace. This provides read-only access to your Linear data. The connector does not create, modify, or delete any Linear data.
- You’ll be redirected back to PipesHub with a success message
- The connector status will update to show “Reauthenticate”, which indicates the connection is active.
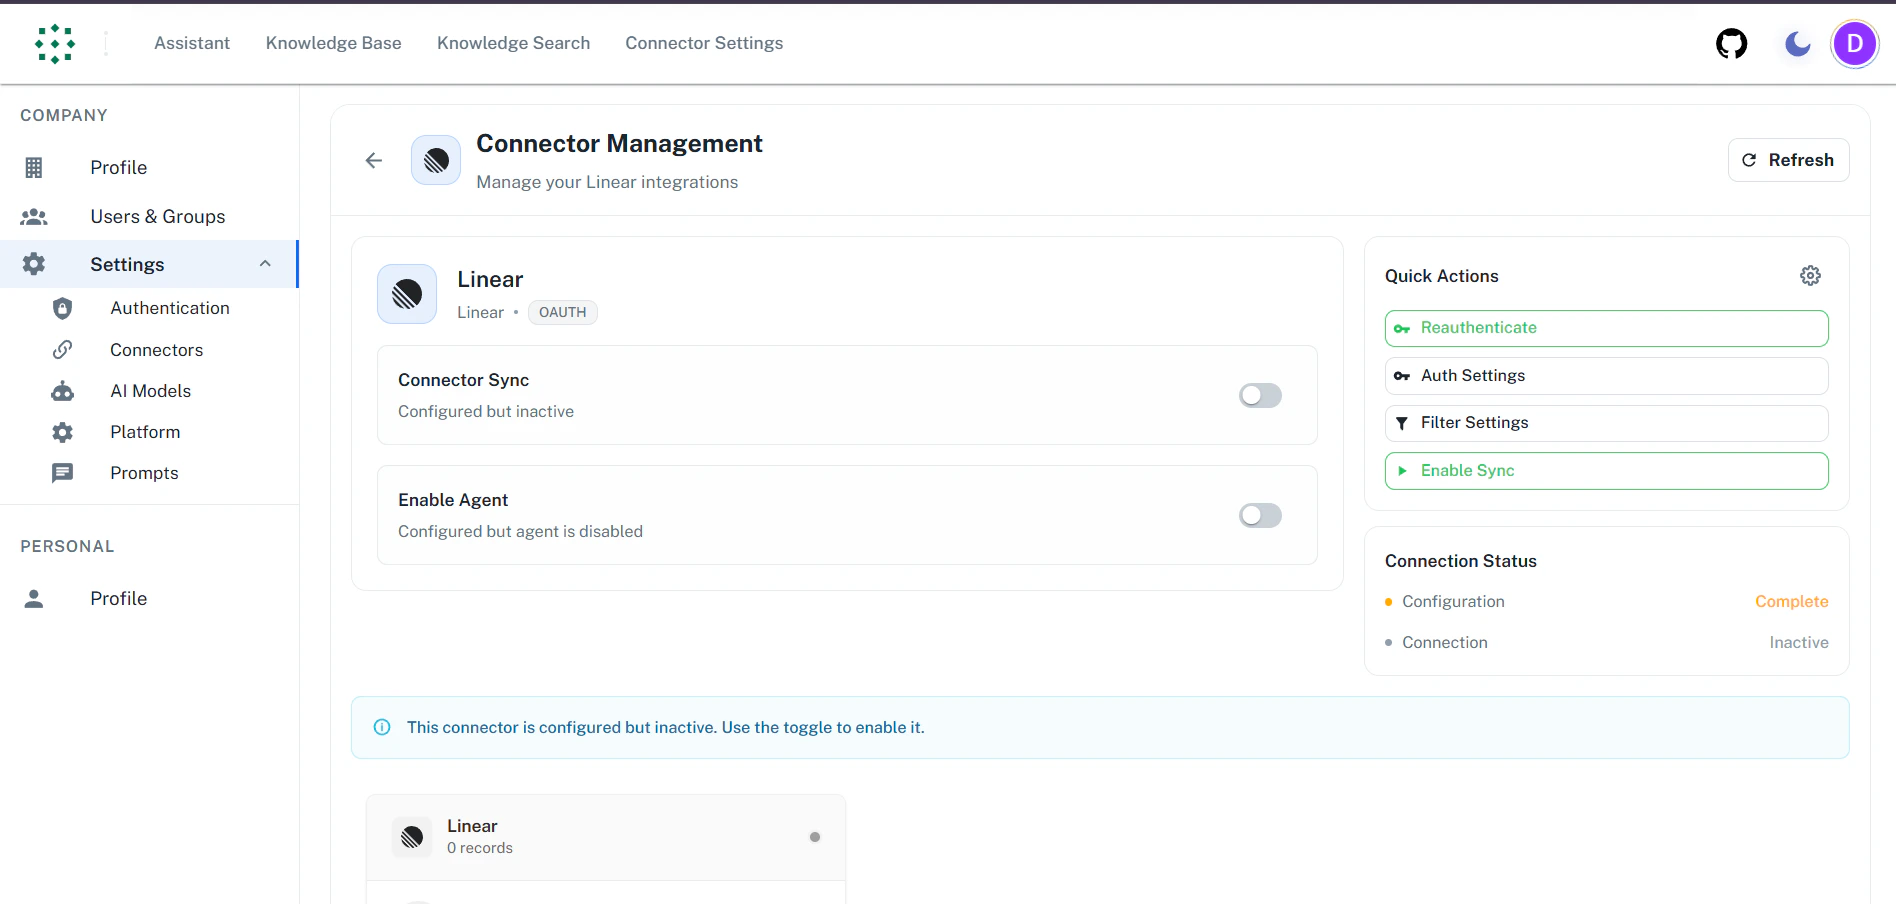
Step 7: Enable and Configure the Connector
- After successful authentication, click “Enable Sync” to activate the connector
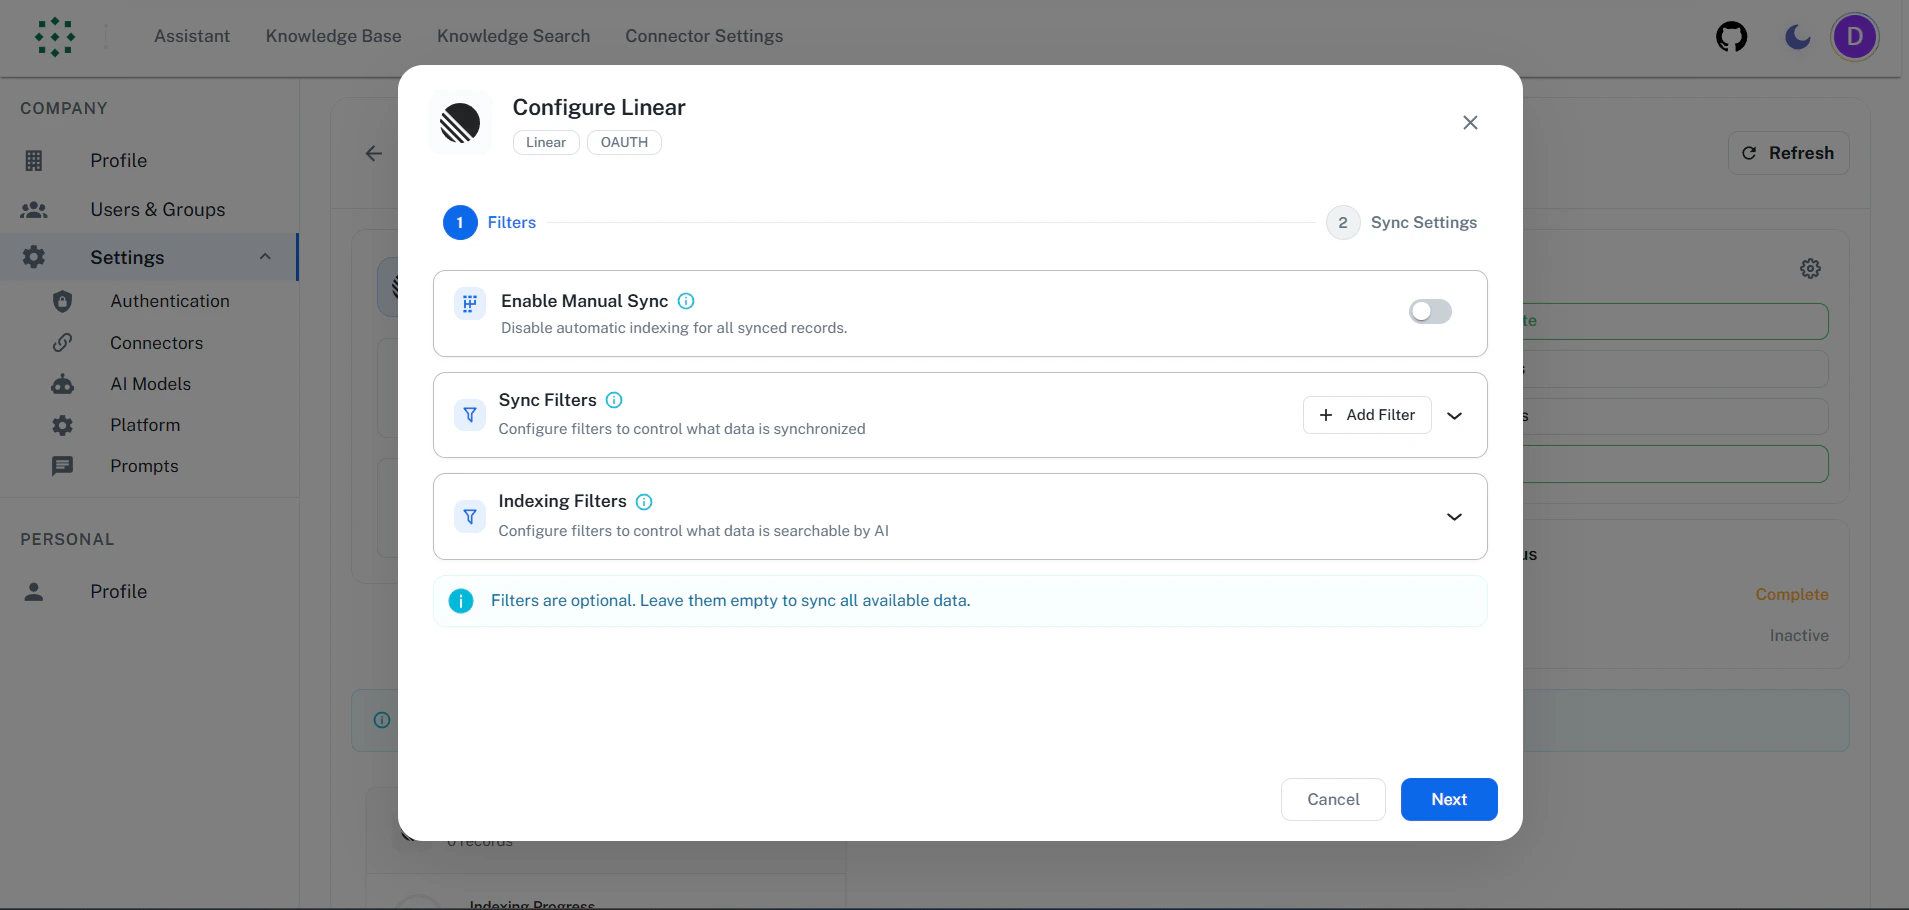
- A configuration dialog will appear with two sections:
- Filters - Control what data is synced
- Sync Settings - Configure synchronization schedule
Sync Filters
Sync filters determine which content is downloaded from Linear. Data excluded by sync filters is never downloaded.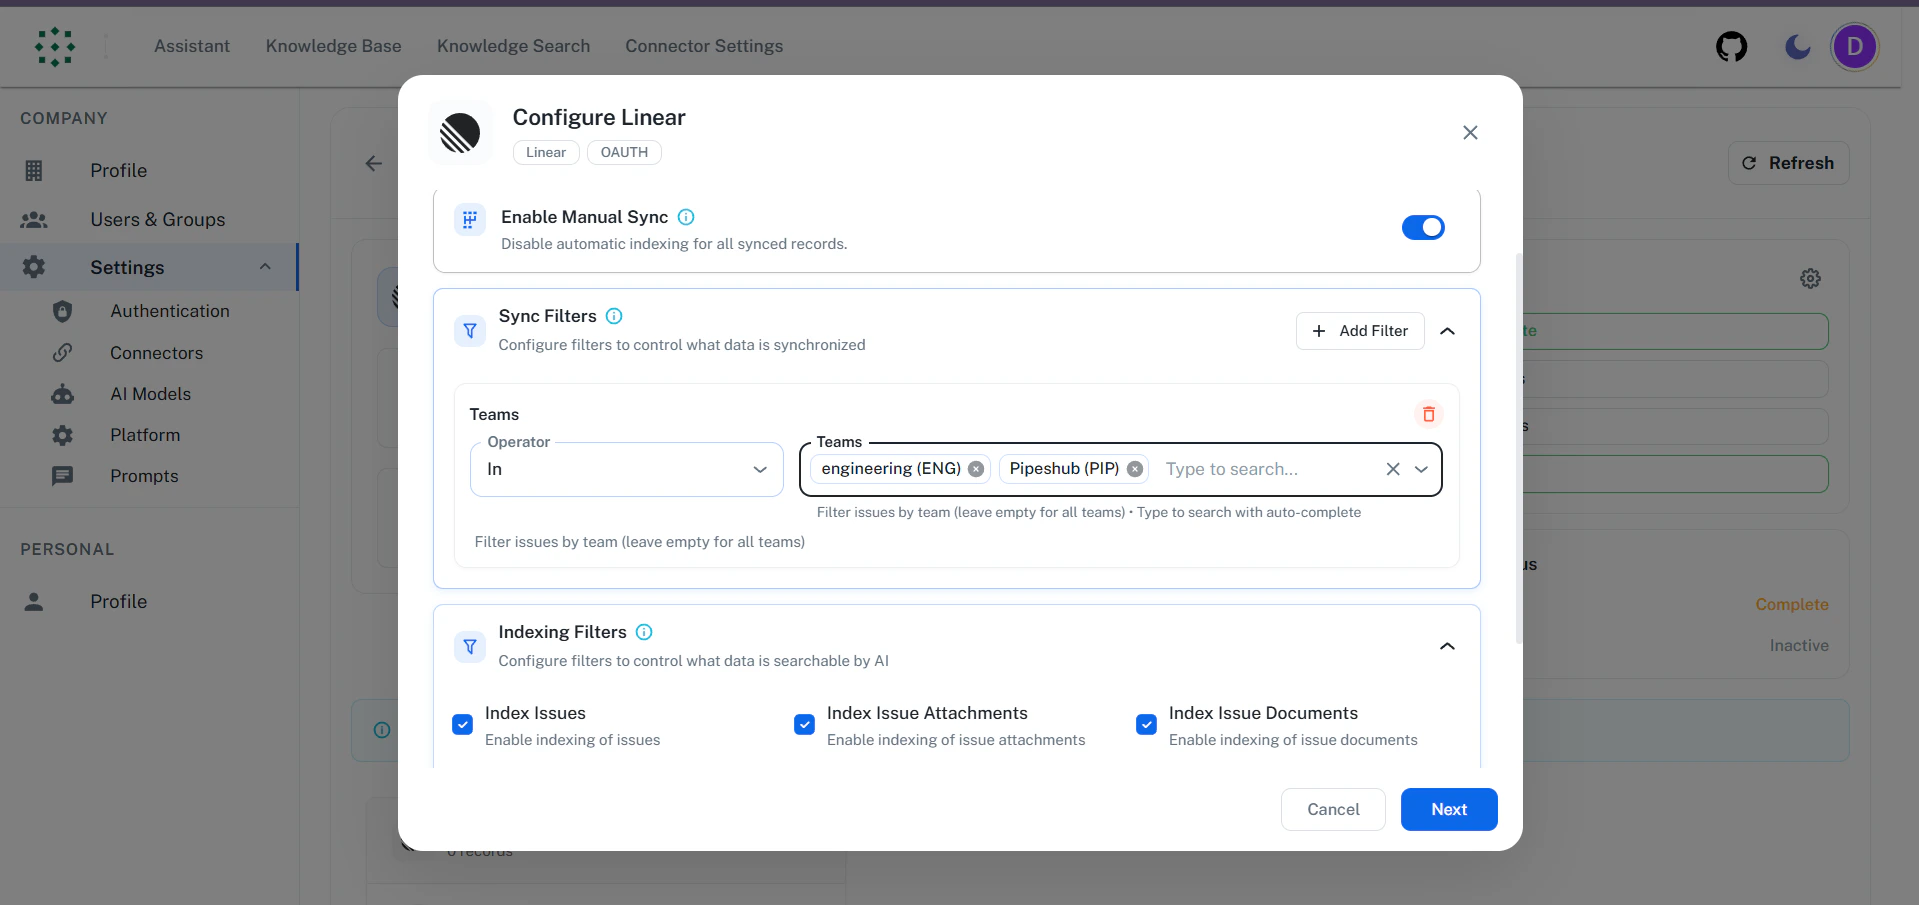
-
Enable Manual Indexing - Control indexing trigger method
- Enabled: Records are indexed only when you manually trigger it
- Disabled (default): Records are indexed automatically after sync
- Use case: Enable if you want full control over when records get indexed
-
Teams - Filter issues and projects by team
- Operator:
In(include only) orNot In(exclude) - Selection: Choose from a searchable dropdown list of all your Linear teams
- The dropdown displays team names (e.g., “Engineering”, “Design”, “Product”)
- Type to search and filter teams by name
- Select multiple teams as needed
- Leave empty to sync all teams
- Operator:
The team list is dynamically fetched from your Linear workspace. You don’t need to manually enter team IDs - simply search and select from the dropdown.
-
Modified Date - Filter by last modification date
- Operators:
Is After,Is Before, orIs Between - Use case: Sync only recently updated issues (e.g., issues modified in the last 6 months)
- Operators:
-
Created Date - Filter by creation date
- Operators:
Is After,Is Before, orIs Between - Use case: Sync only newly created issues or exclude legacy tickets
- Operators:
Indexing Filters
Indexing filters control what synced data gets processed for AI search. All data is synced, but only enabled content types are indexed.Available Indexing Filters:- Index Issues (default: enabled) - Include issue content and comments in search
- Index Issue Attachments (default: enabled) - Include external link attachments in search
- Index Issue Documents (default: enabled) - Include Linear documents in search
- Index Issue and Comment Files (default: enabled) - Include files extracted from issue descriptions and comments
- Index Projects (default: enabled) - Include project content, milestones, and updates in search
- Sync only Engineering team: Teams → Operator:
In, select “Engineering” from dropdown - Exclude archived teams: Teams → Operator:
Not In, select archived teams from dropdown - Recent issues only: Modified Date → Operator:
Is After, Date:2024-06-01 - Index issues but not attachments: Disable “Index Issue Attachments” toggle
- Index everything except files: Disable “Index Issue and Comment Files” toggle
Filters can be configured during initial setup or modified later. Changes to filters will take effect on the next sync.
Sync Settings
Configure your synchronization preferences:- Sync Strategy: Choose between “Scheduled” or “Manual”
- Sync Interval: Choose how often to sync (default: 60 minutes)
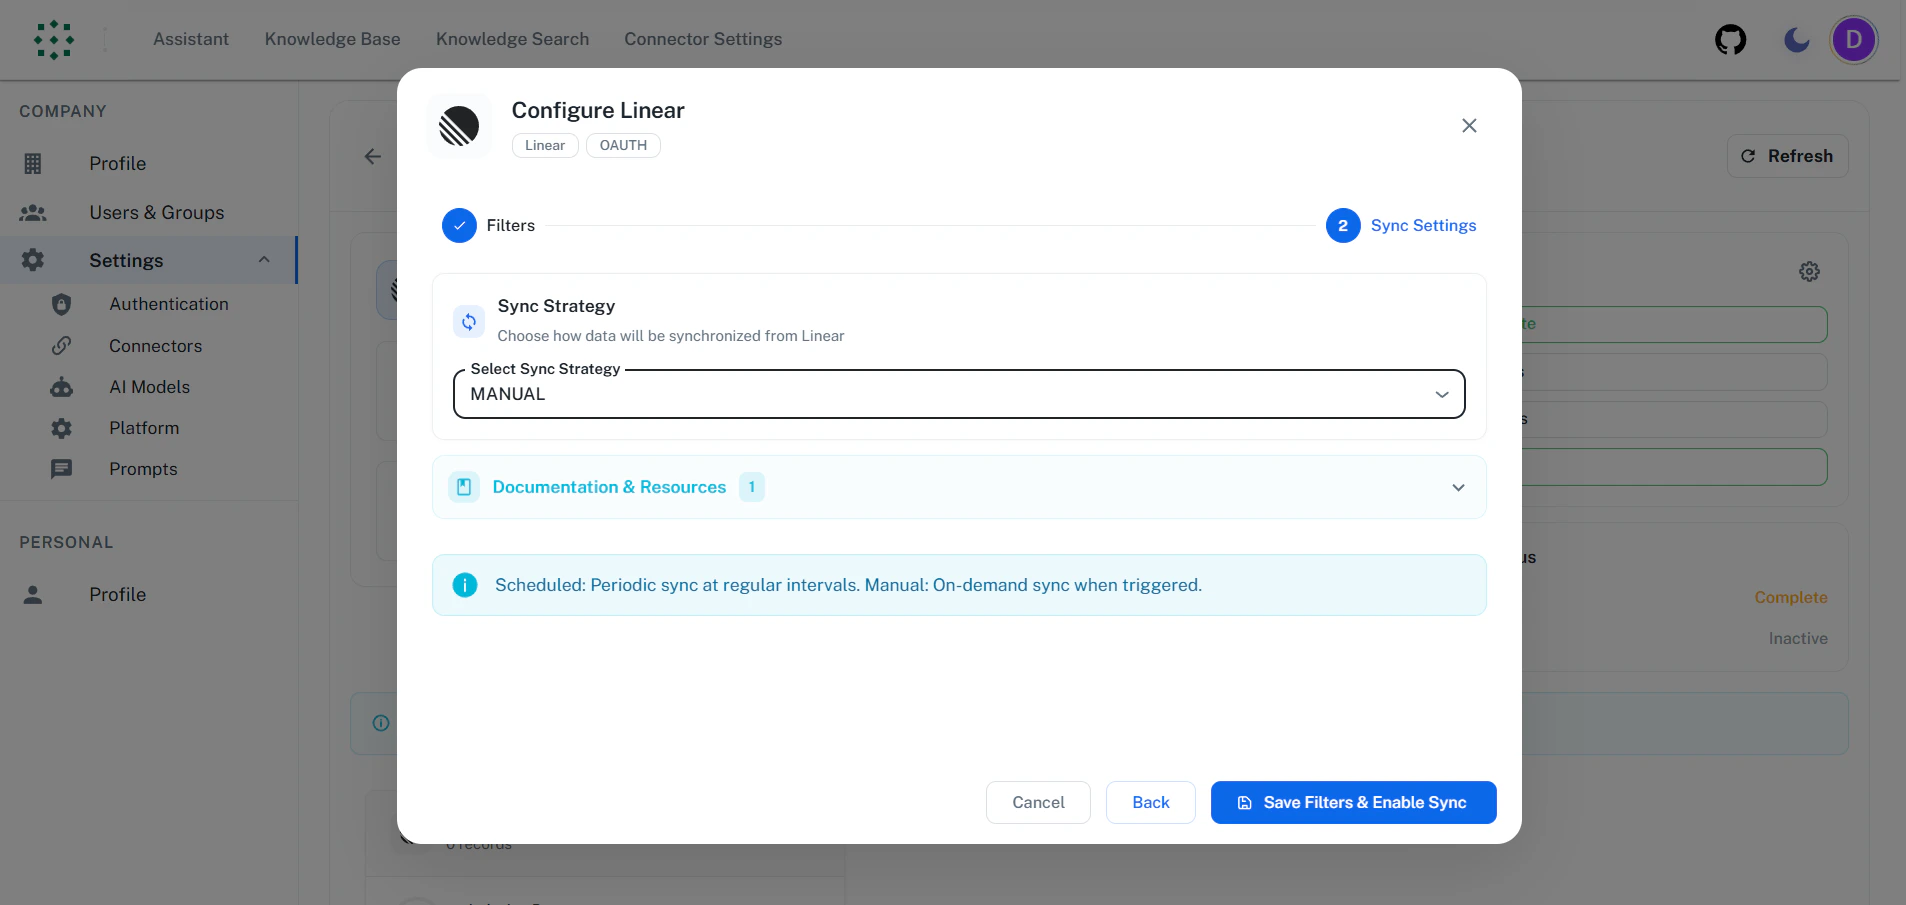
Scheduled sync runs automatically at the specified intervals, keeping your data up-to-date without manual intervention. Manual sync requires you to trigger synchronization on-demand.
Save and Activate
- Click “Save” to save your configuration and enable the connector
- The connector will verify credentials and begin initial synchronization
- Wait for the status to show “Active” or “Syncing”
- Monitor the Indexing Progress to track sync completion
Supported Features
The Linear connector provides:- Full content sync: Teams, issues, projects, comments, attachments, documents, and files
- Incremental sync: Only fetches changes since last sync using
updatedAttimestamps - Batch processing: Fetches data in optimized batches (50 issues, 10 projects per request)
- Permission preservation: Respects team-level public/private access controls
- Dual group tracking: UserGroups (membership) and RecordGroups (content organization)
- Fault tolerance: Per-team checkpoints enable sync resumption on failures
- File handling: Images embedded as base64, other files synced as separate FileRecords
Permission Model
Linear uses a team-based permission model:| Team Type | Permission Behavior |
|---|---|
| Public Teams | All organization members can view team content |
| Private Teams | Only team members can view team content |
- For public teams, content is visible to all organization users in PipesHub
- For private teams, content is only visible to team members in PipesHub
Useful Links
- Linear API Settings: linear.app/settings/api
- OAuth 2.0 Documentation: linear.app/developers/oauth-2-0-authentication
- Linear GraphQL API: linear.app/developers/graphql
- Linear API Reference: Linear API on Apollo Studio
Troubleshooting
Troubleshooting
Troubleshooting
Common Issues
Invalid client credentials error:- Verify Client ID and Client Secret are correct
- Ensure you copied the full values without extra spaces
- Check that the OAuth app is active in Linear API settings
- Regenerate the secret if necessary and update PipesHub
- Ensure the Redirect URI in PipesHub exactly matches the callback URL in Linear
- Check for trailing slashes or protocol differences (http vs https)
- Update both configurations to use the same URL
- Verify you’re signing in with an account that has Linear access
- Ensure you have the necessary permissions in your Linear workspace
- Check that the OAuth application is properly configured
- Verify the connector status shows “Active”
- Check that the authenticating user has access to Linear teams
- Ensure teams are not archived or restricted
- Review sync logs for specific error messages
- Verify the authenticating user has access to the team containing the issues
- Check team privacy settings (public vs. private) in Linear
- Ensure the user is a member of private teams
- Comments are synced as part of issues - ensure “Index Issues” filter is enabled
- Attachments require “Index Issue Attachments” filter to be enabled
- Check that the authenticating user has permission to view comments/attachments
- Ensure the content exists on the issues in Linear
- Only files from Linear’s upload service (uploads.linear.app) are extracted
- External file URLs from other services are not indexed
- Check that “Index Issue and Comment Files” filter is enabled
Connector Workflow
Synchronization Process
Synchronization Process
The Linear connector follows a structured synchronization process to ensure all data is accurately synced and permissions are properly maintained.
Sync Order
The connector syncs data in the following order:- Users → Sync all Linear users with their profiles
- Teams → Sync teams with membership and permission settings
- Issues → Sync issues with comments and embedded files per team
- Attachments → Sync external links attached to issues
- Documents → Sync Linear documents linked to issues
- Projects → Sync projects with milestones, updates, and related content
- Deletions → Detect and remove deleted/archived issues and projects
Full Sync vs Incremental Sync
Full Sync occurs when:- First-time synchronization
- Manual full sync is triggered
- Previous sync completed successfully
- Only fetches content modified since last sync
- Resumes from last checkpoint if interrupted
What Gets Processed
Issues: Title, description, comments (organized by threads), status, priority, assignee, labels, and embedded filesProjects: Description, content, milestones, updates, comments, external links, and documentsAttachments & Documents: Synced separately to capture additions even when parent issue wasn’t modifiedDeletions: Automatically detects trashed/archived content and removes from index along with related recordsFAQ
How long does the initial sync take?
How long does the initial sync take?
The initial sync duration depends on several factors:
- Workspace size: Number of issues, projects, and teams
- Network latency: Connection speed to Linear’s API
- Content complexity: Issues with many comments and attachments take longer
- Use team filters to sync only the teams you need
- Use date filters to exclude old/archived content
- Disable indexing filters for content types you don’t need (e.g., attachments, files)
What OAuth scopes does the connector require?
What OAuth scopes does the connector require?
The Linear connector requests the following OAuth scopes:
| Scope | Description |
|---|---|
read | Read access for your account data (required) |
The connector only requires the
read scope for team synchronization, providing read-only access to your Linear data. It does not create, modify, or delete any Linear data.Does the connector support real-time sync?
Does the connector support real-time sync?
Not currently. The connector uses scheduled polling-based synchronization rather than real-time webhooks. Incremental syncs occur at the configured interval (default: 60 minutes) to capture changes.
Can I sync specific projects only?
Can I sync specific projects only?
Currently, the connector does not support filtering by specific projects. You can filter by:
- Teams: Sync only specific teams
- Modified Date: Sync only recently modified content
- Created Date: Sync only recently created content
Queries not returning results. What could be wrong?
Queries not returning results. What could be wrong?
There are three common causes:
-
Email mismatch - The email used during connector authentication doesn’t match your PipesHub account email. This causes permission issues preventing you from accessing synced data.
- Fix: Reconfigure the connector and authenticate using the same email as your PipesHub account.
-
Records show in “All Records” but not in search - Documents display in the All Records section but don’t appear in search query results.
- Fix: Verify sync filters in the connector settings and ensure indexing has completed. Check that the data matches your search query criteria.
-
Data not yet indexed - The connector is still syncing or hasn’t completed the initial indexing process.
- Fix: Go to Settings > Connectors, check the sync status, and wait for indexing to complete.
Ready to Get Started?
Connect your Linear workspace to PipesHub in just a few minutes. Follow the step-by-step guide above to enable organization-wide issue tracking search across all your Linear content.