

Local FS
Index files from a folder on your computer
✅ Ready📖 Documentation Available
What is this?
Local FS lets you point PipesHub at a folder on your computer so you can search the files in it from PipesHub chat and the knowledge base — just like any other connector. Three things to know up front:- PipesHub only reads the folder. It doesn’t move, rename, copy, or delete anything.
- There’s no login. No password, no API key, no cloud account. You just give it a folder path.
- It’s a personal connector — you set it up under Workspace Settings → Your Connectors, and the files you index are searchable by you inside PipesHub. It is not shared with the rest of your team.
Words you’ll see
One thing to check first — which computer?
The folder needs to be readable by the machine running the PipesHub connector, which isn’t always the same as the laptop in front of you.
If you’re using Docker or a server deployment and you’re not sure, ask whoever set PipesHub up. If it’s just on your laptop, you’re fine — pick any folder.
Quick check for Docker users:
docker compose exec <connectors-service> ls /path/you/will/use. If that lists your files, you’re good. If it says “No such file” or “Permission denied”, the folder isn’t mounted yet.What you need before you start
- A PipesHub account where you can open Workspace Settings (profile menu at the bottom of the main sidebar) and see Your Connectors under the Personal section.
- A folder you want to make searchable.
- About 2 minutes. There’s no cloud setup at all.
Setup
Setup
Setup
Step 1 — Open Local FS in PipesHub
- In the main app, open your user profile menu at the bottom of the left sidebar, then choose Workspace Settings.
- In the workspace settings sidebar, under Personal, click Your Connectors.
- Find the Local FS card.
- Click + Setup on the card.
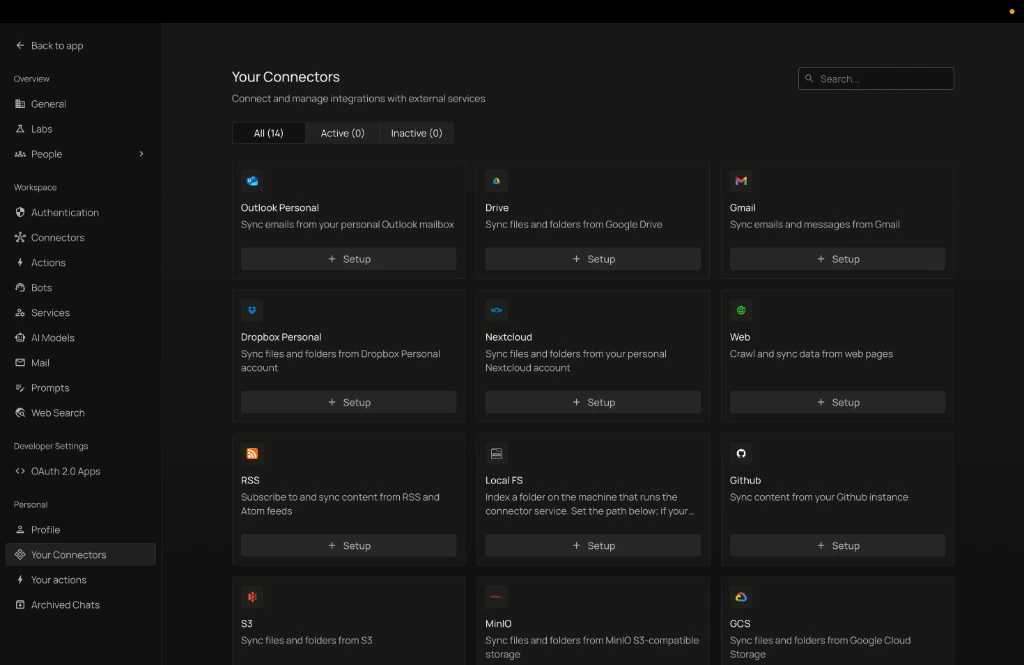
Local FS is a personal connector — set it up from Workspace Settings → Your Connectors, not Workspace Settings → Connectors (team scope). Open Workspace Settings from the profile menu at the bottom of the main sidebar; do not use the Personal section of the main app sidebar (that area is for actions like toolsets, not connector setup).
Step 2 — Name the instance (Authenticate Instance tab)
The first tab is Authenticate Instance. Local FS has no login, so you’ll see a banner that says No authentication required for this connector. That’s normal — there’s nothing to paste.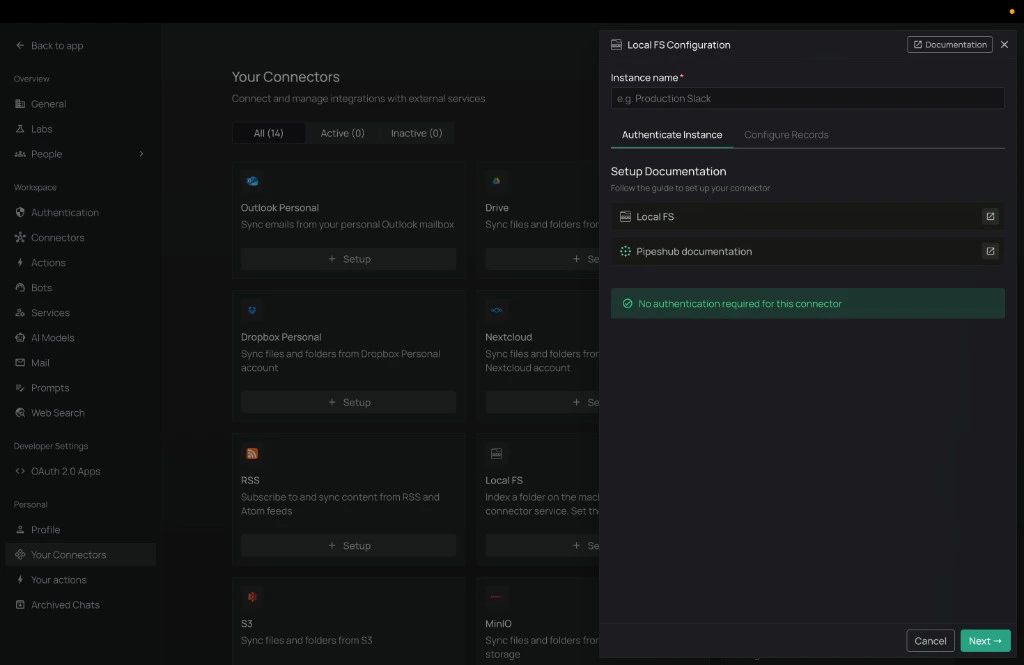
- In Instance name, type a short name you’ll recognise later (for example
My laptoporWork notes). - Click Next → at the bottom.
The instance name is just a label for you. Pick something descriptive — when you add a second folder later, this is how you’ll tell them apart.
Step 3 — Pick the folder and how often to sync (Configure Records tab)
The panel moves you to the Configure Records tab. This is the only tab where you actually have to make choices.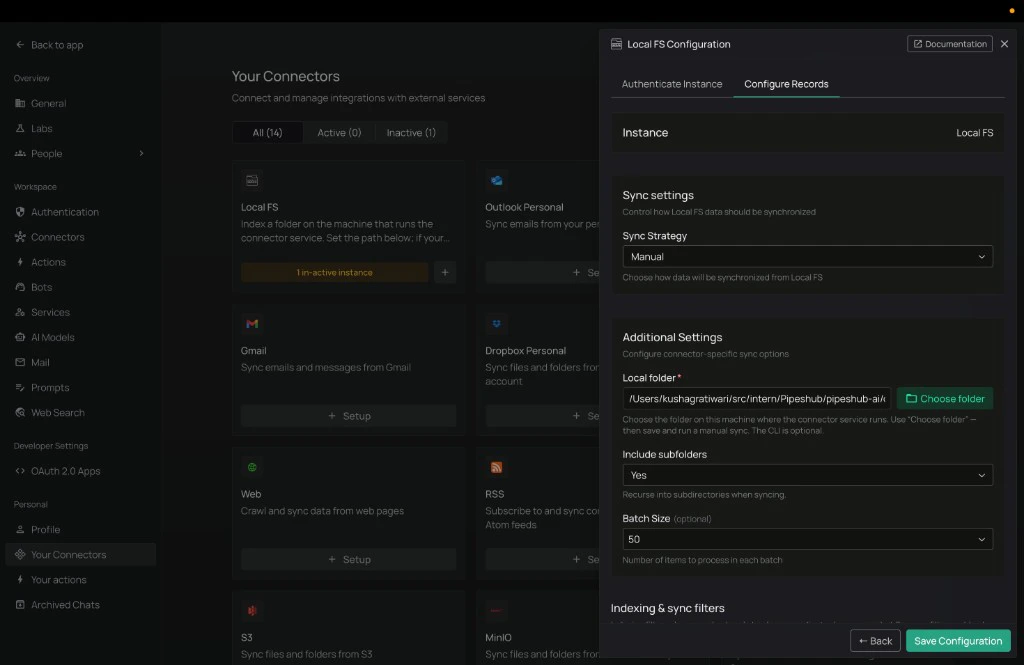
- Sync Strategy
- Scheduled — PipesHub rescans the folder on its own. (Recommended.)
- Manual — only rescans when you press Sync / Full sync yourself.
- Sync Interval — how often a scheduled sync runs. 1 Hour is a good starting point.
- Local folder — the path to the folder you want to index. Use Choose folder if a picker is shown, or type the path directly. Make sure it’s a path the PipesHub connector can see (see “Which computer?” above).
- Include subfolders — leave this on to index everything inside the folder. Turn it off to index only the files at the top level.
- Batch size — leave it as the default unless someone has told you otherwise.
Not sure what to pick? Scheduled, 1 Hour, Include subfolders ON, batch size as-is — that’s the right answer for most people.
Step 4 — (Optional) Narrow down what gets synced
If your folder has lots of files you don’t care about (build outputs, photos, downloads), you can tell PipesHub to skip them.Scroll to Indexing & sync filters and click + Add filter.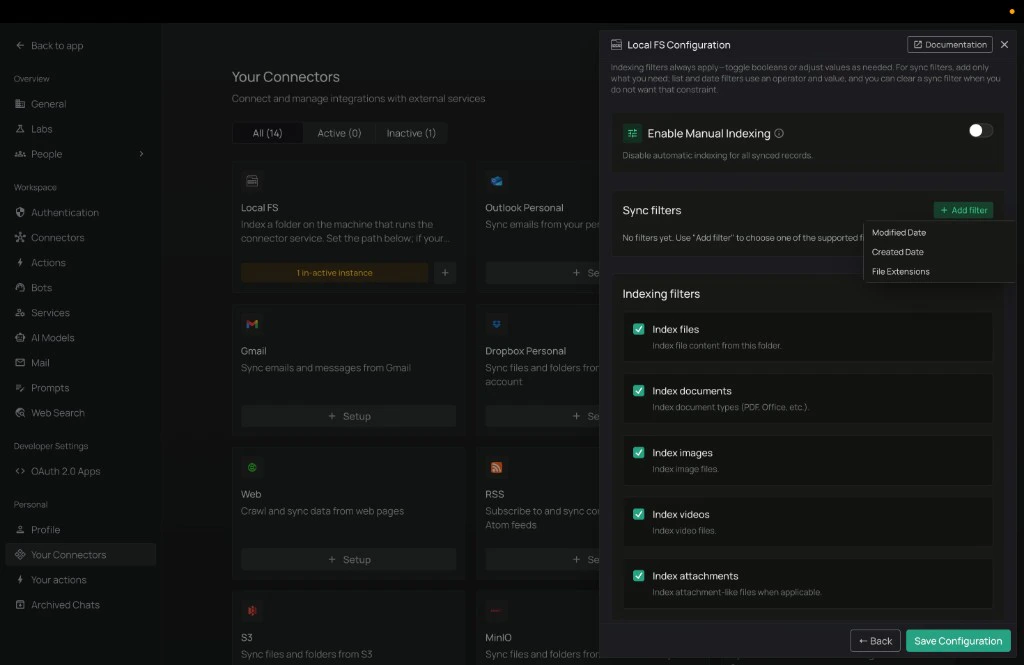
Each filter has an operator — usually In (“only these”) or Not In (“everything except these”).Quick examples:
- PDFs only — File Extensions · In ·
pdf - Skip images and archives — File Extensions · Not In ·
jpg, png, gif, zip - Last year only — Modified Date · After · pick a date
No filters? That’s fine for small folders. PipesHub will just sync everything it can read.
Step 5 — Turn sync on
After you save, you’ll land on the Local FS instance page with one row — your new instance.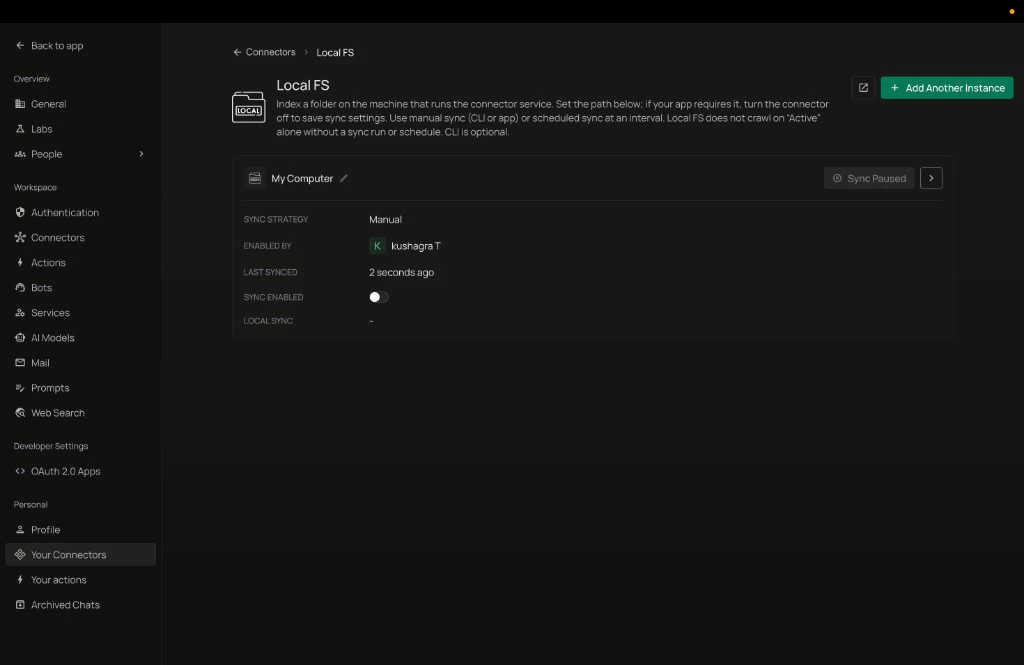
- Find the Sync Enabled toggle on the right of the row.
- Click it on.
Step 6 — Run the first sync and watch progress
Click anywhere on the instance row to open the Overview panel on the right.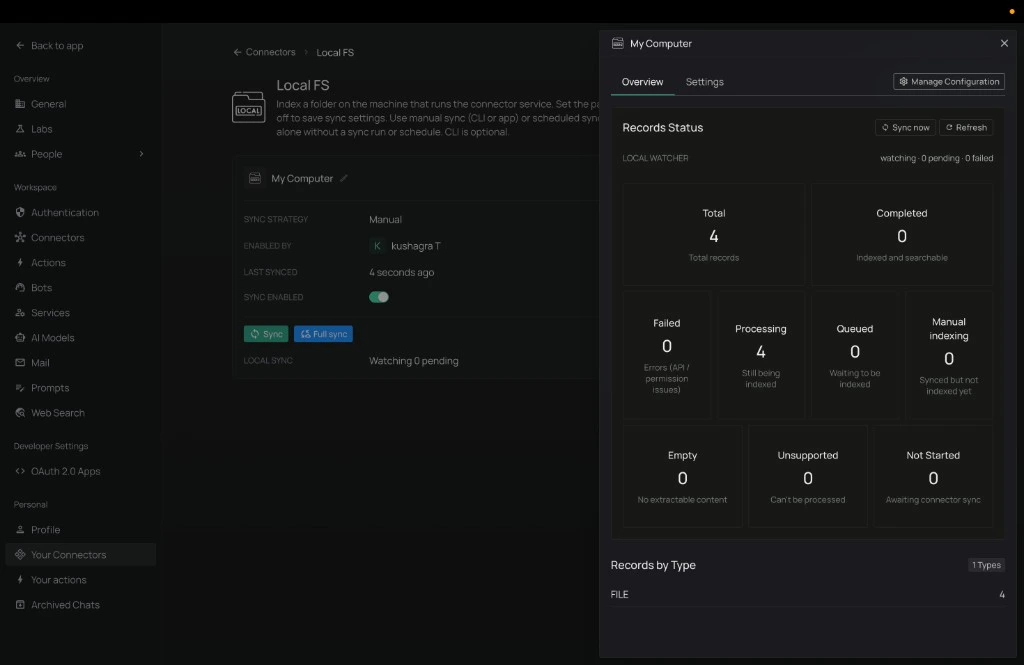
- Total — how many files PipesHub has found.
- Completed — files that are fully indexed and searchable.
- Processing — files being read right now.
- Queued / Not Started — files waiting their turn.
- Failed — files PipesHub couldn’t read (usually a permission issue, or a corrupt/protected file).
- Sync / Full sync — re-run a sync any time. Full sync rescans everything; Sync picks up only what’s changed.
- Manage Configuration — re-opens the two tabs from Steps 2–4 if you want to change the folder or filters later.
How syncing works
How syncing works
First sync (full scan)
The first time, PipesHub walks every file in the folder you chose (and every subfolder, if you left that option on). Bigger folders take longer:Tip: filtering by file extension (e.g. PDFs only) makes the first sync dramatically faster.
Later syncs (just what changed)
After the first sync, PipesHub only looks at what’s different since last time:- New files — added to search.
- Edited files — re-indexed.
- Deleted files — removed from search.
Who can see the synced files?
Local FS is registered as a personal connector. Only your PipesHub user can search the files indexed by your instance. It does not change permissions on disk in any way.Scheduled vs Manual
Scheduled runs on its own at the interval you picked. Set it once and forget about it.Manual only runs when you click Sync or Full sync. Useful when:- You just dropped a batch of files into the folder and want them searchable now.
- You’re testing filter changes.
What PipesHub can read
What PipesHub can read
Fully searchable (text inside the file)
These get parsed so you can search the actual contents:- Documents — PDF, DOCX, PPTX, XLSX, ODT, RTF
- Plain text — TXT, MD, CSV, JSON, XML, HTML
- Code — .py, .js, .ts, .java, and most others
Stored but not searched inside
These show up by filename and metadata, but their contents aren’t indexed:- Images (JPG, PNG, GIF, …)
- Video and audio
- Archives (ZIP, RAR, …)
- Other binary files
Troubleshooting
The connector says it can't find my folder
The connector says it can't find my folder
This almost always means the path is on your laptop but PipesHub is running somewhere else (Docker, a server, Kubernetes).
- If you’re using Docker: the folder must be mounted into the container. Test with
docker compose exec <connectors-service> ls /your/path. - Check Windows vs Mac/Linux path style matches the OS the connector is running on (e.g. don’t paste
C:\Users\...into a Linux container). - Make sure the user the connector runs as has read permission on the folder.
Sync runs but I see 0 files
Sync runs but I see 0 files
- The folder might genuinely be empty, or all the files might live in subfolders while Include subfolders is off.
- Your filters might be excluding everything — open Manage Configuration and double-check.
- Confirm the files exist where you think they do (
lson Mac/Linux, File Explorer on Windows) on the machine running the connector.
Some files synced but they don't appear in search
Some files synced but they don't appear in search
- Allow a minute or two for indexing to finish — large files take longer.
- Check the file type is one PipesHub can read inside (see What PipesHub can read).
- Password-protected PDFs and Office files won’t be indexed.
- Files showing in Failed on the Overview panel will tell you why — usually a permissions problem.
Scheduled sync never seems to run
Scheduled sync never seems to run
- Make sure Sync Strategy is set to Scheduled and Sync Interval has a value.
- Confirm Sync Enabled on the instance card is on (not paused).
- Check the connector process is running and healthy.
It worked locally but broke after a deploy
It worked locally but broke after a deploy
If you moved PipesHub to a new server or container, the old folder path probably doesn’t exist there.
- Re-mount your folder in the new environment (or copy the files).
- Open the instance, click Manage Configuration, update Local folder to the new path, and save.
Frequently asked questions
Does PipesHub modify or delete my files?
Does PipesHub modify or delete my files?
No. The connector only reads files to build search records. It never writes back to your folder.
What happens if I delete a file on disk?
What happens if I delete a file on disk?
On the next sync, PipesHub notices it’s gone and removes it from search.
Can I connect more than one folder?
Can I connect more than one folder?
Yes. On the Local FS instance page click + Add Another Instance, give it a different name, and point it at a different path. Each instance has its own filters and its own on/off toggle.
Is the folder path stored anywhere sensitive?
Is the folder path stored anywhere sensitive?
The path is saved in your PipesHub configuration. There are no credentials to leak — only the path string itself.
Useful links
- Connectors overview — Connectors overview